The Plumeria Pests and Diseases Guide is an essential resource for identifying, preventing, and treating the most common threats to plumeria plants, including pests, fungi, and environmental stressors. This guide offers detailed information on how to recognize early signs of trouble, from insect infestations to fungal infections, and provides practical solutions to address these issues. It also covers strategies for managing environmental factors such as excessive humidity, temperature fluctuations, and poor soil conditions, which can weaken plumeria. With expert tips on natural and chemical treatments, as well as proactive care practices, this guide ensures your plumeria remains healthy, resilient, and free from common ailments, allowing it to thrive season after season.
Beginner’s Guide to Plumeria Pest Control
Beginner’s Guide to Plumeria Pest Control
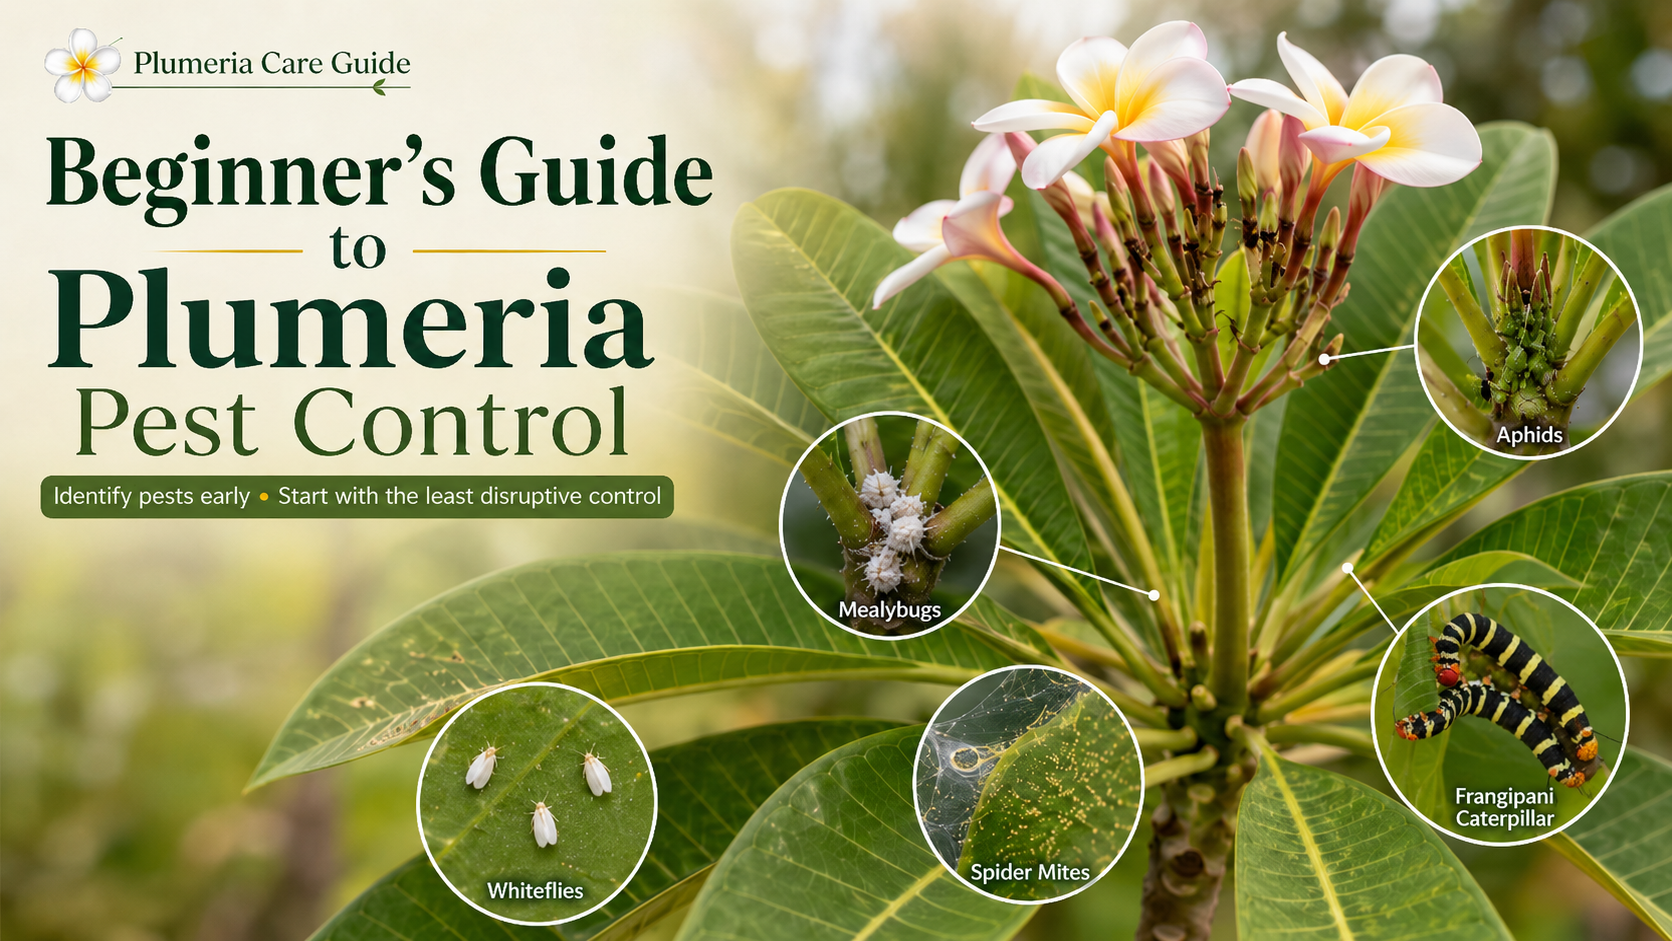
Plumeria plants are known for their fragrant flowers, bold tropical foliage, and strong seasonal growth, but they can attract pests when conditions are favorable. Most pest problems begin quietly. A few aphids on tender growth, a small cluster of mealybugs near a leaf node, or the first signs of spider mite stippling can become a larger problem if the plant is not inspected regularly.
This beginner’s guide explains how to recognize the most common plumeria pests, understand the type of damage they cause, and respond in a practical sequence. The goal is not to spray first and ask questions later. The best pest control starts with observation, correct identification, better growing conditions, and the least disruptive treatment that solves the problem.
Why Pest Control Matters for Plumeria
Plumeria are resilient plants, but pests can weaken them by removing sap, chewing leaves, damaging roots, spreading disease, or stressing new growth. Young plants, rooted cuttings, seedlings, container-grown plumeria, and plants under environmental stress are usually more vulnerable than mature, actively growing trees.
Pest pressure often increases when plumeria are crowded, overwatered, underfed, kept in poor airflow, or grown in conditions that weaken the roots. A plant with strong roots, proper drainage, balanced nutrition, and good sunlight is better able to tolerate minor pest activity and recover from damage.
Common Plumeria Pests
The first step in pest control is knowing what you are looking at. Different pests require different responses, and treating the wrong problem can waste time, damage leaves, or make the situation worse.

Aphids
Aphids are small, soft-bodied insects that often cluster on tender new growth, flower buds, and leaf tips. They may be green, black, yellow, or reddish. On plumeria, aphids are most noticeable on fresh growth and developing inflorescences where the tissue is soft and easy to feed on.
Common signs include curled leaves, distorted new growth, sticky honeydew, ants, and black sooty mold growing on the sticky residue.
Mealybugs
Mealybugs appear as white, cottony clusters on stems, leaf joints, branch tips, and sheltered areas of the plant. They feed by sucking sap and can weaken plumeria over time. Heavy infestations may cause yellowing leaves, poor growth, sticky honeydew, and sooty mold.
Mealybugs often hide in tight areas, so inspect leaf axils, branch crotches, and the undersides of leaves. Container-grown plants and plants kept indoors or in protected spaces can be especially prone to mealybug problems.
Whiteflies
Whiteflies are small white flying insects that rise in a cloud when disturbed. They commonly gather on the undersides of leaves and feed by sucking sap. Damage may appear as yellowing leaves, weakened growth, sticky honeydew, and sooty mold.
Whiteflies can build up quickly in warm conditions, especially where air movement is poor or plants are crowded.
Spider Mites
Spider mites are tiny pests that are often difficult to see without magnification. Their damage is usually noticed before the mites themselves. Look for fine stippling, dull leaves, bronze or yellow speckling, webbing, and premature leaf drop.
Spider mites are often worse in hot, dry, dusty conditions. Plumeria grown under stress, near reflective heat, or in dry protected spaces may become more vulnerable.
Scale Insects
Scale insects look like small bumps attached to stems, leaves, or leaf veins. They may be brown, tan, gray, white, or shell-like. Because they often do not move once established, beginners may mistake them for normal bark texture or stem blemishes.
Scale can weaken plumeria slowly by feeding on sap. Heavy infestations may cause yellowing, leaf drop, sticky residue, and general decline.
Thrips
Thrips are slender insects that often hide in buds and flowers. They can scar petals, distort buds, damage tender tissue, and cause streaking or browning on blooms. Thrips are difficult to see because they are small and often stay tucked inside flowers or tight new growth.
Frangipani Caterpillar
The frangipani caterpillar, also called the frangipani worm, is one of the most recognizable plumeria pests. It is typically bold black with yellow or pale bands and reddish-orange areas near the head and tail. These caterpillars can feed heavily on plumeria leaves and may defoliate sections of a plant quickly when present in numbers.
Although the damage can look alarming, healthy established plumeria often recover after the caterpillars are removed or finish feeding. Young plants, seedlings, and recently rooted cuttings need closer protection because they have less stored energy and fewer leaves to spare.
Soil-Dwelling Pests
Some pests affect plumeria below the soil line. Fungus gnat larvae can damage tender seedling roots in wet media. Root mealybugs and root aphids can weaken container-grown plants. Nematodes may cause root damage, stunting, and poor growth. Soil pests are often harder to diagnose because the first visible symptoms may look like watering problems, nutrient deficiency, or general decline.
Step-by-Step Plumeria Pest Management
The best approach is to work in order. Start with inspection and identification. Improve plant conditions. Use physical or organic controls first when appropriate. Escalate only when the pest level or plant risk justifies it.
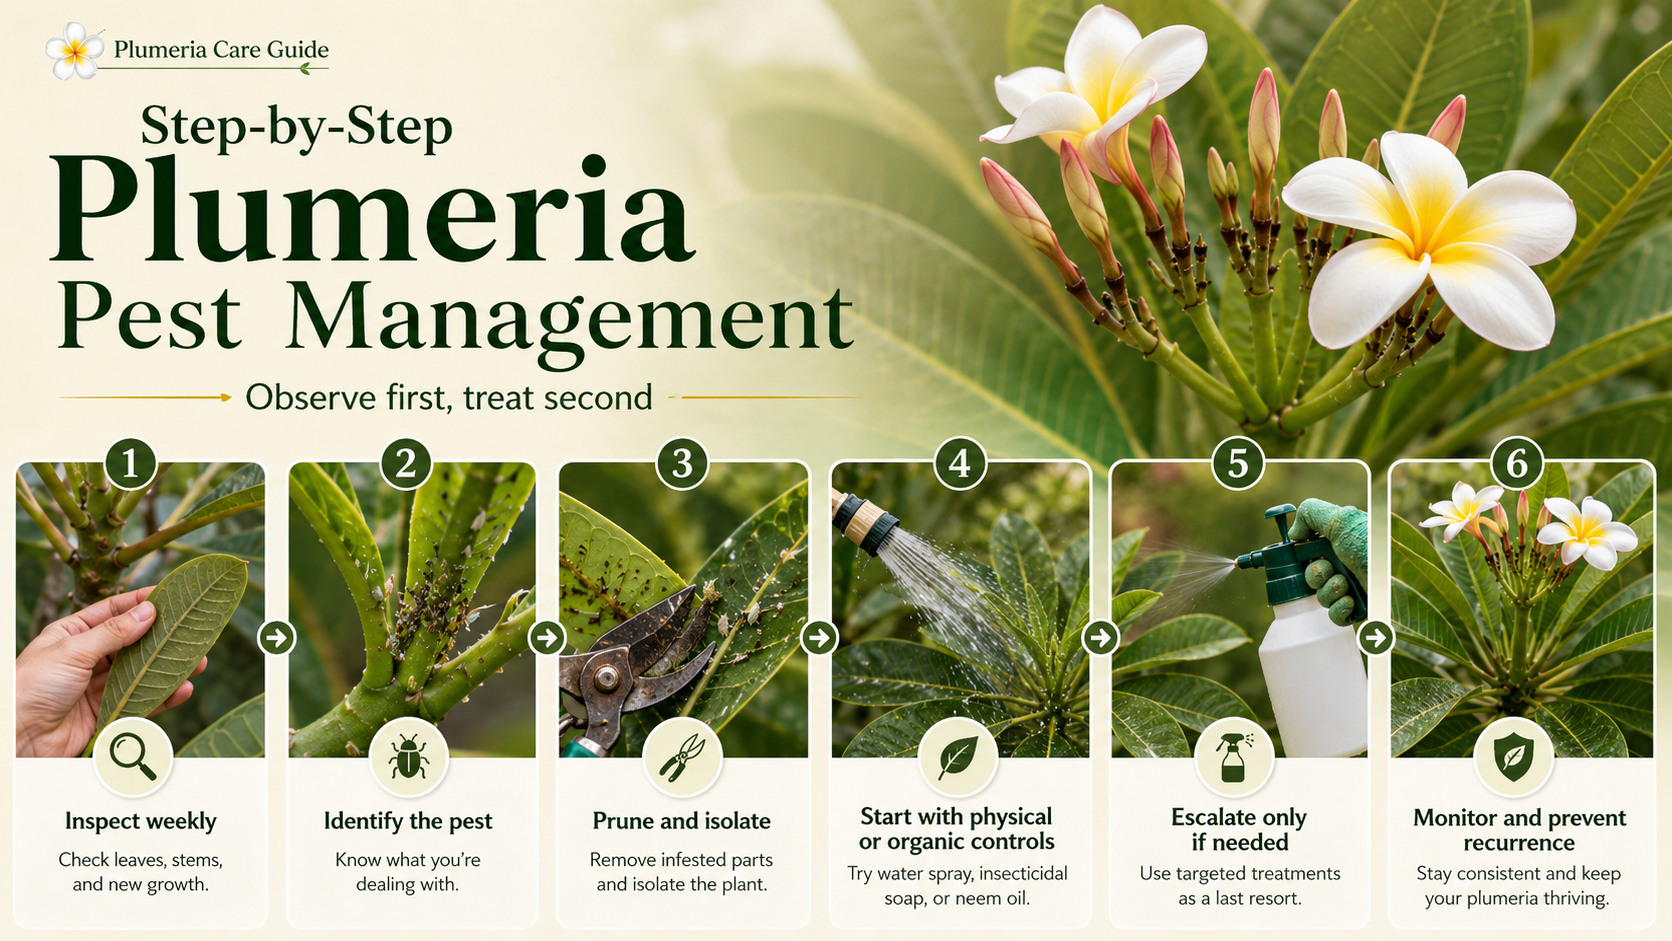
Step 1: Inspect Weekly
Inspect plumeria at least once a week during active growth. Look closely at new growth, flower buds, leaf undersides, branch tips, leaf nodes, and the soil surface. Use a hand lens when checking for mites, thrips, scale crawlers, or small insects.
- Look for stippling, curling, yellowing, webbing, sticky residue, cottony clusters, chewing, or distorted buds.
- Check for ants, which often indicate honeydew-producing pests such as aphids, mealybugs, whiteflies, or scale.
- Inspect new plants before placing them near established plumeria.
- Check both container plants and in-ground plants, especially during warm active growth.
Step 2: Identify the Pest Before Treating
Do not assume every leaf problem is caused by insects. Sunburn, fertilizer burn, salt accumulation, drought stress, overwatering, nutrient imbalance, and disease can all resemble pest damage. Match the symptom to the likely cause before choosing a treatment.
| Symptom | Possible Pest | What to Check |
|---|---|---|
| Sticky leaves, ants, sooty mold | Aphids, mealybugs, whiteflies, scale | New growth, stems, leaf undersides |
| Fine stippling, webbing, dull leaves | Spider mites | Undersides of leaves and dry, hot areas |
| Cottony white clusters | Mealybugs | Leaf axils, branch joints, stems |
| Hard bumps on stems or leaves | Scale insects | Stems, midribs, leaf veins |
| Chewed leaves or rapid defoliation | Frangipani caterpillar, grasshoppers, beetles, slugs | Leaves, stems, nighttime feeding areas |
| Scarred flowers or distorted buds | Thrips | Flower buds, blooms, tender growth |
Step 3: Improve Growing Conditions
Pest control works better when the plant is not already stressed. A weak plumeria is more likely to decline from pest feeding and less likely to recover quickly after treatment.
- Use a fast-draining soil mix so roots are not kept wet for long periods.
- Avoid overwatering, especially in cool weather or when plants are dormant.
- Provide strong light and good air movement.
- Avoid excessive nitrogen, which can encourage soft, pest-prone growth.
- Keep the growing area clean by removing fallen leaves, weeds, and old debris.
- Separate stressed or newly acquired plants until they are inspected.
Step 4: Remove Small Infestations Physically
Many early pest problems can be reduced before sprays are needed. Physical removal is often the safest first step, especially for beginners.
- Spray aphids, mites, and whiteflies off leaves with a firm stream of water.
- Remove heavily infested leaves when practical.
- Hand-pick frangipani caterpillars if the plant is small enough to inspect closely.
- Wipe mealybugs or scale with a cotton swab dipped in rubbing alcohol, avoiding excessive alcohol on tender tissue.
- Dispose of infested plant material in the trash, not compost.
Step 5: Use Organic and Low-Impact Controls
Organic and lower-impact controls are often useful when applied early and repeated correctly. Coverage matters. Many products must contact the pest directly, especially oils and soaps.
- Insecticidal soap: Useful for aphids, whiteflies, and soft-bodied insects when sprayed thoroughly.
- Horticultural oil or neem oil: Can help suppress mites, scale crawlers, whiteflies, and mealybugs when used carefully.
- BT: A targeted option for caterpillars when they are actively feeding.
- Spinosad: Useful for some chewing insects and thrips, depending on label directions.
- Sticky traps: Helpful for monitoring whiteflies, fungus gnats, and some flying pests.
Always test sprays on a small area first, avoid spraying during midday heat, and do not spray drought-stressed plumeria. Oils and soaps can damage leaves if applied too strongly, too often, or during hot sun.
Step 6: Escalate Only When Needed
Chemical controls should be reserved for serious, persistent, or plant-threatening infestations. They can be useful tools, but they should not replace inspection, sanitation, proper watering, and good plant care.
Systemic insecticides may help with certain sap-sucking pests, but they should be used carefully and only according to the product label. Contact sprays may provide faster knockdown but require proper pest identification and good coverage. Miticides may be needed for severe spider mite problems because ordinary insecticides often do not control mites well.
Always follow label directions, wear protective gear, avoid spraying open flowers when pollinators are active, and follow local regulations.
Step 7: Monitor After Treatment
Pest control is rarely finished after one application. Eggs may hatch, hidden insects may remain, or conditions may still favor reinfestation. Recheck the plant every few days after treatment and then weekly until the problem is controlled.
- Look for new pest activity, not just old damage.
- Repeat treatments only as directed by the product label.
- Rotate control methods when appropriate to reduce resistance pressure.
- Continue improving airflow, sanitation, and plant health.
Organic vs. Chemical Controls
| Pest | First Response | Organic / Low-Impact Option | Escalation Option |
|---|---|---|---|
| Aphids | Water spray, prune tender infested tips if needed | Insecticidal soap, horticultural oil | Systemic or contact insecticide if severe |
| Mealybugs | Isolate plant, wipe clusters | Alcohol swab, neem or horticultural oil | Systemic treatment for persistent infestations |
| Whiteflies | Improve airflow, use sticky traps | Insecticidal soap, oil sprays | Targeted insecticide if populations persist |
| Spider mites | Rinse foliage, reduce dust and stress | Horticultural oil, repeated rinsing | Miticide for severe outbreaks |
| Scale | Manual removal where practical | Horticultural oil during crawler stage | Systemic or labeled scale treatment |
| Frangipani caterpillar | Hand-pick when practical | BT when caterpillars are feeding | Labeled caterpillar control if severe |
| Thrips | Remove damaged blooms, monitor buds | Spinosad or sticky traps where appropriate | Labeled thrips control if persistent |
Seasonal Pest Prevention for Plumeria
Spring
As plumeria wake up and push new growth, inspect tender shoots and developing leaves for aphids, thrips, and early mite activity. Spring is also a good time to clean the growing area, remove old leaves, and check overwintered plants before placing them near healthy plants.
Summer
Warm weather can increase pest pressure. Watch for whiteflies, spider mites, caterpillars, mealybugs, and scale. Maintain proper watering, good drainage, and airflow. Avoid letting container plants become severely drought-stressed, because stressed plants are more vulnerable to pest damage.
Fall
Inspect plants before moving them indoors, into greenhouses, or into protected spaces. Mealybugs, scale, and mites can spread quickly in enclosed areas. Treat small problems before winter storage or dormancy.
Winter
Dormant or semi-dormant plumeria need less water and less fertilizer. Overwatering during cool weather can weaken roots and create stress that makes pest and disease problems harder to manage. Inspect stored or indoor plants for scale, mealybugs, and mites.
Practical Plumeria Care Notes
- Healthy roots matter: A plumeria with a strong root system recovers from pest pressure better than a plant with weak or rotting roots.
- Drainage helps pest prevention: Wet, stale soil can encourage fungus gnats and root stress.
- Do not overfeed nitrogen: Excessive soft growth can attract sap-sucking pests.
- Watch seedlings closely: Seedlings have fewer stored reserves and can be damaged faster by pests or wet soil conditions.
- Container plants need extra attention: Pests can build up quickly in pots, especially when plants are crowded together.
- Environmental stress matters: Heat, drought, cold, poor airflow, and overwatering can all weaken plumeria and make pest problems worse.
Common Mistakes
- Spraying before identifying the pest.
- Using strong chemicals for a small problem that could be rinsed or pruned away.
- Spraying oils or soaps during hot midday sun.
- Ignoring the undersides of leaves.
- Confusing old damage with active infestation.
- Overwatering a stressed or dormant plumeria after pest damage.
- Failing to isolate infested container plants.
- Repeating the same treatment without checking whether it is working.
Troubleshooting Notes
If a plumeria continues to decline after pest treatment, look beyond insects. Check soil moisture, drainage, root condition, recent fertilizer use, weather changes, sun exposure, and possible disease symptoms. Pests are not always the primary cause. Sometimes they are a secondary problem on a plant already weakened by root stress, environmental damage, or poor growing conditions.
When symptoms appear suddenly, inspect the whole plant: leaves, stems, branch tips, soil surface, roots if necessary, and nearby plants. A complete inspection prevents unnecessary treatment and helps avoid misdiagnosis.
Myths and Misconceptions
Myth: One spray fixes everything.
Most pest problems require follow-up inspection. Eggs may hatch later, hidden insects may remain, and some pests require repeated applications at the correct interval.
Myth: All leaf damage is caused by pests.
Plumeria leaf damage can also come from sunburn, drought, fertilizer burn, salt accumulation, cold stress, water stress, or disease. Correct identification matters.
Myth: Organic treatments are always safe.
Oils, soaps, and natural sprays can still damage plumeria leaves if applied too strongly, too often, or during heat and direct sun.
Myth: More treatment is better.
Overtreatment can stress the plant, harm beneficial insects, and create unnecessary chemical exposure. The best approach is targeted, measured, and based on what is actually present.
Final Thoughts
Plumeria pest control begins with observation. When growers learn to inspect regularly, identify pests accurately, and respond in the right order, most pest problems become manageable. Start with plant health, sanitation, and physical removal. Use organic or low-impact controls when appropriate, and reserve stronger treatments for serious or persistent infestations.
A healthy plumeria grown in the right soil, with proper drainage, balanced nutrition, good airflow, and suitable seasonal care, is always easier to protect than a stressed plant. Pest control is not just about killing insects. It is about creating conditions where plumeria can stay strong, recover quickly, and continue growing well.
Next Up
- How to Identify Aphids on Plumeria
- How to Identify Mealybugs on Plumeria
- How to Identify Spider Mites on Plumeria
- How to Identify Caterpillars on Plumeria, Including the Frangipani Worm
- DIY Organic Pest Control Recipes for Plumeria
- Seasonal Pest Checklist for Plumeria Growers
Continue Learning
- For related care guidance: PlumeriaCareGuide.com pest and disease articles
- For step-by-step instruction: PlumeriaWay.com pest, diagnostics, or Grow Guide resource
- For cultivar or trait examples: PlumeriaDatabase.com cultivar and trait references
- For nursery-tested plants, fertilizer, or supplies: FloridaColorsPlumeria.com resources