
The Plumeria Pests and Diseases Guide is an essential resource for identifying, preventing, and treating the most common threats to plumeria plants, including pests, fungi, and environmental stressors. This guide offers detailed information on how to recognize early signs of trouble, from insect infestations to fungal infections, and provides practical solutions to address these issues. It also covers strategies for managing environmental factors such as excessive humidity, temperature fluctuations, and poor soil conditions, which can weaken plumeria. With expert tips on natural and chemical treatments, as well as proactive care practices, this guide ensures your plumeria remains healthy, resilient, and free from common ailments, allowing it to thrive season after season.
How to Prevent Rust Mites on Plumeria (Seasonal and Year-Round Strategies)
What to check next
This guide helps you confirm that a living pest is present, identify where it is feeding, and choose a measured response without treating inactive damage. Read the detailed explanation, then use this sequence to decide what to do.
Confirm the evidence for microscopic mites
- Look for
- Bronzing, rough or distorted new growth, shortened internodes, and active mites or eggs found with strong magnification.
- Compare with
- Thrips, herbicide exposure, nutrient problems, sun injury, and ordinary spider mites may overlap visually.
- Safest first response
- Confirm the affected tissue and mite type before selecting a labeled miticide; many general insecticides do not control mites.
Microclimate clue: Warm protected growth can favor rapid mite buildup, while rain and overhead rinsing may temporarily reduce exposed populations.
- 1
Inspect before treating
Use bright light and magnification on leaf undersides, tips, petioles, stems, and the soil line.
- 2
- 3
Identify the feeding pattern
Separate sucking, chewing, mining, boring, and root-zone damage.
- 4
Start with the least disruptive action
Isolate, wash, and use only a treatment labeled for the confirmed pest and plant.
- 5
Repeat the inspection
Eggs or protected life stages can survive the first response, so follow-up checks matter.
How microclimate changes this answer
Dry heat favors mites, protected humid growth favors some scale and mealybugs, and wet shade increases snail and slug activity.
Compare this insect or pest pattern with healthy growth
Use these references to confirm that this article matches the visible pattern before changing care or applying a treatment.
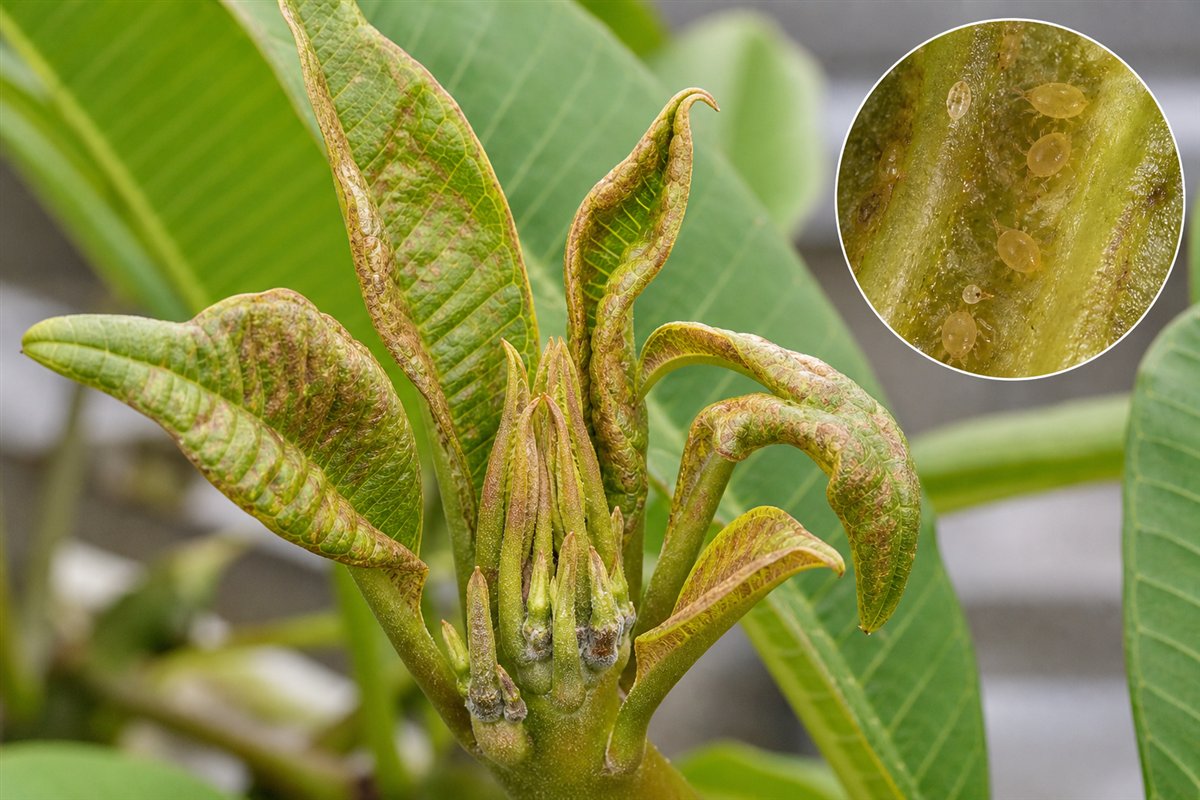 Condition reference
 Healthy baseline
- LocationCheck which plant part, age of growth, and exposed or protected side is affected.
- TextureDecide whether the evidence is dry, powdery, sticky, raised, translucent, soft, or intact.
- ProgressionPhotograph the same area so you can tell whether the pattern is stable, improving, or spreading.
Use more than one clue. Confirm the photo with recent conditions, roots, watering history, and the rest of the plant before acting.
Rust vs. Rust Mite Guide Path
- Identify plumeria rust when orange or yellow powdery pustules appear, especially on leaf undersides.
- Identify rust mite-like damage when leaves show bronzing, russeting, fine speckling, or distortion without orange fungal spores.
- Use the disease symptom checklist when rust, mildew, leaf spot, mites, or stress are hard to separate.
Rust mite-like damage is prevented by keeping plumeria foliage clean, reducing stress, and catching mite activity early. This is especially important in hot, dry, dusty, protected, or crowded growing areas where mite pressure can build before leaves look badly damaged.
Rust Mites Article Path
Use this group in order when possible: identify the problem, treat only when needed, then prevent repeat outbreaks or recurrence.
- Identify rust mites
How to Identify Rust Mites on Plumeria - Treat rust mites
How to Treat Rust Mites on Plumeria (Organic & Chemical Control Options) - Prevent rust mites
How to Prevent Rust Mites on Plumeria (Seasonal and Year-Round Strategies)
Safety and diagnostics: before applying products, review the Treatment Safety Checklist. If symptoms do not match this group, return to the Pest & Disease Identification Guide.
Prevention should also protect natural enemies. Many mite outbreaks become worse when broad insecticides remove predatory mites and other beneficials.
Prevent Spread Without Treating Every Bronze Leaf
| Situation | Prevention action | Why it matters |
|---|---|---|
| Healthy new growth | Photograph the upper and lower surfaces as a baseline and inspect regularly with magnification. | Fine russeting and texture changes are easier to recognize when a healthy comparison exists. |
| New plumeria enters the collection | Keep it in an observation area with no leaf contact and inspect the newest growth before combining plants. | Rust mites can be difficult to see before damage becomes obvious. |
| Bronzing or roughened growth appears | Isolate the plant and compare with spider mites, thrips, sun, spray injury, nutrition, and edema. | Bronzing alone is not proof of rust mites. |
| Rust mites are confirmed | Reduce plant-to-plant contact, handle affected plants last, and monitor nearby plumeria. | Early containment is less disruptive than treating the entire collection automatically. |
| Predatory mites or other natural enemies are present | Avoid unnecessary broad-spectrum products and check compatibility before any spray. | Natural enemies may suppress mites and can be harmed by residues. |
| Leaves fall or heavily damaged material is removed | Collect debris and keep it out of the growing area. | Sanitation removes damaged material and simplifies follow-up inspection. |
Use preventive miticides only when a current label, confirmed local risk, and resistance plan justify them. Repeated calendar spraying can injure leaves, kill natural enemies, and select for resistant mites.
Prevention Checklist
- Inspect leaf undersides and tender growth. Look for bronzing, fine speckling, distortion, or early russeting.
- Rinse foliage in the morning during mite season. Canopy rinsing reduces dust and helps interrupt mites without keeping leaves wet overnight.
- Avoid drought stress. Stressed plants tolerate mite feeding poorly.
- Reduce dust. Dusty leaves favor mite buildup and interfere with natural enemies.
- Improve spacing and airflow. Crowded plants are harder to inspect and treat.
- Protect beneficial mites and insects. Avoid unnecessary broad-spectrum sprays.
- Quarantine suspicious plants. New plants with bronzing or distortion should be watched before joining the main collection.
- Separate diagnosis from rust fungus. Orange powder means fungal rust, not mite rusting.
What Not to Do
- Do not wait for severe bronzing before inspecting. Early mite issues are easier to slow.
- Do not keep plants dusty in hot weather. Dust can tip the balance toward mites.
- Do not spray preventively with harsh products. Unneeded sprays can remove predators and stress foliage.
- Do not confuse prevention advice for mites with prevention advice for fungal rust. Morning canopy rinsing can help mites, but late-day wet leaves can favor diseases.
Seasonal Timing
- Spring: Inspect tender new leaves as growth resumes.
- Summer: Increase canopy rinsing and inspections during hot, dry, dusty weather.
- Late season: Remove badly damaged leaves before plants are crowded or protected.
- Winter protection: Check protected plants because mites can persist where rain and predators are limited.
Signs Prevention Is Working
- New leaves expand without fresh bronzing or russeting.
- Tap tests show fewer moving mites.
- Leaves are cleaner and less dusty.
- Plants are less drought stressed during hot weather.
- Beneficial insects and predatory mites remain active.
Rust Mite Prevention Check
Quick prevention check: rust mites are often discussed as eriophyid-type mites, but exact confirmation may require magnification. Rust mite-like problems are easiest to prevent by reducing plant stress and catching early damage before it spreads. Hot, dry, dusty, protected conditions can favor mite problems, especially when leaves are not being rinsed by rain and plants are crowded.
- Rinse foliage when conditions favor mites. Why: spraying the canopy helps disrupt mite populations and removes dust from leaf surfaces.
- Inspect leaf undersides and veins. Why: early mite pressure is often hidden before damage is obvious from above.
- Separate suspicious plants. Why: mites can spread through close plant contact and handling.
- Avoid broad unnecessary sprays. Why: preserving beneficial insects and predatory mites can help keep pest mites lower.
- Compare with fungal rust. Why: rust prevention and mite prevention require different choices.
If symptoms appear, confirm the cause before treating and use the Treatment Decision Guide to choose the least stressful effective step.
Before Treating Rust Mite-Like Damage
Rust mite-like symptoms should be confirmed carefully because bronzing can come from several causes. Treat when damage is spreading, new growth is affected, or inspection supports mite activity rather than rust, sun, nutrient stress, or old damage.
- Check for orange rust pustules before assuming mites.
- Inspect tender growth, protected leaf surfaces, and nearby plants.
- Improve airflow and reduce stress while monitoring the pattern.
- Use treatment only when the problem is active or clearly progressing.
Related Guides
- How to Identify Rust Mites on Plumeria
- How to Treat Rust Mites on Plumeria (Organic & Chemical Control Options)
- Plumeria Spider Mites
- Beneficial Insects for Plumeria Pest Management
- Treatment Safety Checklist
Turn the explanation into an action plan
- Monitor
- Check the same marked leaves and nearby plants every three to seven days until no active pests or fresh damage remain.
- Change one thing
- Make the smallest justified correction, record the date, and avoid stacking treatments before you can see which one helped.
- Escalate when needed
- Seek local diagnostic help when damage accelerates despite treatment, borers enter major stems, or the pest cannot be identified.