
The Propagation and Rooting Guide provides detailed, step-by-step instructions for successfully propagating plumeria through various methods, including cuttings, grafting, and seed starting. This comprehensive guide walks you through each technique, offering proven strategies to encourage healthy root development and ensure strong, thriving plants. Whether you’re starting with a cutting, grafting to preserve a cultivar, or growing from seed, you’ll learn how to create the ideal conditions for success. With expert advice on soil types, humidity levels, and care routines, this guide helps you master the art of plumeria propagation, ensuring your plants grow strong from the very beginning.
Plumeria Propagation and Rooting Questions and Answers
What to check next
This guide helps you match the cutting to its rooting stage and distinguish normal waiting from dehydration, false shoot growth, mold, rot, and roots. Read the detailed explanation, then use this sequence to decide what to do.
- 1
Confirm the stage
Separate fresh-cut, callusing, newly planted, unrooted shoot growth, and confirmed rooting.
- 2
- 3
Water once at the beginning
After planting a fully callused cutting, water once at the beginning of rooting and add no more water to the mix until two or three fully expanded leaves have grown.
- 4
Avoid constant disturbance
Do not pull the cutting to search for roots; use stability and sustained leaf growth.
- 5
How microclimate changes this answer
Cool nights and wet media slow rooting and increase rot risk. Hot sun and dry wind can dehydrate an unrooted cutting; light stem misting is allowed when a firm cutting looks dehydrated, but keep water off the base and mix.
Rooting-cutting water rule: Water once at the beginning of the rooting process. Do not water again until the cutting has produced two or three full-sized leaves. If the firm cutting looks dehydrated, light misting is allowed; do not use misting to keep the rooting medium wet.
After roots are confirmed: Water newly rooted cuttings sparingly and allow the soil mix to dry before watering again.
Rooting-cutting watering standard
For a planted, unrooted plumeria cutting in rooting medium: water once at the beginning of the rooting process. Do not add water to the rooting mix again until two or three fully expanded leaves have grown. Buds, tip swelling, or one opening leaf do not trigger another watering.
If the cutting is firm but looks dehydrated, lightly mist only the exposed stem. Keep water off the base and do not wet the rooting medium.
After early rooting is established: water sparingly and allow the soil mix to dry before watering again. This rule is for cuttings planted in medium; seeds, seedlings, grafted rootstocks, air layers, and cuttings actively rooting in water use their own method-specific care.
Use these quick answers as a practical propagation and rooting reference for plumeria. For deeper guidance, follow the related Knowledge Base links in each answer.
Propagation and Rooting Questions
For most growers, rooting cuttings is the simplest and most dependable propagation method. Grafting is useful when you want to preserve a cultivar on a stronger root system, and air layering can help when you want roots before removing a branch. Start with Best Practices & Tips for Beginners in Plumeria Propagation, then compare methods in Taking Cuttings for Rooting Plumeria, Choosing Healthy Rootstocks for Plumeria Grafting, and Introduction to Air Layering for Plumeria Propagation.
Root plumeria cuttings when warmth, light, and active growth support root formation. In many climates this means late spring through summer, while cooler seasons require more caution and warmer rooting conditions. See Optimal Seasons & Regional Considerations for Plumeria Propagation and Light & Temperature Management Post Propagation for Plumeria.
Choose firm, healthy, mature cuttings from a strong parent plant. Handle sap safely, use clean tools, avoid damaged or diseased tissue, and let the cutting dry enough before rooting so the cut end is less likely to rot. Useful starting points are Selecting Ideal Parent Plants & Varieties for Plumeria Propagation, Taking Cuttings for Rooting Plumeria, and Handling Safety & Plumeria Sap Precautions.
Rooting hormone can help, but timing and cutting condition matter. Apply it only to properly prepared cuttings, and avoid creating a wet, sealed, or contaminated cut surface that encourages rot. For details, see Applying Rooting Hormone to Fresh Plumeria Cuttings – Why Timing Matters and Rooting Boosters & Growth Stimulators for Plumeria.
For a planted, unrooted plumeria cutting, use an airy, low-retention, fast-draining medium. The cutting stores the water it needs while roots form, so the mix should not be kept continuously moist. Compare Perlite-Based Mediums, Soil-Based Mediums: Cactus & Succulent Mixes, and Containers, Rooting Tubes & Supplies.
Choose a rooting method based on the cutting condition, your climate, and how well you can maintain warmth, stability, airflow, and inspection. For cuttings planted in medium, water once at the beginning and do not water the mix again until two or three fully expanded leaves have grown. Bag rooting and active water rooting use their own method-specific care. Compare Traditional Soil Rooting Method, Soil in Rooting Tubes, Rooting in Coir, and Water Rooting Method.
Keep a planted, unrooted cutting warm, stable, and in bright shade. Water once at the beginning of the rooting process, then do not add water to the mix again until two or three fully expanded leaves have grown. Buds, tip swelling, or one opening leaf do not trigger watering. If the cutting is firm but looks dehydrated, lightly mist only the exposed stem and keep water off the base and medium. After early roots and full leaves are present, water sparingly and allow the mix to dry before watering again. For details, use Proper Watering Guidelines Post Propagation, Light & Temperature Management Post Propagation, and Addressing Moisture Management Problems.
Do not tug on or unpot a cutting to test for roots. Safer signs include two or three fully expanded leaves, stable new growth, improved anchoring without deliberate pulling, and visible roots when a clear rooting tube or container is used. Buds, tip swelling, or one opening leaf alone do not confirm rooting. Track the expected stages in Propagation Timeline & Milestones for Rooting Plumeria Cuttings and Regular Checking for Signs of Success.
The most common causes are excess moisture, poor drainage, cold conditions, damaged tissue, fungal or mold pressure, and slow root development. A firm cutting in warm conditions with fast drainage has a much better chance than one kept cold and wet. Review Addressing Rot and Mushiness, Addressing Fungal & Mold Issues, and Slow Root Development.
Use grafting when you want to preserve a cultivar, work with difficult material, or place a scion onto a stronger root system. Use air layering when you want roots to form on a branch before it is separated from the parent plant. Helpful guides include Choosing Healthy Rootstocks, Flat Graft (Cleft Graft), Step-by-Step Air Layering Technique, and Special Care & Propagation Strategies for Difficult Plumeria Varieties.
A newly rooted cutting has a small, easily stressed root system. Water lightly enough to moisten the root zone, then allow the mix to dry before watering again. Increase water gradually only as the root system, full-sized leaves, warmth, and active growth increase. Never keep the mix continuously damp.
If roots are not yet confirmed, use the unrooted-cutting rule instead: water once at the beginning of the rooting process and do not water the mix again until two or three fully expanded leaves have grown. Light misting is allowed only when the cutting looks dehydrated. Use the Cutting Condition Checker when the stage is uncertain.
Bag rooting is a controlled-humidity method. Begin with a healthy cutting whose cut end has fully callused, a clean bag, and only lightly moist, airy rooting medium. Keep the bag warm and in bright indirect light. Because the enclosure slows moisture loss, the medium must not be wet or waterlogged.
Monitor for spreading softness, odor, or excessive standing condensation without repeatedly disturbing the cutting. Bag rooting follows different moisture rules from the standard rooting-medium method. Compare the methods in the Rooting Plumeria Cuttings Condition and Method Checklist.
Use a healthy, fully callused cutting, a clean container, and enough clean water to cover only the intended rooting section. Keep the cutting upright, warm, and in bright indirect light. Watch for cloudy water, odor, or soft tissue, and refresh the water when needed.
After usable roots develop, transition gently to an airy, fast-draining mix and avoid keeping the new root zone continuously wet. The standard one-time watering rule does not apply while a cutting is actively being water rooted. Follow the Water Rooting Method for Plumeria Cuttings.
Rooting tubes are narrow, usually clear, well-drained containers that let you watch root development without tugging on or unpotting a plumeria cutting. They do not make a cutting root faster; their main advantage is easier observation.
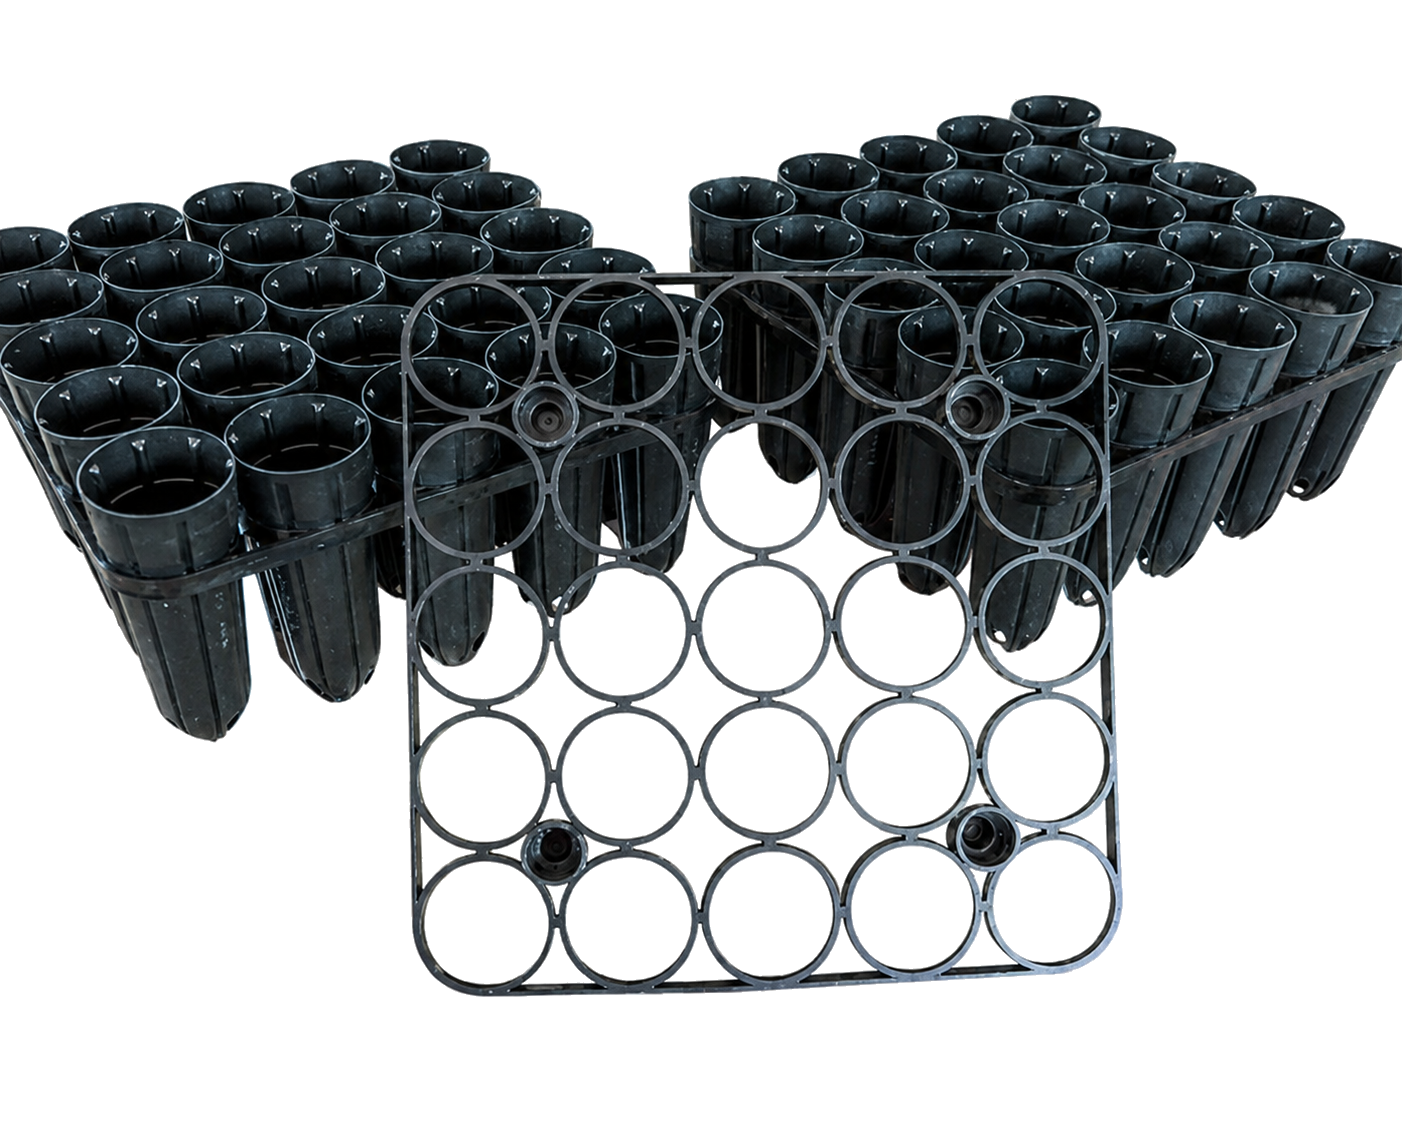
A rooting tube can work well when the cutting is fully callused, firm, healthy, and small enough to be supported safely. The tube must be wide enough to accept the base without scraping it, held upright in a stable rack, protected from rain and standing runoff, filled with a very airy, low-retention mix, and shaded or sleeved so direct sun does not overheat the clear root zone.
Use a wider conventional pot when the cutting is heavy or highly branched, the callused base does not fit comfortably, the tube cannot be stabilized, or the clear wall cannot be protected from direct sun. Rooting tubes use the same stage-based watering rule as other soil-rooted plumeria cuttings: after planting a fully callused cutting, water once at the beginning and do not water the mix again until two or three fully expanded leaves have grown. If a firm cutting looks dehydrated, lightly mist only the exposed stem; do not wet the base or keep the rooting mix moist.
Related Plumeria Care Guide help
Follow the soil-in-rooting-tubes method · Compare rooting tubes with other containers · Check the condition and stage of the cutting
Transplant an established plumeria during warm active growth, usually late spring to early summer after frost risk, while avoiding extreme heat, heavy rain, or cold. Prepare the well-drained destination first, water appropriately before the move, preserve as much of the root system as practical, and lift the plant by its root ball rather than pulling on branches.
Replant at the original depth, backfill without burying the trunk, and water enough to settle the soil without leaving it saturated. Provide temporary wind or sun protection if exposure changes sharply. Delay strong feeding until the plant is stable and showing renewed growth.
Related Plumeria Care Guide help
When & How to Repot or Transplant Plumeria: In-Depth DIY Guide · How to Transplant a Plumeria Safely
Different plumeria cultivars can perform differently with cuttings, grafting, or other propagation methods because stem thickness, vigor, rooting tendency, and sensitivity to rot vary. Use vegetative propagation to preserve a named cultivar; seedlings are genetically different. A cultivar known to root readily may suit a cutting, while a scarce or difficult-to-root cultivar may be safer as a graft on compatible healthy rootstock.
Start with sound correctly labeled material, clean tools, appropriate callusing, warmth, and a fast-draining medium. Do not compensate for slow rooting by keeping the base wet. Record method, date, cultivar, and conditions, and compare results over multiple attempts rather than assuming one failure defines the cultivar. Choose the method that preserves valuable material while matching the grower’s skill and controlled environment.
Related Plumeria Care Guide help
Do Different Plumeria Cultivars Require Different Propagation Methods
No routine alcohol dip is recommended for fresh plumeria cuttings. Isopropyl alcohol can injure living tissue, does not correct internal rot, and is not a substitute for clean stock, disinfected tools, callusing, and suitable rooting conditions. Use alcohol to disinfect appropriate tools according to a sound sanitation method, not to soak the cutting.
If a cutting arrives with a questionable surface, isolate and inspect it, photograph the area, and determine whether tissue is firm, dry, soft, or spreading. Trim only confirmed damaged tissue with clean tools, then follow the guide’s drying and rooting steps. Avoid combining alcohol, bleach, peroxide, fungicide, and other treatments.
Related Plumeria Care Guide help
Move a rooted cutting when it has an established, functioning root system and the current container is becoming restrictive, dries too rapidly, tips easily, or no longer supports even watering. New leaves alone do not prove a strong root system, so look for stable growth and roots visible through drainage holes or a gently checked root ball.
Choose only the next practical pot size with excellent drainage; an oversized volume of wet mix can raise rot risk. Repot during warm active conditions, preserve healthy roots, and keep the cutting at the same depth. Let the disturbed root zone settle, then resume watering by condition rather than immediately saturating it on a schedule.
Related Plumeria Care Guide help
Begin with a healthy, firm cutting and a clean, fully callused base. Plant it securely in a clean, fast-draining rooting medium, keep it warm and stable, and resist repeated watering. For an unrooted cutting planted in medium, the PCG standard is one initial watering and no more water in the medium until two or three fully expanded leaves have formed. Tip swelling or one opening leaf is not the same milestone.
If a firm cutting looks dehydrated, lightly mist the exposed stem only; do not keep the base or rooting mix wet. Use a different protocol for water rooting, seeds, seedlings, grafted rootstocks, or air layers.
Related Plumeria Care Guide help
Rooting time varies with cultivar, cutting condition, callus quality, method, root-zone warmth, season, and moisture control. Think in milestones rather than a promised number of weeks: the cutting remains firm, the tip activates, leaves develop, the plant resists a very gentle stability check, and roots eventually become established.
Do not tug repeatedly or unpot the cutting simply to look for roots. For a cutting planted in medium, do not restart watering because a bud swells; wait for the PCG milestone of two or three fully expanded leaves. A firm, stable cutting may simply be slow. Softness, spreading discoloration, wet tissue, or odor requires diagnostic attention.
Related Plumeria Care Guide help
Plumeria can sometimes root in water, but water roots and roots formed in an aerated medium are not identical, and transition to soil can be a vulnerable step. A clean, fast-draining medium is generally the more direct route for long-term container growing, while water rooting is a separate method that requires careful sanitation, oxygen, and transition management.
Choose based on cutting condition, cultivar, climate, and your ability to control moisture after roots form. Do not apply the “one initial watering” soil-rooting rule to a cutting intentionally rooting in water; each method has its own protocol.
Related Plumeria Care Guide help
Compare water rooting and soil rooting · How to Root Plumeria Cuttings in Water
A wrinkled but still firm cutting may be using stored water while roots form. A soft, mushy, wet, darkening, hollow, or foul-smelling area is more concerning for rot. Those conditions need different responses, so do not water automatically just because the stem wrinkles.
Check where the softness begins, whether it is spreading, the rooting medium’s moisture, recent temperatures, odor, and base color. Keep a suspect cutting dry and separate while you assess it. Advancing soft rot may require cutting back with a sterile tool into firm clean tissue, then allowing a new callus to form. A photo of the whole cutting and close views of the base are useful.
Related Plumeria Care Guide help
Troubleshoot rot, mold, and slow rooting · Use Plumeria Diagnostics
A firm cutting can remain unrooted for a while when the season is cool, root-zone warmth is low, the cutting is slow by cultivar, the callus is incomplete, the medium is unsuitable, or the cutting has been disturbed. Slow does not automatically mean dead.
Check firmness, warmth, stability, medium moisture, planting depth, and whether the cutting was properly callused. Do not repeatedly unpot or tug it, and do not add water to a planted unrooted cutting merely because no roots are visible. Follow the PCG soil-rooting watering milestone. If the base is soft, wet, darkening, hollow, or odorous, switch from “slow rooting” to rot triage.
Related Plumeria Care Guide help
Keep the cutting separate and first determine whether the growth is superficial or connected to soft, wet, spreading decay. Photograph the undisturbed surface, then check stem and base firmness, odor, medium moisture, and whether discoloration continues beneath the surface.
Improve gentle airflow and keep the base and rooting medium from staying wet. Do not scrub aggressively or apply several home remedies before identifying the pattern. If the tissue underneath remains firm and clean, surface growth may be manageable. Softness, collapse, dark spread, seepage, or foul odor supports a more serious rot path and may require sterile cutback to healthy tissue.
Related Plumeria Care Guide help
Troubleshoot cutting mold and rot · Submit the pattern to Plumeria Diagnostics
Rot is more likely when the base is soft, wet, darkening, collapsing, hollow, seeping, or foul-smelling—not merely dry, callused, or wrinkled. Isolate the cutting, stop unnecessary moisture, and mark the visible boundary so you can see whether it advances.
If decay is progressing, use a clean sharp tool to cut beyond all affected tissue into firm, clean tissue, disinfecting the tool between cuts. Allow the new cut to dry and callus before restarting an appropriate rooting method. Products cannot restore dead tissue, so sanitation, complete removal of decay, dry-down, and moisture correction come first.
Related Plumeria Care Guide help
Review the updated stem-rot path · Use photo-assisted Diagnostics
Related Plumeria Way Resources
Want guided next steps? Start with the Plumeria Way rooting course guide and the Choosing and Preparing Plumeria Cuttings Course Guide. For book references, see M1 Acquiring Plumeria Cuttings, M2 Rooting Methods, and M3 Grafting Fundamentals.
Turn the explanation into an action plan
- Monitor
- Record the planting date, one initial watering date, firmness, stability, and the first two or three fully expanded leaves without moving the base.
- Change one thing
- Make the smallest justified correction, record the date, and avoid stacking treatments before you can see which one helped.
- Escalate when needed
- Unpot only when the base softens, odor develops, collapse advances, or the cutting is clearly failing rather than simply slow.