
The Plumeria Pests and Diseases Guide is an essential resource for identifying, preventing, and treating the most common threats to plumeria plants, including pests, fungi, and environmental stressors. This guide offers detailed information on how to recognize early signs of trouble, from insect infestations to fungal infections, and provides practical solutions to address these issues. It also covers strategies for managing environmental factors such as excessive humidity, temperature fluctuations, and poor soil conditions, which can weaken plumeria. With expert tips on natural and chemical treatments, as well as proactive care practices, this guide ensures your plumeria remains healthy, resilient, and free from common ailments, allowing it to thrive season after season.
How to Identify and Treat Root Mealybugs in Plumeria
What to check next
This guide helps you confirm that a living pest is present, identify where it is feeding, and choose a measured response without treating inactive damage. Read the detailed explanation, then use this sequence to decide what to do.
Confirm the evidence for mealybugs
- Look for
- White cottony insects or egg masses in tips, nodes, petiole joints, roots, and protected crevices, often with honeydew and ants.
- Compare with
- Mold, mineral residue, dried latex, and ordinary plant fibers do not move or reveal soft-bodied insects beneath the wax.
- Safest first response
- Isolate the plant, inspect both canopy and roots, physically remove visible colonies, and repeat checks for newly hatched insects.
Microclimate clue: Warm, sheltered, humid locations and crowded collections favor concealed colonies and repeated reinfestation.
- 1
Inspect before treating
Use bright light and magnification on leaf undersides, tips, petioles, stems, and the soil line.
- 2
- 3
Identify the feeding pattern
Separate sucking, chewing, mining, boring, and root-zone damage.
- 4
Start with the least disruptive action
Isolate, wash, and use only a treatment labeled for the confirmed pest and plant.
- 5
Repeat the inspection
Eggs or protected life stages can survive the first response, so follow-up checks matter.
How microclimate changes this answer
Dry heat favors mites, protected humid growth favors some scale and mealybugs, and wet shade increases snail and slug activity.
Compare this insect or pest pattern with healthy growth
Use these references to confirm that this article matches the visible pattern before changing care or applying a treatment.
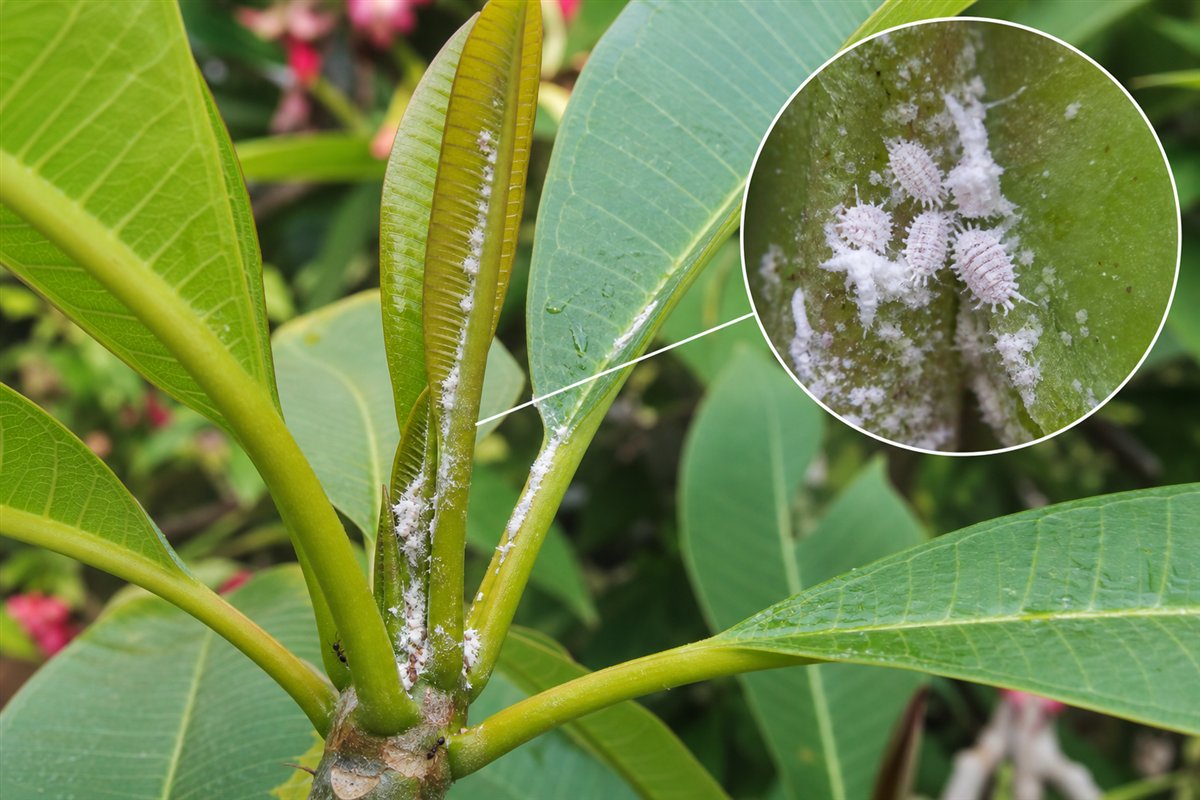 Condition reference
 Healthy baseline
- LocationCheck which plant part, age of growth, and exposed or protected side is affected.
- TextureDecide whether the evidence is dry, powdery, sticky, raised, translucent, soft, or intact.
- ProgressionPhotograph the same area so you can tell whether the pattern is stable, improving, or spreading.
Use more than one clue. Confirm the photo with recent conditions, roots, watering history, and the rest of the plant before acting.
Root mealybugs decision path: Confirm the defining evidence before changing care or applying a product.
- Confirm: Look for white wax, cottony clusters, insects on roots or pot walls, and unexplained decline despite reasonable watering. Mineral deposits and healthy pale roots should not be mistaken for insects.
- Start conservatively: Isolate the plant and nearby pots. If confirmed and the plant can tolerate repotting, remove contaminated mix, inspect and clean the container, trim only dead roots, and repot into clean draining medium.
- Escalate carefully: Use a pesticide, bait, biological control, or root treatment only when it is labeled for the pest and treatment site. Follow every dilution, timing, temperature, protective-equipment, and maximum-application direction.
- Protect the plant and garden: Avoid open blooms and pollinator activity, test foliar products on a small area, and never combine treatments unless both labels allow it.
- Monitor: Reinspect drainage holes, pot edges, and plant vigor every 7 to 10 days. Use a root-zone product only when its label includes the pest, plant or site, application method, and interval.
Growing-condition check: Use recent rain, heat, humidity, wind, plant stage, pot or in-ground status, and the saved microclimate as supporting evidence. This is a logical response based on the observations, not a guaranteed diagnosis.
Use this guide path: Identify and Treat | Prevent
Root-Zone Pest Diagnostic Path
Use this path when a plumeria declines from the roots up: weak growth, poor rooting, unexplained wilting, yellowing, sparse feeder roots, pests near drain holes, or problems that do not match normal watering.
- Start with the soil-dwelling pest hub when the problem may be below the soil line.
- Check root mealybugs when white waxy or cottony residue appears around roots, pot walls, or drainage holes.
- Check root aphids when small mobile insects, ants, or root-zone colonies are present without the cottony wax pattern.
- Check fungus gnats when small flies hover around moist media and larvae are suspected in seedling or propagation trays.
- Check root weevils when adult leaf notching and hidden larval root damage appear together.
Why it matters: Foliar sprays rarely solve a root-zone pest. Root problems require isolation, root inspection, clean media, clean containers, and careful treatment choices.
Root mealybugs are hidden root-zone sap feeders that can weaken plumeria without obvious pests on the leaves. They often live around roots, pot walls, drainage holes, dry pockets in the mix, and protected spaces near the root crown.
Where This Page Fits
Primary root mealybug guide. Use this page when you suspect white, waxy, cottony pests in the root zone or unexplained decline tied to hidden root feeding.
- If you are not sure which root-zone pest is involved, start with How to Identify Soil-Dwelling Pests on Plumeria. After confirming the problem, use How to Treat Soil-Dwelling Pests on Plumeria for broader treatment decisions. Do not treat root mealybugs as a leaf-only pest; the main problem is below the soil line.
Root Mealybugs Article Path
Use this group in order when possible: identify the problem, treat only when needed, then prevent repeat outbreaks or recurrence.
- Identify and treat root mealybugs
How to Identify and Treat Root Mealybugs in Plumeria - Prevent root mealybugs
How to Prevent Root Mealybugs in Plumeria - Compare soil-dwelling pests
How to Identify Soil-Dwelling Pests on Plumeria
Safety and diagnostics: before applying products, review the Treatment Safety Checklist. If symptoms do not match this group, return to the Pest & Disease Identification Guide.
Because the damage starts below the soil line, root mealybugs are often mistaken for root rot, nutrient stress, watering problems, or general decline. The plant may look weak above ground while the real evidence is in the potting mix.
Identity note: Root mealybugs are mealybugs in the family Pseudococcidae. Many root-zone mealybugs are Rhizoecus-type pests or related groups. They are different from ordinary leaf and stem mealybugs because they hide below the soil line.
Photo and Confirmation Checklist
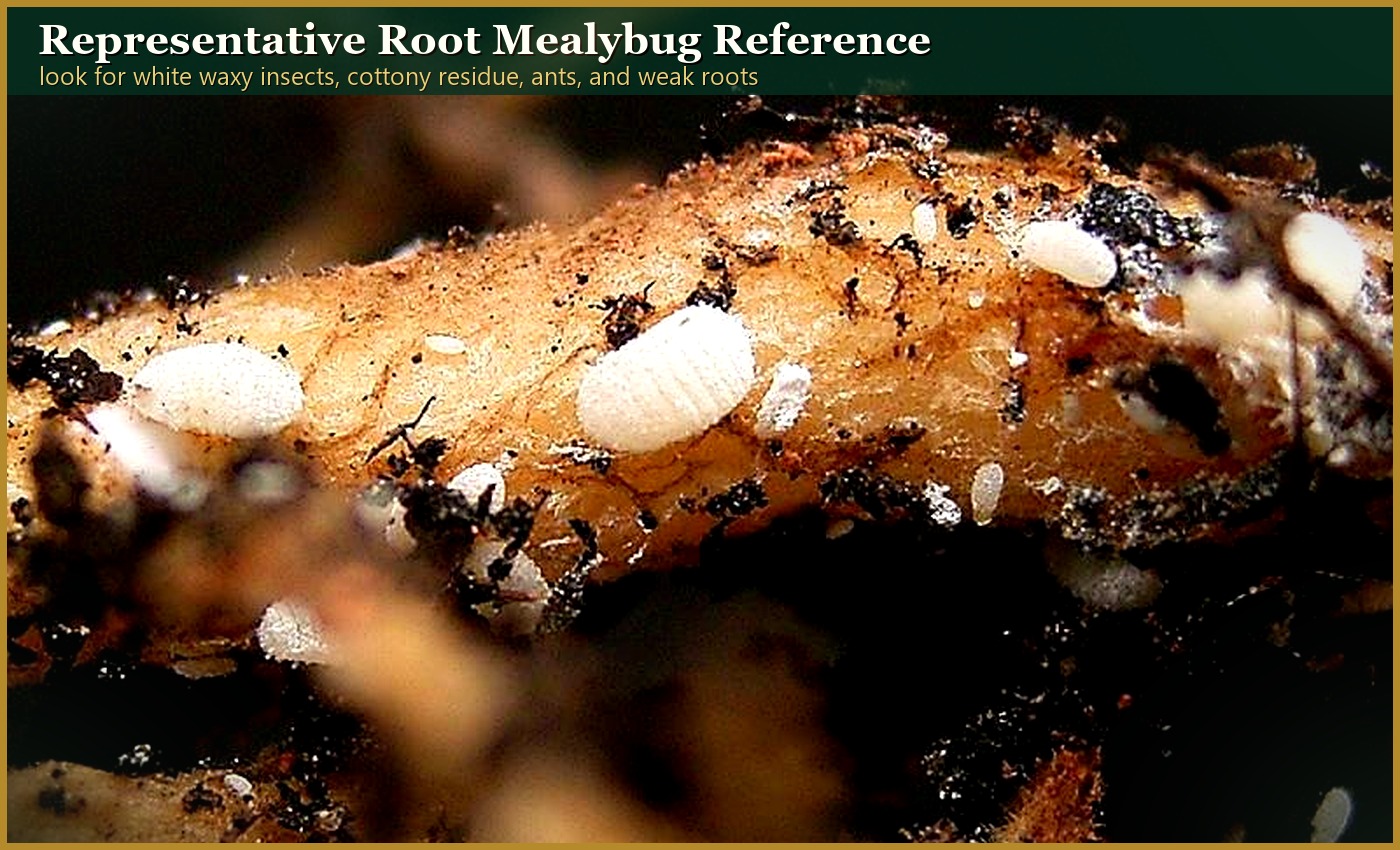
- Remove the root ball carefully and inspect the roots, pot wall, and drainage holes.
- Look for white waxy or cottony clusters that are not simply perlite or mineral residue.
- Check for weak roots, poor rooting, yellowing, wilting, and decline that does not match normal watering.
- Compare with root aphids, fungus gnat larvae, root rot, and mineral deposits before treating.
Root Mealybug Guide Path
- Identify and treat root mealybugs when white waxy colonies appear in the media, around roots, pot walls, or drainage holes.
- Prevent root mealybugs through clean media, clean containers, quarantine, and root-zone inspection.
- Use the soil-dwelling pest treatment hub when symptoms could involve fungus gnats, root aphids, root weevils, or several root-zone problems.
Quick ID
- Main clue: White waxy or cottony material around roots, pot walls, drainage holes, or media pockets.
- Plant symptoms: Weak growth, wilting, yellowing, sparse roots, poor rooting, or decline despite reasonable care.
- Common look-alikes: Perlite, mineral deposits, fungal mycelium, root aphids, fungus gnat larvae, and root rot.
- Best confirmation: Root inspection, not foliar inspection.
Treatment Priorities
- Isolate the plant. The why: root-zone pests can spread through pots, benches, media, and plant handling.
- Discard infested media when practical. The why: wax, eggs, and insects can remain in the mix.
- Wash or replace the container. The why: pests can hide along pot walls, rims, and drainage holes.
- Inspect and clean the root system gently. The why: treatment must reach the pest location without destroying useful roots.
- Repot into fresh fast-draining media. The why: clean media reduces reinfestation risk and supports recovery.
If a soil treatment or systemic product is considered, use only a product labeled for the pest, plant, and site. Follow all label directions and check the treatment safety checklist. Severe root mealybug infestations on low-value or badly declining plants may justify discarding the plant to protect the rest of the collection.
What Not to Do
- Do not rely on foliar sprays for root mealybugs. The why: the pest is below the soil line.
- Do not reuse suspicious media. The why: hidden stages can restart the infestation.
- Do not confuse every white particle with root mealybugs. The why: perlite and mineral residue are common in potting media.
- Do not place treated plants immediately back into the main collection. The why: follow-up inspection is needed before the plant is cleared.
How Root Mealybugs Differ From Stem Mealybugs
Root mealybugs live mostly below the soil line, so the plant may look thirsty, nutrient stressed, or weak before pests are obvious. They are mealybugs in the broad family Pseudococcidae, and root-associated groups such as Rhizoecus species are often used as examples. Exact identification is less important than confirming white waxy residue and active insects in the root zone.
- Inspect pot edges and drain holes. Why: white waxy residue may appear where roots and media touch the container.
- Check the root ball, not only the stem. Why: above-ground mealybug treatment may miss root mealybugs completely.
- Look for weak feeder roots. Why: root feeding reduces water and nutrient uptake before leaf symptoms are specific.
- Compare with root aphids and fungus gnat larvae. Why: all can cause root stress, but treatment choices differ.
Use the Treatment Decision Guide when deciding whether to isolate, wash roots, replace media, treat, or discard a heavily infested plant.
Representative Image Note
Some root-zone pest images are representative references rather than perfect plumeria-specific examples. Use them to understand the general pest or symptom pattern, but confirm the diagnosis by inspecting the actual rootball, potting mix, drainage, root condition, and plant symptoms together.
- Look for the pest itself when possible, not just weak growth above the soil line.
- Compare root symptoms with watering stress, root rot, fertilizer burn, transplant damage, poor drainage, and old perlite or organic residue.
- Photograph the whole plant, pot, rootball, and close-up evidence if you are documenting the problem.
Photo note: plumeria-specific root-zone pest photos are still needed. See the Plumeria Pest & Disease Photo Contribution Guide.
Confirm Before Disturbing the Roots
Root mealybugs rarely attack plumeria. Weak growth, yellow leaves, or a declining plant are not enough to confirm them. Look for white waxy or cottony material attached to roots and, when possible, the insects themselves before treating.
| What you find | What it may mean | Best next step |
|---|---|---|
| White cotton or wax attached to roots, with visible insects | Strong evidence of root mealybugs | Isolate the plant and begin the treatment sequence below. |
| Loose, evenly shaped white particles | Perlite, pumice, or another soil-mix ingredient | Compare the particles with the original mix before treating. |
| White crust on the pot rim or soil surface | Fertilizer salts or mineral deposits | Review fertilizer strength and water quality; do not apply insecticide for deposits. |
| Small mobile, pear-shaped insects or persistent ant activity | Root aphids may be more likely | Use the root-aphid identification guide before choosing a product. |
| Fine white fungal threads without insects | Beneficial or saprophytic fungi may be present | Check drainage, odor, and root firmness before disturbing the rootball. |
| Weak or yellow plant without root-zone insects | Drainage, salts, nutrition, weather stress, or rot | Return to the Root and Soil Checker for a broader comparison. |
Treat Only After Confirmation
- Isolate the plant. Keep its pot, runoff, and tools away from other plumerias.
- For a stable, established plant, remove contaminated mix, clean the pot and tools, and repot in fresh, fast-draining material. Do not bare-root an unrooted or newly rooted cutting merely to inspect it.
- Use the least disruptive labeled option first. A label-approved root-zone treatment may be appropriate when the pest is confirmed. Systemic or chemical products are a last resort and must list the plant and intended site on the label.
- Monitor new roots and growth. Recheck rather than automatically repeating treatments.
Watering safeguard: an unrooted cutting receives one initial watering and no more until two or three full-sized leaves have grown; mist the stem only if a firm cutting looks dehydrated. Water a newly rooted cutting sparingly and let the mix approach dry before watering again. Keep seedlings lightly and evenly moist, never saturated.
Prevention and Quarantine
Because root mealybugs rarely attack plumeria, prevention should focus on clean materials and observation rather than routine pesticide drenches.
- Use fresh, clean, fast-draining media. Do not reuse mix from a suspect plant.
- Clean pots, trays, benches, and tools before reuse. Pay particular attention to pot rims and drainage holes.
- Quarantine new plants and rooted cuttings. Keep them away from shared benches and drainage trays until inspection is complete.
- Inspect roots when repotting or when evidence justifies it. Do not disturb a healthy root ball merely as a precaution.
- Label and monitor treated plants. Recheck pot edges, drainage holes, and vigor before returning the plant to the collection.
Best Times to Inspect
- Before adding a purchased or received plant to the main collection.
- During necessary repotting or up-potting.
- Before sharing rooted plants, reused pots, or growing media.
- When decline continues despite reasonable watering, drainage, and nutrition.
- Before plants are crowded together for overwintering.
Avoid preventive harsh drenches. Confirm living insects or characteristic root-zone wax before choosing a labeled root treatment.
Related Guides
- How to Prevent Root Mealybugs in Plumeria
- How to Identify Soil-Dwelling Pests on Plumeria
- How to Treat Soil-Dwelling Pests on Plumeria
- Isolation and Sanitation Checklist
- Treatment Safety Checklist
Help Improve This Photo Reference
If you have a clear plumeria photo of root mealybugs, you can help improve this guide. The most useful photos show white waxy material in the root zone, insects on roots or pot walls, and the affected plant before repotting.
Submit a photo for review. Photos are not published automatically; they are checked for permission, plant context, and diagnostic accuracy before being used.
Turn the explanation into an action plan
- Monitor
- Check the same marked leaves and nearby plants every three to seven days until no active pests or fresh damage remain.
- Change one thing
- Make the smallest justified correction, record the date, and avoid stacking treatments before you can see which one helped.
- Escalate when needed
- Seek local diagnostic help when damage accelerates despite treatment, borers enter major stems, or the pest cannot be identified.