The Plumeria Pests and Diseases Guide is an essential resource for identifying, preventing, and treating the most common threats to plumeria plants, including pests, fungi, and environmental stressors. This guide offers detailed information on how to recognize early signs of trouble, from insect infestations to fungal infections, and provides practical solutions to address these issues. It also covers strategies for managing environmental factors such as excessive humidity, temperature fluctuations, and poor soil conditions, which can weaken plumeria. With expert tips on natural and chemical treatments, as well as proactive care practices, this guide ensures your plumeria remains healthy, resilient, and free from common ailments, allowing it to thrive season after season.
How to Identify Mealybugs on Plumeria
Sap-Sucking Pest Diagnostic Path
Use this path when plumeria leaves look sticky, speckled, curled, dusty, bronzed, distorted, puckered, weak, or covered with honeydew or sooty mold. These pests overlap, so inspect undersides, tips, buds, stems, and protected joints before choosing a treatment.
- Start with the sap-sucking pest checklist to compare mites, mealybugs, scale, aphids, whiteflies, thrips, and leafhoppers.
- Check spider mites when leaves look stippled, dusty, bronzed, webbed, or stressed in hot dry weather.
- Check mealybugs when white cottony clusters, hidden colonies, honeydew, ants, or weak growth appear.
- Check scale insects when bumps stay attached to stems, leaves, petioles, or undersides.
- Check aphids when soft insects cluster on tender tips, buds, and new leaves.
- Check whiteflies when tiny white adults flutter from leaf undersides or honeydew and sooty mold appear.
- Check thrips when flowers, buds, or tender growth show silvery scarring, streaking, speckling, or distortion.
- Check leafhoppers when small jumping insects, marginal discoloration, puckered leaves, or fast-moving leaf pests are present.
Why it matters: Broad sprays can miss hidden pests or harm beneficial insects. Matching the pest to the symptom pattern helps you treat only what needs treatment.
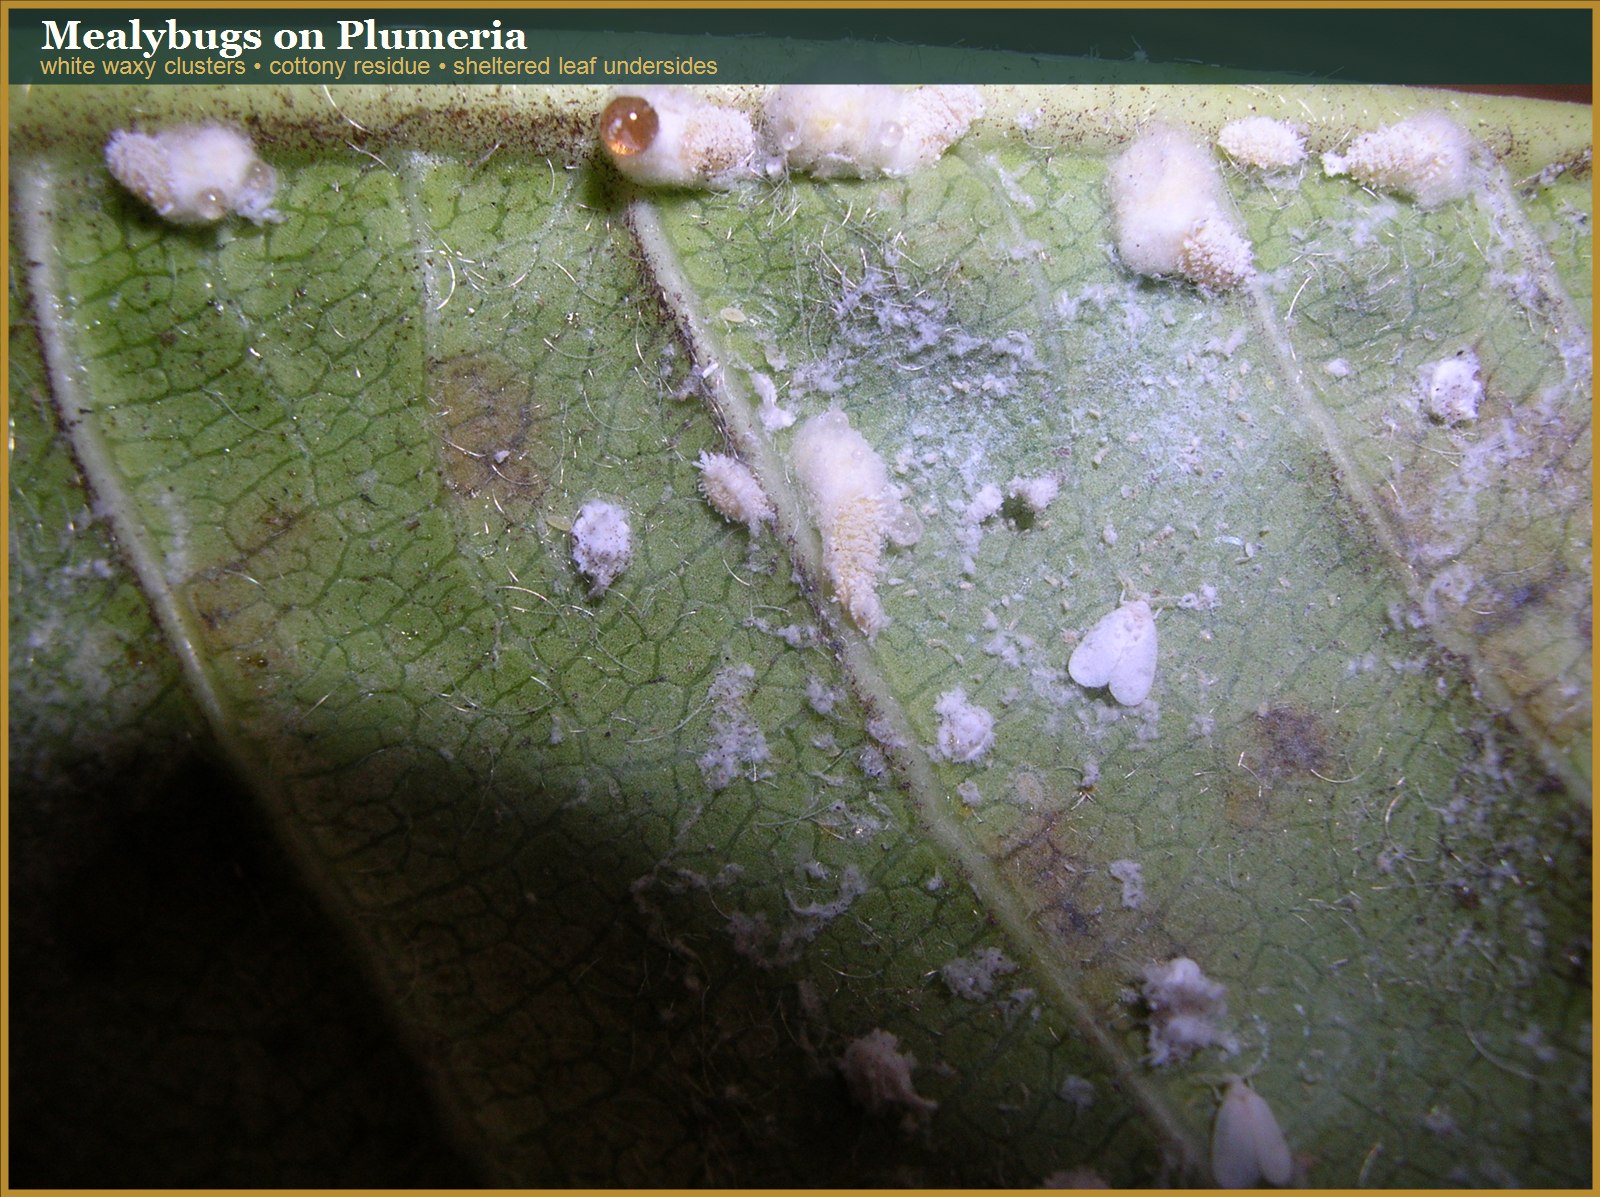
Mealybugs are soft-bodied sap-sucking insects covered with white waxy or cottony material. On plumeria, they often hide in protected places before they become obvious: leaf joints, stem tips, petioles, undersides of leaves, branch crotches, flower stems, and tight new growth.
Mealybugs Article Path
Use this group in order when possible: identify the problem, treat only when needed, then prevent repeat outbreaks or recurrence.
- Identify mealybugs
How to Identify Mealybugs on Plumeria - Treat mealybugs
How to Treat Mealybugs on Plumeria - Prevent mealybugs
How to Prevent Mealybugs on Plumeria
Safety and diagnostics: before applying products, review the Treatment Safety Checklist. If symptoms do not match this group, return to the Pest & Disease Identification Guide.
Mealybugs matter because they remove sap, weaken growth, produce sticky honeydew, attract ants, and can lead to black sooty mold. A small hidden colony can spread through a collection if infested plants are moved, pruned, or overwintered close together.
Identity note: Mealybugs belong to the family Pseudococcidae. Above-ground mealybugs usually show on stems, leaves, and protected joints, while root mealybugs hide below the soil line and need root-zone inspection.
Photo and Confirmation Checklist
- Inspect leaf bases, stem tips, petioles, branch crotches, and the underside of leaves.
- Look for white cottony clusters, waxy residue, honeydew, ants, and sooty mold.
- Check roots if the plant declines but no leaf or stem colony explains the symptoms.
- Photograph both the colony and its location on the plant when possible.
Mealybug Guide Path
- Identify mealybugs when white cottony clusters, waxy residue, honeydew, ants, or hidden colonies appear on stems, leaves, tips, or joints.
- Treat mealybugs when active colonies are present, new growth is weakening, or honeydew and ants show the colony is expanding.
- Prevent mealybugs by inspecting protected joints, quarantining new plants, managing ants, cleaning pots/tools, and avoiding crowded sheltered growth.
- Check root mealybugs if the plant declines but leaf and stem inspections do not explain the problem.
Quick ID
- Insect: Small soft-bodied insects covered in white waxy or cottony material.
- Location: Protected joints, leaf bases, stem tips, undersides, flower stems, and branch crotches.
- Residue: Sticky honeydew and black sooty mold may appear when colonies build.
- Ant clue: Ants may move around the colony because they feed on honeydew.
- Hidden clue: Weak growth with few visible pests may mean you need to inspect the roots for root mealybugs or other root-zone pests.
Mealybugs vs. Look-Alikes
- Scale: Usually appears as attached bumps, not cottony mobile clusters.
- Aphids: Soft clusters on tender tips, but without the same white waxy covering.
- Whiteflies: Adults flutter from leaf undersides when disturbed.
- Powdery mildew: Produces fungal coating on leaf surfaces, not insects hidden in joints.
- Perlite or mineral residue: Does not move, feed, produce honeydew, or attract ants as a colony.
How to Confirm
- Use bright light and inspect protected spaces, not just open leaf surfaces.
- Gently disturb the white material with a toothpick or cotton swab and look for soft insects underneath.
- Check for honeydew and ants as supporting evidence.
- Inspect neighboring plants because mealybugs often move through crowded collections.
- Inspect the root zone if stem and leaf treatment fails or decline seems out of proportion to visible pests.
What Not to Do
- Do not inspect only the top of the leaves. The why: mealybugs hide in joints and protected spaces.
- Do not ignore ants. The why: ants often point to honeydew-producing pests and can protect colonies.
- Do not assume all white material near roots is harmless perlite. The why: root mealybugs can look like waxy white residue in the media.
Mealybug confirmation checks
Mealybugs are soft-bodied sap-sucking insects, often in the family Pseudococcidae. On plumeria they commonly hide in protected places.
- Check leaf axils, branch crotches, undersides of leaves, and sheltered stem areas for white cottony clusters.
- Look for sticky honeydew, ants, and sooty mold around feeding sites.
- Separate stem mealybugs from root mealybugs; root mealybugs leave cottony residue in the potting mix or along the pot wall.
- A cotton swab with alcohol can help confirm a small cluster, but test carefully and avoid broad alcohol use on tender tissue.