
The Plumeria Pests and Diseases Guide is an essential resource for identifying, preventing, and treating the most common threats to plumeria plants, including pests, fungi, and environmental stressors. This guide offers detailed information on how to recognize early signs of trouble, from insect infestations to fungal infections, and provides practical solutions to address these issues. It also covers strategies for managing environmental factors such as excessive humidity, temperature fluctuations, and poor soil conditions, which can weaken plumeria. With expert tips on natural and chemical treatments, as well as proactive care practices, this guide ensures your plumeria remains healthy, resilient, and free from common ailments, allowing it to thrive season after season.
Aphids on Plumeria: Identification, Treatment and Prevention
What to check next
This guide helps you confirm that a living pest is present, identify where it is feeding, and choose a measured response without treating inactive damage. Read the detailed explanation, then use this sequence to decide what to do.
Confirm the evidence for aphids
- Look for
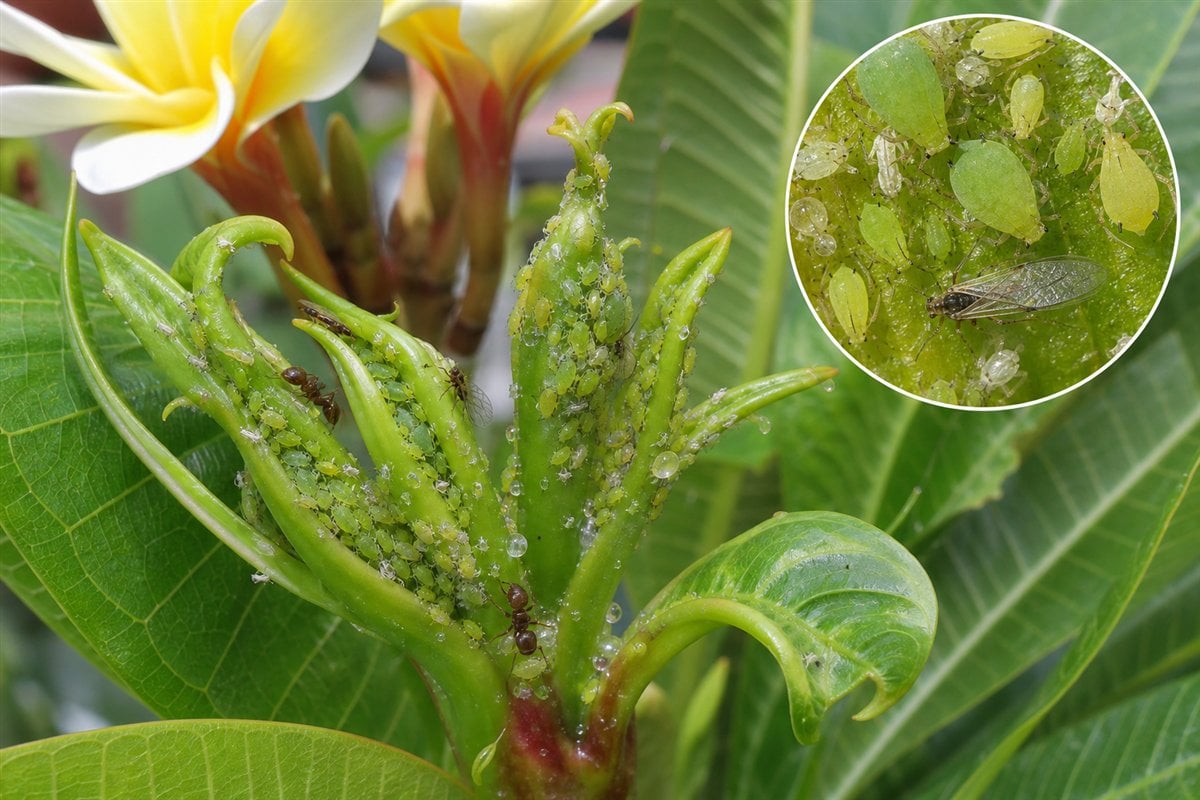
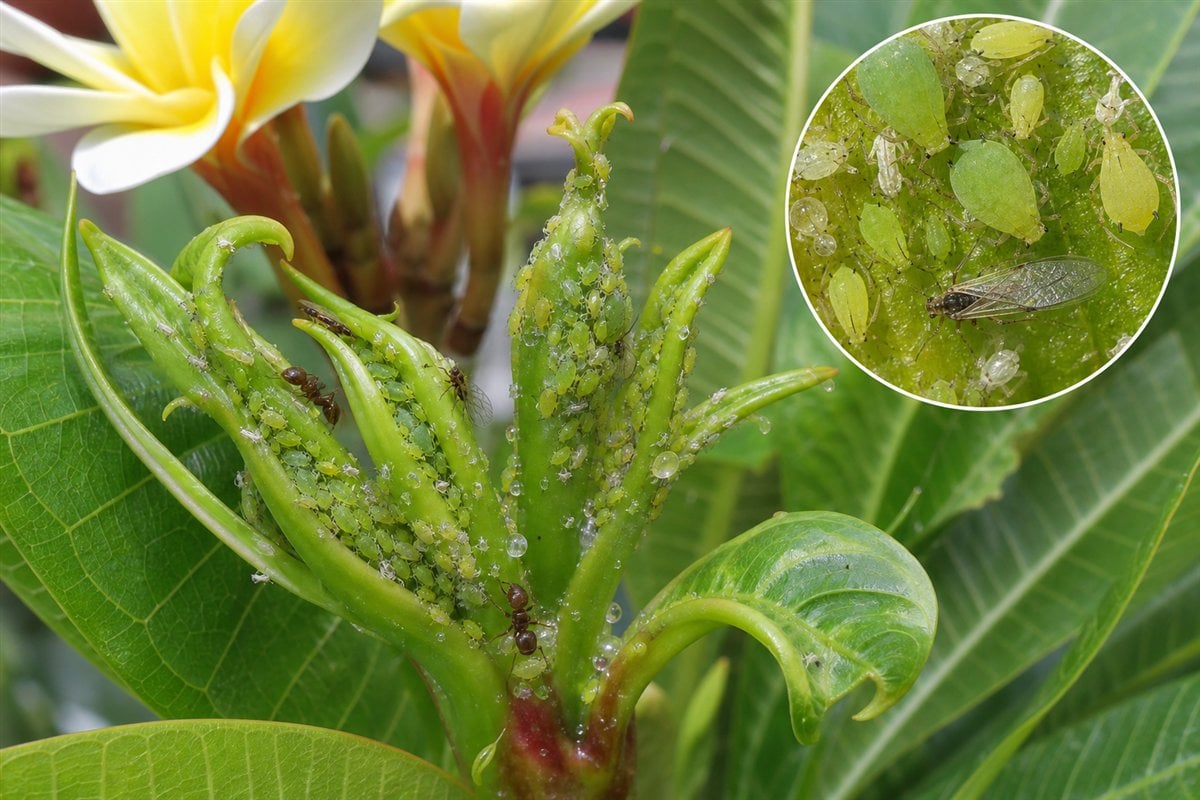
- Clusters of soft-bodied insects on tender tips, buds, and leaf undersides, plus curled growth, cast skins, honeydew, or ants.
- Compare with
- Thrips, leafhoppers, heat-distorted tips, and nutrient-related curling can resemble aphid injury without visible colonies.
- Safest first response
- Rinse or remove concentrated colonies, protect beneficial insects, and use a labeled treatment only if active populations continue.
Microclimate clue: Mild weather and soft new growth can support rapid aphid reproduction; heavy rain may temporarily knock colonies down.
- 1
Inspect before treating
Use bright light and magnification on leaf undersides, tips, petioles, stems, and the soil line.
- 2
- 3
Identify the feeding pattern
Separate sucking, chewing, mining, boring, and root-zone damage.
- 4
Start with the least disruptive action
Isolate, wash, and use only a treatment labeled for the confirmed pest and plant.
- 5
Repeat the inspection
Eggs or protected life stages can survive the first response, so follow-up checks matter.
How microclimate changes this answer
Dry heat favors mites, protected humid growth favors some scale and mealybugs, and wet shade increases snail and slug activity.
Compare this insect or pest pattern with healthy growth
Use these references to confirm that this article matches the visible pattern before changing care or applying a treatment.
 Condition reference
 Healthy baseline
- LocationCheck which plant part, age of growth, and exposed or protected side is affected.
- TextureDecide whether the evidence is dry, powdery, sticky, raised, translucent, soft, or intact.
- ProgressionPhotograph the same area so you can tell whether the pattern is stable, improving, or spreading.
Use more than one clue. Confirm the photo with recent conditions, roots, watering history, and the rest of the plant before acting.
Aphids are soft-bodied sap feeders that gather on tender plumeria tips, unfolding leaves, buds, and flower stems. This overview helps you confirm an active colony, choose the least disruptive treatment that fits the evidence, protect beneficial insects, and prevent the next outbreak.
Quick Answer
Confirm the Pattern
| What you see | What it may mean | Next step |
|---|---|---|
| Clusters of soft-bodied insects on tips, buds, or leaf undersides | Aphids are a strong match. | Photograph the colony and check whether beneficial insects are already feeding. |
| Sticky honeydew, ants, or sooty mold | A sap-feeding pest is active, but aphids are not the only possibility. | Inspect for aphids, mealybugs, soft scale, and whiteflies. |
| Fine pale stippling or webbing without visible aphid colonies | Spider mites are a closer match. | Use the mite identification path. |
| Fixed bumps attached to stems or leaves | Scale insects may be more likely. | Use the scale identification path before spraying. |
| Tiny white adults fly up from leaf undersides | Whiteflies may be more likely. | Look for flat attached immature stages below leaves. |
| Wedge-shaped insects jump or move sideways | Leafhoppers may be more likely. | Inspect several young leaf undersides. |
| Decline with no insects above the soil | Watering, drainage, roots, nutrition, disease, or a below-soil pest may be involved. | Check the root and soil conditions before assuming root aphids. |
Treatment Decision Guide
- Small, accessible colony: Isolate the plant when practical, use a firm stream of water, wipe or pinch off concentrated colonies, and remove only badly damaged tender growth that can be spared.
- Beneficial insects are active: Protect lady beetles, lacewing larvae, hoverfly larvae, parasitic wasps, and other aphid predators. Manage ants that defend aphids and avoid broad treatments while helpers are working.
- Aphids remain active: Compare a currently labeled insecticidal soap or horticultural oil. Thorough coverage is essential; test a small area first and avoid heat, direct midday sun, drought stress, open flowers, and other label restrictions.
- Damaging infestation persists: Consider a currently labeled ornamental insecticide only as a last resort after the pest is confirmed and safer measures are insufficient. Protect pollinators, predators, seedlings, cuttings, tender growth, and nearby plants.
Organic and Biological Options
- Water and hand removal: useful for an early, reachable colony and leaves no pesticide residue.
- Beneficial insects: lady beetles, lacewing larvae, hoverfly larvae, and parasitoid wasps can suppress aphids when ants and broad-spectrum pesticides do not interfere.
- Insecticidal soap: a contact option that must reach the aphids directly; repeat only as the current label permits.
- Horticultural oil: another contact option that can affect exposed aphids and eggs, but heat, tender tissue, recent products, and plant stress can increase injury risk.
Prevention by growing conditions
- Quarantine incoming plants and inspect tender tips, buds, flower stems, and unfolding leaves.
- Control ants when they defend aphid colonies from predators and move aphids to fresh growth.
- Avoid excessive nitrogen that creates repeated flushes of soft, vulnerable growth.
- Preserve lady beetles, lacewing larvae, hoverfly larvae, and parasitoid wasps by avoiding routine broad-spectrum sprays.
- Check new growth after weather changes, moving plants, fertilizing, or nearby vegetation drying down.
Microclimate: warm protected tips, tender fertilized growth, ant activity, nearby host plants, and sheltered greenhouse conditions can increase aphid pressure. Heavy rain or a firm canopy rinse may reduce exposed colonies, but survivors can rebuild quickly on new growth.
Simple Follow-Up Schedule
| Timing | Action |
|---|---|
| Day 0 | Confirm aphids, photograph the colony, isolate if practical, manage ants, and use the lowest appropriate treatment level. |
| Days 3-5 | Inspect tips, buds, and leaf undersides for living aphids, new honeydew, and beneficial-insect activity. |
| Day 7 | Compare photographs and repeat only the action permitted by the treatment plan or product label. |
| Weeks 2-4 | Continue weekly checks until two consecutive inspections show no expanding colony or fresh honeydew. |
Possible Root Aphids
Do not diagnose root aphids from yellowing or slow growth alone. Those symptoms overlap with excess moisture, poor drainage, root rot, fertilizer injury, nutrient imbalance, dormancy, and environmental stress. Use the root aphid identification guide only when below-soil evidence is present or unexplained decline remains after the more common causes are checked.
Detailed Aphid Guides
- How to Identify Aphids on Plumeria – photographs, confirmation clues, look-alikes, and inspection steps.
- How to Treat Aphids on Plumeria – detailed physical, predator, organic contact, and last-resort choices.
- How to Prevent Aphids on Plumeria – quarantine, ant control, plant management, and seasonal monitoring.
- Sap-Sucking Pest Checklist – compare aphids with mites, mealybugs, scale, and whiteflies.
Reference basis: UC Statewide IPM aphid guidance, UC IPM ornamental nursery aphid guidance, and the EPA introduction to pesticide labels.
Turn the explanation into an action plan
- Monitor
- Check the same marked leaves and nearby plants every three to seven days until no active pests or fresh damage remain.
- Change one thing
- Make the smallest justified correction, record the date, and avoid stacking treatments before you can see which one helped.
- Escalate when needed
- Seek local diagnostic help when damage accelerates despite treatment, borers enter major stems, or the pest cannot be identified.