The Plumeria Pests and Diseases Guide is an essential resource for identifying, preventing, and treating the most common threats to plumeria plants, including pests, fungi, and environmental stressors. This guide offers detailed information on how to recognize early signs of trouble, from insect infestations to fungal infections, and provides practical solutions to address these issues. It also covers strategies for managing environmental factors such as excessive humidity, temperature fluctuations, and poor soil conditions, which can weaken plumeria. With expert tips on natural and chemical treatments, as well as proactive care practices, this guide ensures your plumeria remains healthy, resilient, and free from common ailments, allowing it to thrive season after season.
How to Identify Spider Mite Damage on Plumeria
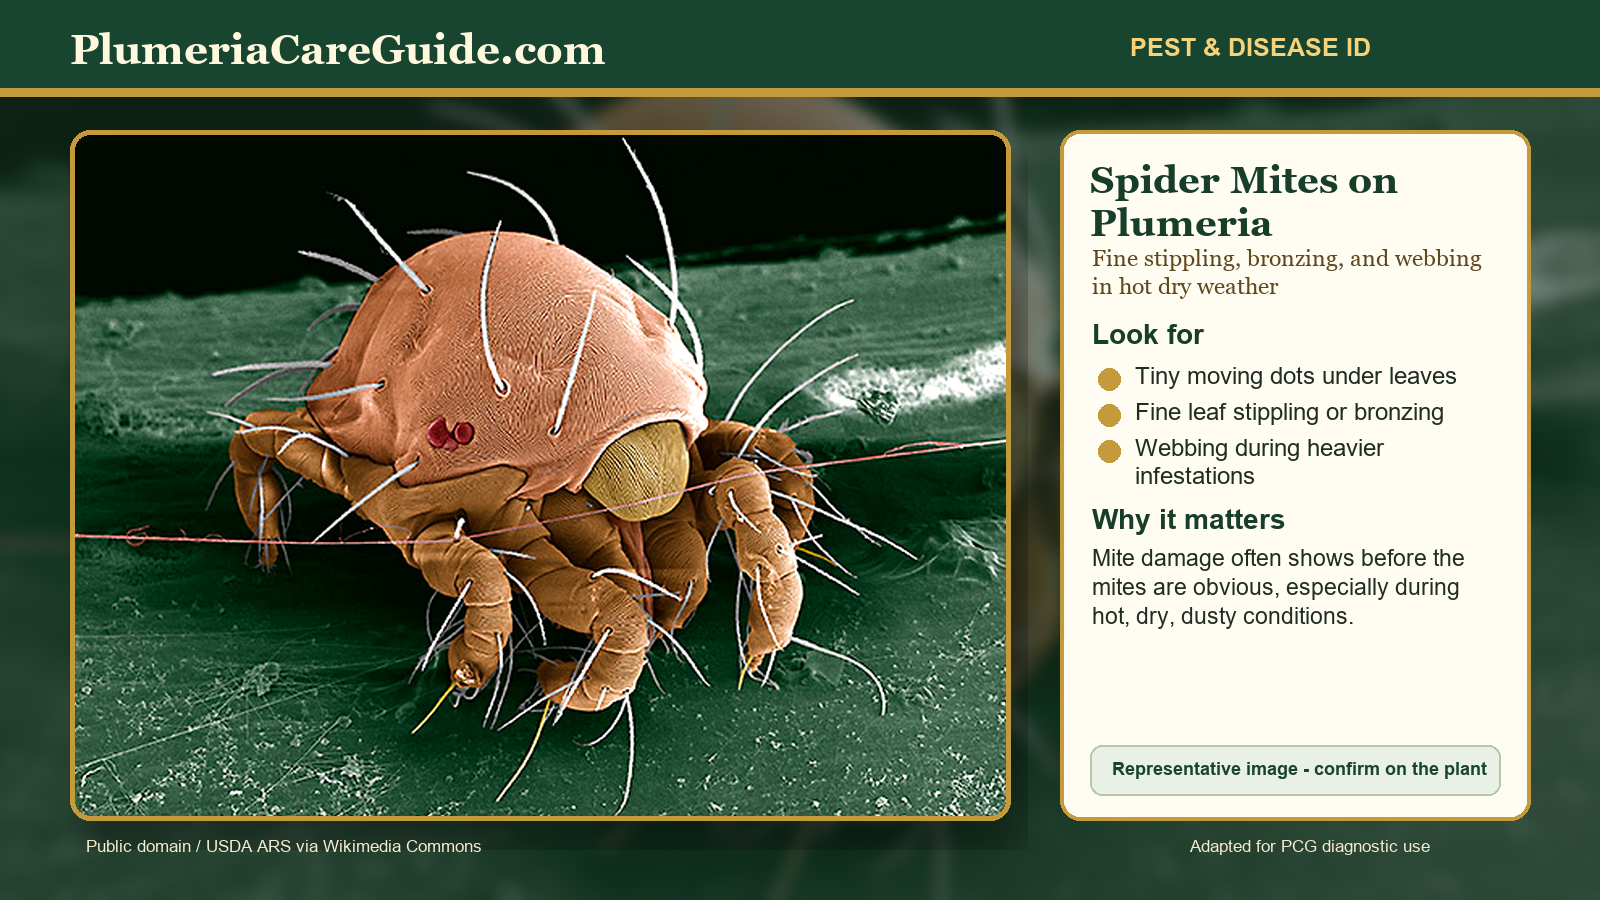
How to Identify Spider Mite Damage on Plumeria
How to check it: Use the Sap-Sucking Pest Checklist to inspect undersides, nodes, and nearby plants. Open the detailed checklist: Sap-Sucking Pest Checklist: How to Spot Mites, Mealybugs, Scale, Aphids, and Whiteflies.
Where This Page Fits
Primary spider mite identification guide. Use this page when you see stippling, dusty-looking leaves, fine webbing, bronzing, or leaf drop and need to confirm spider mites before treating.
- If you are not sure which mite is involved, start with Mites on Plumeria. After active spider mites are confirmed, use How to Treat Spider Mites on Plumeria. For recurring warm-season problems, keep Seasonal Spider Mite Checklist nearby.
Spider Mites Article Path
Use this group in order when possible: identify the problem, treat only when needed, then prevent repeat outbreaks or recurrence.
- Identify spider mite damage
How to Identify Spider Mite Damage on Plumeria - Treat spider mites
How to Treat Spider Mites on Plumeria (Organic & Chemical Methods) - Use seasonal mite guidance
Plumeria Spider Mites (Seasonal and Year-Round Tips) - Check seasonal mite timing
Seasonal Spider Mite Checklist for Plumeria Growers
Safety and diagnostics: before applying products, review the Treatment Safety Checklist. If symptoms do not match this group, return to the Pest & Disease Identification Guide.
Spider mites are one of the most common recurring pests on plumeria, especially in hot, dry, dusty conditions and during the long warm stretch from late June until weather cools. These tiny arachnids feed by piercing plant cells and sucking out their contents, causing leaf damage that often goes unnoticed until the plant shows serious symptoms. Learning to identify spider mite damage early can make the difference between saving a healthy plumeria and losing a plant to unchecked infestation. This guide will help you recognize the telltale signs, understand spider mite behavior, and know where and when to look.
Spider Mite Guide Path
- Identify spider mite damage before treating.
- Treat active spider mites with rinsing, coverage, and follow-up inspection.
- Use seasonal prevention during hot, dry, dusty weather.
- Follow the seasonal checklist for routine monitoring.
Quick ID
- Common name: Spider mites on plumeria
- Scientific name or group: Twospotted spider mite: Tetranychus urticae; sixspotted spider mite: Eotetranychus sexmaculatus
- Type: Mite, not an insect
- Peak risk: Hot, dry, dusty weather; in many warm regions, pressure often builds from late June until cooler weather returns.
- Main clue: Fine stippling, dull dusty leaves, bronzing, webbing, leaf drop, and worsening damage in hot dry conditions.
- Control note: A canopy rinse is not the same as watering the soil; aim water at leaf undersides to physically dislodge mites and webbing.
- Where to inspect: Leaf undersides, especially along veins; use a hand lens or tap leaves over white paper.
- Common look-alikes: Broad mites, cyclamen mites, rust disease, spray burn, drought stress, sun stress.
How to confirm: Check the undersides of affected leaves, especially along the veins, with a hand lens. You can also tap a suspect leaf over white paper and watch for tiny moving dots. Stippling, bronzing, webbing, and leaf drop point toward spider mites; twisted new growth or damaged buds may point more toward broad mites or cyclamen mites.
What Are Spider Mites?
Spider mites are not true insects; they are tiny arachnids related to spiders and ticks. On plumeria, spider mite problems are most likely during hot, dry, dusty, crowded, or protected growing conditions. Damage is usually noticed before the mites themselves because the mites feed from leaf undersides and are difficult to see without magnification.
Mites Found on Plumeria
| Mite | Scientific Name or Group | Best Identification Clues |
|---|---|---|
| Twospotted spider mite | Tetranychus urticae | Fine stippling, dull dusty leaves, bronzing, webbing, leaf drop, and decline during hot dry stress. This is one of the most common spider mite problems on ornamentals and should be checked early on plumeria. |
| Sixspotted spider mite | Eotetranychus sexmaculatus | Yellow speckling, bronzing, leaf distortion, premature leaf drop, weak new growth, damaged growing tips, and sometimes webbing under the leaves. This mite is specifically associated with plumeria. |
| Red spider mites | Grower term; species varies | Reddish mites, rusty or bronzed leaves, pale dots, fine webbing, and dry tired-looking foliage. Use the term as a visual clue, then confirm by underside inspection. |
| Broad mites | Polyphagotarsonemus latus | Twisted or distorted new leaves, hardened or shiny new growth, stunted tips, curled leaves, and damaged buds. Damage can resemble virus, herbicide injury, or nutrient stress. |
| Cyclamen mites | Phytonemus pallidus | Distorted young leaves, tight stunted growth, curled or thickened tissue, and damaged buds or flowers. Less commonly discussed on plumeria, but important as a tender-growth distortion look-alike. |
Most common practical diagnosis: for plumeria growers, the most likely mite problem is usually spider mites, especially twospotted spider mite or sixspotted spider mite. Check leaf undersides along the veins with a hand lens, or tap a leaf over white paper and watch for tiny moving dots.
Important difference: spider mites usually cause stippling, bronzing, webbing, and leaf drop. Broad mites and cyclamen mites usually cause distorted new growth, twisted leaves, hardened tips, and damaged buds. That difference helps narrow the diagnosis before treatment.
Understanding the Spider Mite Life Cycle
Spider mites go through the following stages:
- Egg
- Larva
- Nymph (2 stages)
- Adult
In hot weather, the entire cycle can take as little as 5-7 days, allowing populations to rapidly increase if left unchecked. Eggs are laid on the underside of leaves and hatch rapidly. Because multiple generations can exist simultaneously, infestations often intensify week after week.
Why this matters: Early detection is key. By the time you notice widespread leaf damage, thousands of mites may be present.
Where and When to Look
Spider mites are most active in:
- Late spring through summer, especially during hot, dry spells
- Indoor overwintering areas with low humidity
- Greenhouses or grow rooms lacking good air circulation
Focus your inspection on:
- Undersides of leaves, where mites congregate and lay eggs
- New growth and older leaves-mites will target both as the infestation spreads
- Lower canopy of dense foliage, which creates the warm microclimate they love
Inspect weekly using a magnifying lens or by tapping a leaf over a white sheet of paper and watching for crawling specs.
Visual Symptoms of Spider Mite Damage
Here are the most common signs to look for:
1. Fine Stippling or Speckling on Leaves
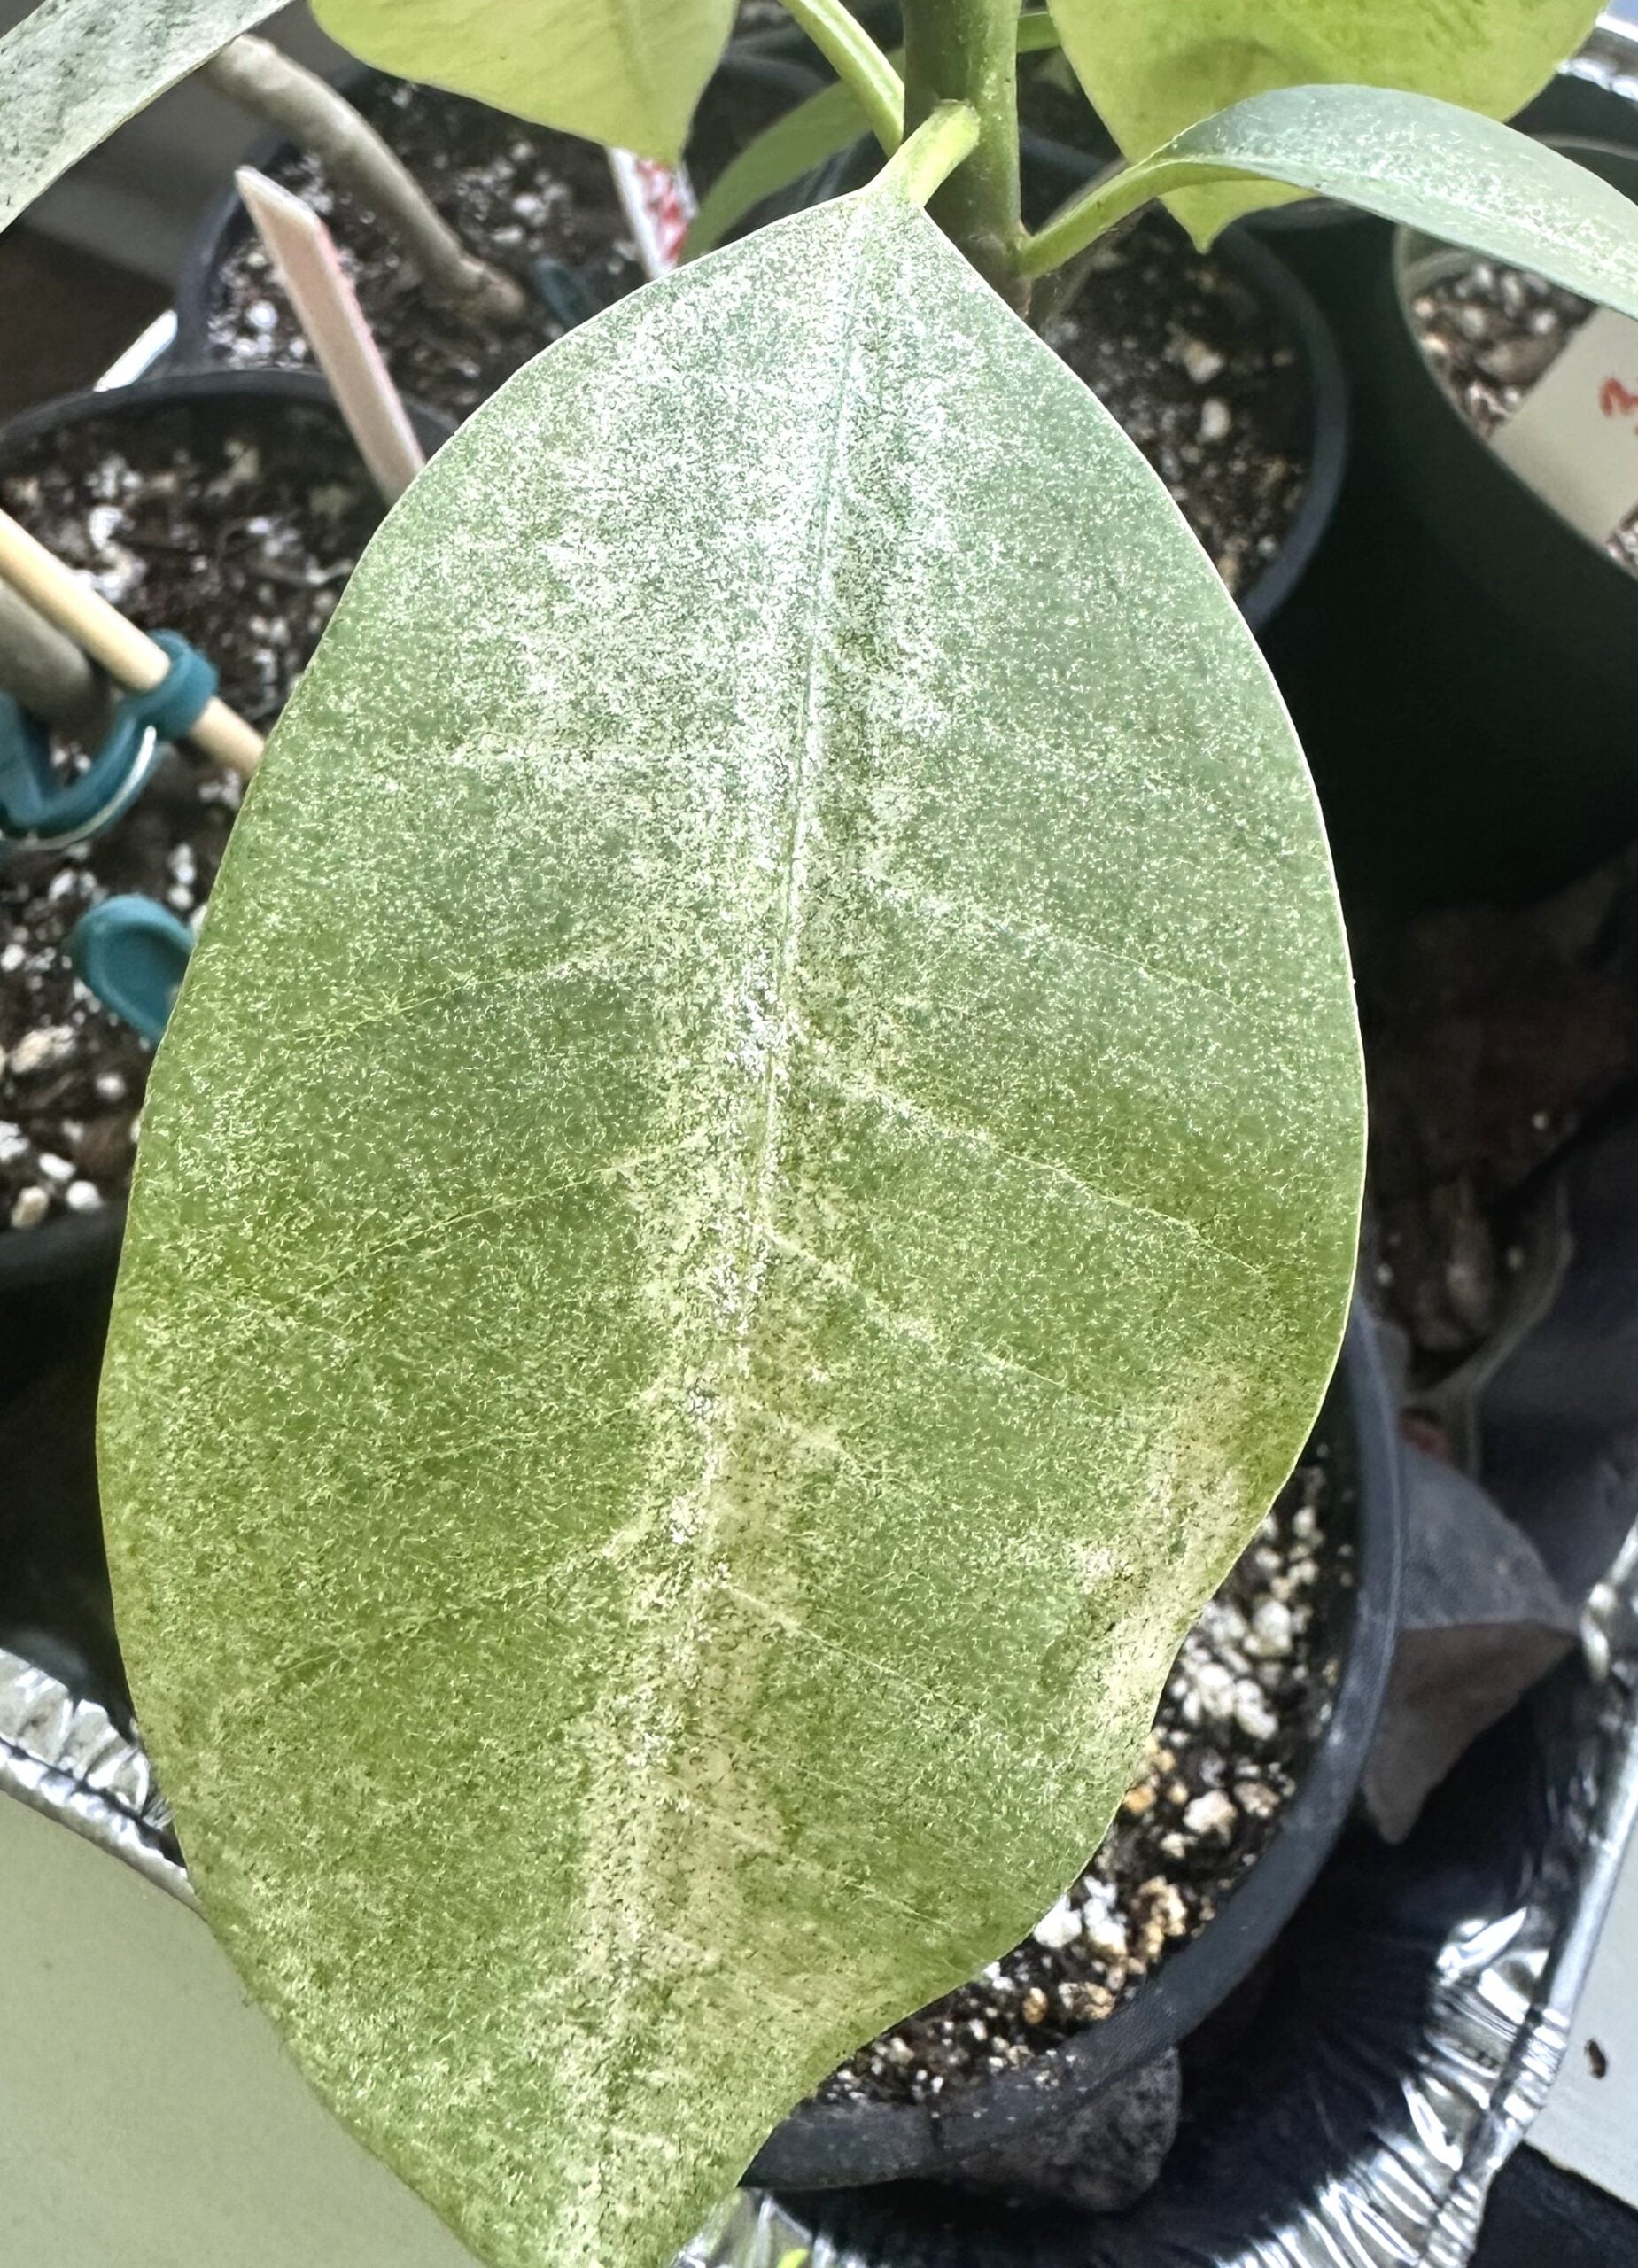
This is usually the first noticeable symptom. The tops of leaves develop a dusty or mottled appearance-tiny yellow or white dots from where mites have punctured the leaf surface.
2. Rusty or Bronze Tint
As damage progresses, leaves begin to take on a bronze or rusty hue, especially near the edges and between veins.
3. Webbing
Fine, silken threads may be visible between the undersides of leaves, around petioles (leaf stems), or along growing tips. This webbing is how spider mites earned their name.
Tip: Webbing means the infestation is moderate to severe. If you see webbing, act immediately.
4. Curling or Wilting
In more advanced cases, leaves begin to curl inward or droop from dehydration. This is especially true if mite damage disrupts the plant’s water balance.
5. Premature Leaf Drop
Leaves will yellow and fall off earlier than normal. Heavy mite populations can defoliate a plumeria, weakening it before it can bloom.
6. Blackened Tips or Dieback
In some cases-especially with six-spotted mites-feeding damage can lead to tip abscission, where the terminal growth drops off, mimicking fungal black tip rot.
Step-by-Step Identification Process
- Visually inspect your plumeria each week-especially in warm, dry weather.
- Look for stippling or dusty discoloration on the top of leaves.
- Check leaf undersides with a magnifying glass for crawling mites or eggs.
- Shake a leaf over a sheet of white paper. Watch for tiny moving specs.
- Look for fine webbing, especially at the joints and undersides.
- Check for leaf curl, bronze tint, or premature drop.
- Confirm diagnosis before treatment. If unsure, isolate and observe closely for a day or two.
What to Do If You Suspect Spider Mites
Once you’ve identified spider mite symptoms, early action is key:
- Isolate the affected plant (if potted) to prevent spread.
- Spray foliage with a strong jet of water, especially undersides of leaves. Repeat daily if needed.
- Apply insecticidal soap or horticultural oil (like neem or canola oil) every 7 days until the infestation subsides.
- Introduce predatory mites (e.g., Phytoseiulus persimilis) if growing in a greenhouse or enclosed space.
- Remove severely damaged leaves to reduce egg and mite populations.
Prevention Tips
- Keep humidity levels up during dry periods.
- Canopy-rinse plants weekly in hot weather, and 2-3 times per week during peak mite pressure; aim the spray at leaf undersides where mites feed and lay eggs.
- Maintain airflow between plants by pruning or spacing pots.
- Don’t over-fertilize with high-nitrogen products (tender growth attracts mites).
- Quarantine new plants for a few days before adding them to your collection.
Conclusion
Spider mites are sneaky and destructive, but with sharp observation and early action, you can catch and control them before they cause major damage. Learning to recognize stippling, webbing, and bronzing on your plumeria is the first defense. Weekly inspections, canopy rinses, and preventive sprays during warm months will protect your plant’s health and help ensure a long, beautiful blooming season.
Confirming Spider Mites on Plumeria
Spider mites are most likely when stippling or bronzing begins on older or lower leaves during hot, dry, dusty, or protected conditions. Confirmation matters because similar leaf speckling can also come from nutrient stress, sun stress, residue, or old weather damage.
- Inspect the underside of leaves, especially along veins and near the midrib.
- Look for tiny moving specks, fine webbing, dull or dusty-looking leaves, and yellow-white stippling.
- Tap a suspect leaf over white paper and watch for tiny moving dots.
- Check nearby plants because mites often spread through a collection before symptoms become obvious.
- Do not rely on top-of-leaf symptoms alone; underside inspection is the stronger confirmation step.
Photo note: plumeria-specific spider mite photos are especially useful when they show the underside of leaves, early stippling, webbing, and recovery after control.
How to confirm spider mite damage
- Look under leaves with a hand lens, especially along the midrib and side veins.
- Tap a leaf over white paper; tiny moving specks support a mite diagnosis.
- Check for fine webbing, pale stippling, bronze or dusty-looking leaves, and damage that often starts on older or lower leaves.
- Compare the damage pattern with broad mite injury. Twisted new tips suggest broad mites or cyclamen mites more than ordinary spider mites.
Do not rely on leaf color alone. Water stress, nutrient imbalance, sun stress, residue, and spray injury can all mimic part of the pattern.
Related Guides
- How to Treat Spider Mites on Plumeria (Organic & Chemical Methods)
- Plumeria Spider Mites (Seasonal and Year-Round Tips)
- Seasonal Spider Mite Checklist for Plumeria Growers
- Treatment Safety Checklist
- Pest & Disease Identification Guide
Help Improve This Photo Reference
If you have a clear plumeria photo of spider mite damage, you can help improve this guide. The most useful photos show leaf undersides along the veins, stippling or bronzing, fine webbing, and a wider photo showing the whole plant or affected branch.
Submit a photo for review. Photos are not published automatically; they are checked for permission, plant context, and diagnostic accuracy before being used.