
The Plumeria Pests and Diseases Guide is an essential resource for identifying, preventing, and treating the most common threats to plumeria plants, including pests, fungi, and environmental stressors. This guide offers detailed information on how to recognize early signs of trouble, from insect infestations to fungal infections, and provides practical solutions to address these issues. It also covers strategies for managing environmental factors such as excessive humidity, temperature fluctuations, and poor soil conditions, which can weaken plumeria. With expert tips on natural and chemical treatments, as well as proactive care practices, this guide ensures your plumeria remains healthy, resilient, and free from common ailments, allowing it to thrive season after season.
Mites on Plumeria: Spider Mites, Rust Mites, Broad Mites, and Cyclamen Mites
What to check next
This guide helps you confirm that a living pest is present, identify where it is feeding, and choose a measured response without treating inactive damage. Read the detailed explanation, then use this sequence to decide what to do.
Confirm the evidence for microscopic mites
- Look for
- Bronzing, rough or distorted new growth, shortened internodes, and active mites or eggs found with strong magnification.
- Compare with
- Thrips, herbicide exposure, nutrient problems, sun injury, and ordinary spider mites may overlap visually.
- Safest first response
- Confirm the affected tissue and mite type before selecting a labeled miticide; many general insecticides do not control mites.
Microclimate clue: Warm protected growth can favor rapid mite buildup, while rain and overhead rinsing may temporarily reduce exposed populations.
- 1
Inspect before treating
Use bright light and magnification on leaf undersides, tips, petioles, stems, and the soil line.
- 2
- 3
Identify the feeding pattern
Separate sucking, chewing, mining, boring, and root-zone damage.
- 4
Start with the least disruptive action
Isolate, wash, and use only a treatment labeled for the confirmed pest and plant.
- 5
Repeat the inspection
Eggs or protected life stages can survive the first response, so follow-up checks matter.
How microclimate changes this answer
Dry heat favors mites, protected humid growth favors some scale and mealybugs, and wet shade increases snail and slug activity.
Compare this insect or pest pattern with healthy growth
Use these references to confirm that this article matches the visible pattern before changing care or applying a treatment.
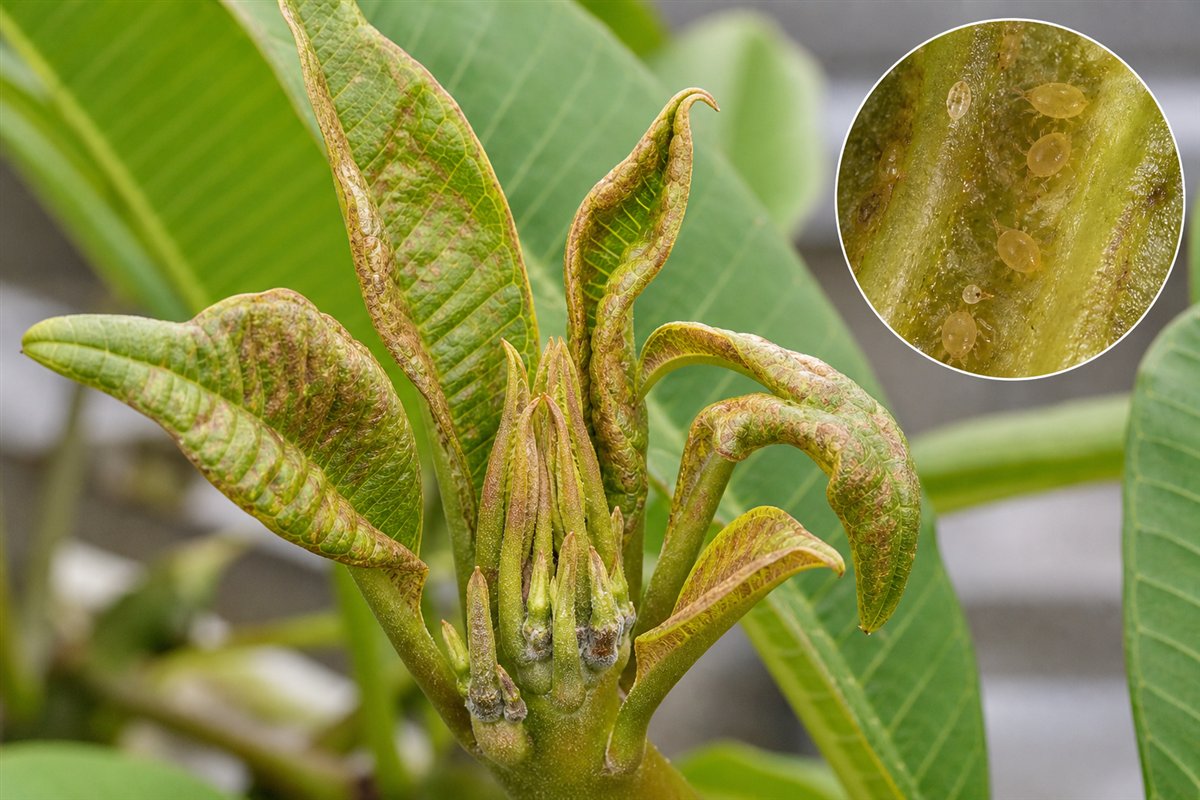 Condition reference
 Healthy baseline
- LocationCheck which plant part, age of growth, and exposed or protected side is affected.
- TextureDecide whether the evidence is dry, powdery, sticky, raised, translucent, soft, or intact.
- ProgressionPhotograph the same area so you can tell whether the pattern is stable, improving, or spreading.
Use more than one clue. Confirm the photo with recent conditions, roots, watering history, and the rest of the plant before acting.
Rust, broad, and cyclamen mites decision path: Confirm the defining evidence before treating.
- Confirm: Use magnification and symptom location. Broad or cyclamen mites often distort tender tips; rust mites can cause bronzing or russeting. Spider mites more often produce stippling and sometimes webbing. Nutrient, herbicide, and weather injury can mimic distortion.
- Start conservatively: Isolate when practical, photograph the newest affected tissue, and seek magnified confirmation before using a miticide. Many general insecticides do not control mites and may reduce beneficial predators.
- Escalate only when justified: Use only a product labeled for the confirmed pest and treatment site. Follow the label for interval, coverage, temperature, protective equipment, and maximum applications.
- Protect flowers and beneficial insects: Avoid treating open blooms or applying while pollinators are active.
- Monitor: Inspect the newest growth every 3 to 4 days. If treatment is justified, repeat only at the product-label interval because eggs and protected stages may survive.
Microclimate check: Consider recent weather, plant stage, container or in-ground culture, airflow, and saved growing-area conditions. This is a logical response based on evidence, not a guaranteed diagnosis.
Use this guide path: Identify and Manage
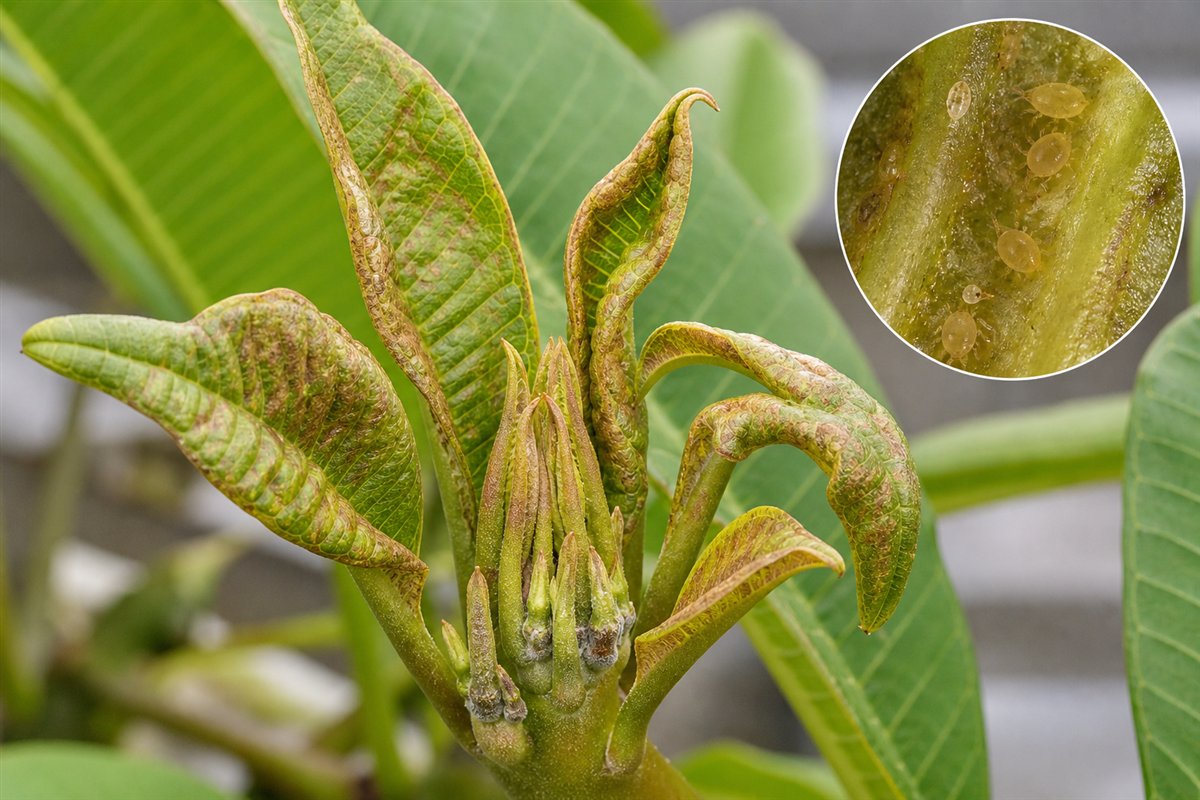
Use this hub when plumeria leaves look dusty, speckled, bronzed, webbed, curled, distorted, roughened, or weakened but obvious insects are hard to find. Mite problems overlap with nutrient stress, water stress, fungal rust, sun stress, and pesticide burn, so diagnosis should start with where the damage appears and whether mites are active now.
Where This Page Fits
Mite overview and symptom sorter. Start here when leaves look dusty, stippled, bronzed, webbed, curled, distorted, or roughened but the exact mite problem is not clear yet.
- Use Spider Mite Damage on Plumeria for stippling, webbing, dusty leaves, and leaf drop. Use Rust Mites on Plumeria for bronzing, roughened surfaces, and mite damage that can be confused with rust. Once mites are confirmed, move to How to Treat Spider Mites on Plumeria or the specific mite article that best matches the symptoms.
Mites are not one diagnosis. Spider mites usually cause stippling, bronzing, moving specks, and sometimes webbing, while broad and cyclamen mites more often distort tender new growth and are difficult to confirm without strong magnification. Use the path that matches the evidence you can actually see.
Compare Mite Groups Before Treating
| Possible mite | Typical field pattern | Confirmation strength |
|---|---|---|
| Spider mites | Pale stippling, bronzing, moving specks, eggs, and sometimes fine webbing, especially beneath leaves | A white-paper tap test and hand lens can often confirm moving mites. Webbing strongly supports spider mites but may appear late. |
| Rust mites | Fine russeting, bronzing, roughened or scarred surfaces, and declining leaf quality without obvious webbing | They are extremely small. Strong magnification or expert examination is more reliable than symptoms alone. |
| Broad mites | Distorted, hardened, cupped, bronzed, or stunted new growth concentrated near tender tips | Symptoms overlap with thrips, herbicide or spray injury, heat, and nutrition. Microscopic confirmation is preferred. |
| Cyclamen mites | Stunted or twisted tender leaves and buds, often hidden in folds and protected new growth | These mites are difficult to see with a normal hand lens. Expert or microscopic confirmation is preferred. |
| No mite confirmed | Uniform scorch, fertilizer burn, edema, root stress, sun injury, or distortion after a recent treatment | Review timing, roots, weather, and products before applying a miticide. |
Mites are not insects, and an insecticide does not automatically control them. Choose a product only when the label includes the target mite, plant or use site, and application method.
Start Here
- Identify spider mite damage when leaves show stippling, bronzing, webbing, and tiny moving specks under leaves.
- Treat spider mites when active mites are confirmed and canopy rinsing, isolation, or targeted treatment is needed.
- Identify rust mite-like damage when leaves look bronzed, russeted, or roughened without orange fungal rust spores.
- Use the disease symptom checklist when fungal rust, mites, mildew, sunburn, or nutrient stress overlap.
Mite Types Found or Suspected on Plumeria
- Sixspotted spider mite (Eotetranychus sexmaculatus): an important mite associated with plumeria. Look for yellow speckling, bronzing, leaf drop, weak new growth, and damage under leaves near veins.
- Twospotted spider mite (Tetranychus urticae): a common ornamental pest that can attack plumeria, especially in hot, dry, dusty, protected, or stressed conditions.
- Red spider mites: a grower term that may refer to several reddish spider mites. Look for bronzing, pale dots, dusty leaves, webbing, and leaf drop.
- Rust mites: tiny eriophyid-type mites that can create bronzing, russeting, or roughened surfaces and can be confused with fungal rust.
- Broad mites (Polyphagotarsonemus latus): microscopic mites that usually damage tender new growth, causing distorted, hardened, shiny, curled, or stunted tips.
- Cyclamen mites (Phytonemus pallidus): microscopic mites that can damage tender tissue, buds, and tight new growth on many ornamentals.
Russet mites and bulb mites: terms you may see
Older or generic gardening articles may mention russet mites or bulb mites. On plumeria, growers more often need to separate spider mites, rust mite-like damage, broad mites, cyclamen mites, fungal rust, and stress damage. Russeting describes a bronzed or roughened symptom pattern, while bulb mites are not a primary plumeria leaf pest. If damage begins below the soil line or in decaying media, use the soil-dwelling pest and root-zone guides before assuming a foliage mite problem.
Quick Diagnosis Difference
- Spider mites: stippling, bronzing, dull leaves, fine webbing, leaf drop, and tiny moving dots under leaves.
- Rust mite-like damage: bronzing or russeting without orange fungal spores.
- Broad or cyclamen mites: distorted new growth, curled young leaves, stunted tips, and damaged buds.
- Plumeria rust fungus: orange or yellow powdery pustules, usually on leaf undersides.
How to Confirm Mites
- Inspect the underside of leaves, especially along veins.
- Tap leaves over white paper and look for tiny moving dots.
- Use a hand lens or magnification when possible.
- Compare older leaves with new growth to see whether damage is still spreading.
- Check recent conditions: heat, drought stress, dust, crowding, greenhouse or patio protection, and lack of rain.
Canopy rinsing matters. Spraying the foliage with water is different from watering the soil. A firm rinse of leaf undersides can physically reduce mite pressure, remove dust, and slow population buildup, especially from late June until cooler weather returns.
Mite Confirmation Notes
Mite symptoms overlap with rust, dust, nutrient stress, sun stress, spray residue, and general leaf aging. The best diagnosis comes from combining the visible pattern with an underside leaf inspection.
- Spider mites usually cause fine stippling, bronzing, dusty-looking leaves, webbing in heavier cases, and leaf drop.
- Rust mites usually cause bronzing or rusty-looking damage without the orange powdery pustules of true plumeria rust.
- Broad mites and cyclamen mites are more associated with distorted tender growth, tight tips, curled new leaves, and damaged buds.
- Use a hand lens when possible, and check the underside of leaves near veins and protected areas.
- The white-paper tap test can help confirm moving mites on spider-mite-suspect leaves.
Photo note: more plumeria-specific mite photos are still needed, especially underside views, webbing, rust mite bronzing, and distorted new growth. See the Plumeria Pest & Disease Photo Contribution Guide.
Diagnostic differences between mite groups
Mite damage can look similar at first glance, so separate the pattern of damage before choosing a treatment.
- Sixspotted spider mite (Eotetranychus sexmaculatus): one of the more important mite problems on plumeria; check the underside of leaves, especially near veins, for stippling, bronzing, weak tips, and early leaf drop.
- Twospotted spider mite (Tetranychus urticae): often increases during hot, dry, dusty, or protected conditions; fine webbing, dull leaves, speckling, and bronzing are common clues.
- Broad mite (Polyphagotarsonemus latus): usually damages tender new growth more than older leaves; look for twisted, hardened, shiny, or stunted tips.
- Cyclamen mite (Phytonemus pallidus): also favors tender tissue and can cause tight, distorted growth that may be mistaken for virus, herbicide injury, or nutrient stress.
As a quick rule, spider mites usually point to stippling, bronzing, webbing, and leaf drop. Broad mites and cyclamen mites usually point to distorted new growth and damaged tips.
Related Guides
- How to Identify Spider Mite Damage on Plumeria
- How to Treat Spider Mites on Plumeria (Organic & Chemical Methods)
- Plumeria Spider Mites (Seasonal and Year-Round Tips)
- How to Identify Rust Mites on Plumeria
- How to Treat Rust Mites on Plumeria (Organic & Chemical Control Options)
- Sap-Sucking Pest Checklist: How to Spot Mites, Mealybugs, Scale, Aphids, and Whiteflies
Turn the explanation into an action plan
- Monitor
- Check the same marked leaves and nearby plants every three to seven days until no active pests or fresh damage remain.
- Change one thing
- Make the smallest justified correction, record the date, and avoid stacking treatments before you can see which one helped.
- Escalate when needed
- Seek local diagnostic help when damage accelerates despite treatment, borers enter major stems, or the pest cannot be identified.