
The Plumeria Pests and Diseases Guide is an essential resource for identifying, preventing, and treating the most common threats to plumeria plants, including pests, fungi, and environmental stressors. This guide offers detailed information on how to recognize early signs of trouble, from insect infestations to fungal infections, and provides practical solutions to address these issues. It also covers strategies for managing environmental factors such as excessive humidity, temperature fluctuations, and poor soil conditions, which can weaken plumeria. With expert tips on natural and chemical treatments, as well as proactive care practices, this guide ensures your plumeria remains healthy, resilient, and free from common ailments, allowing it to thrive season after season.
Seasonal Spider Mite Checklist for Plumeria Growers
What to check next
This guide helps you confirm that a living pest is present, identify where it is feeding, and choose a measured response without treating inactive damage. Read the detailed explanation, then use this sequence to decide what to do.
Confirm the evidence for spider mites
- Look for
- Fine pale stippling that expands into bronzing, active mites or eggs on leaf undersides, and fine webbing in established infestations.
- Compare with
- Rust mites, thrips, dust, spray residue, drought stress, and natural leaf aging can create similar discoloration.
- Safest first response
- Isolate the plant, confirm activity with magnification, rinse leaf undersides, and use only a labeled control suited to the plant and temperature.
Microclimate clue: Hot, dry, dusty, protected locations can accelerate spider-mite reproduction and shorten the time between follow-up inspections.
- 1
Inspect before treating
Use bright light and magnification on leaf undersides, tips, petioles, stems, and the soil line.
- 2
- 3
Identify the feeding pattern
Separate sucking, chewing, mining, boring, and root-zone damage.
- 4
Start with the least disruptive action
Isolate, wash, and use only a treatment labeled for the confirmed pest and plant.
- 5
Repeat the inspection
Eggs or protected life stages can survive the first response, so follow-up checks matter.
How microclimate changes this answer
Dry heat favors mites, protected humid growth favors some scale and mealybugs, and wet shade increases snail and slug activity.
Compare this leaf pattern with healthy growth
Use these references to confirm that this article matches the visible pattern before changing care or applying a treatment.
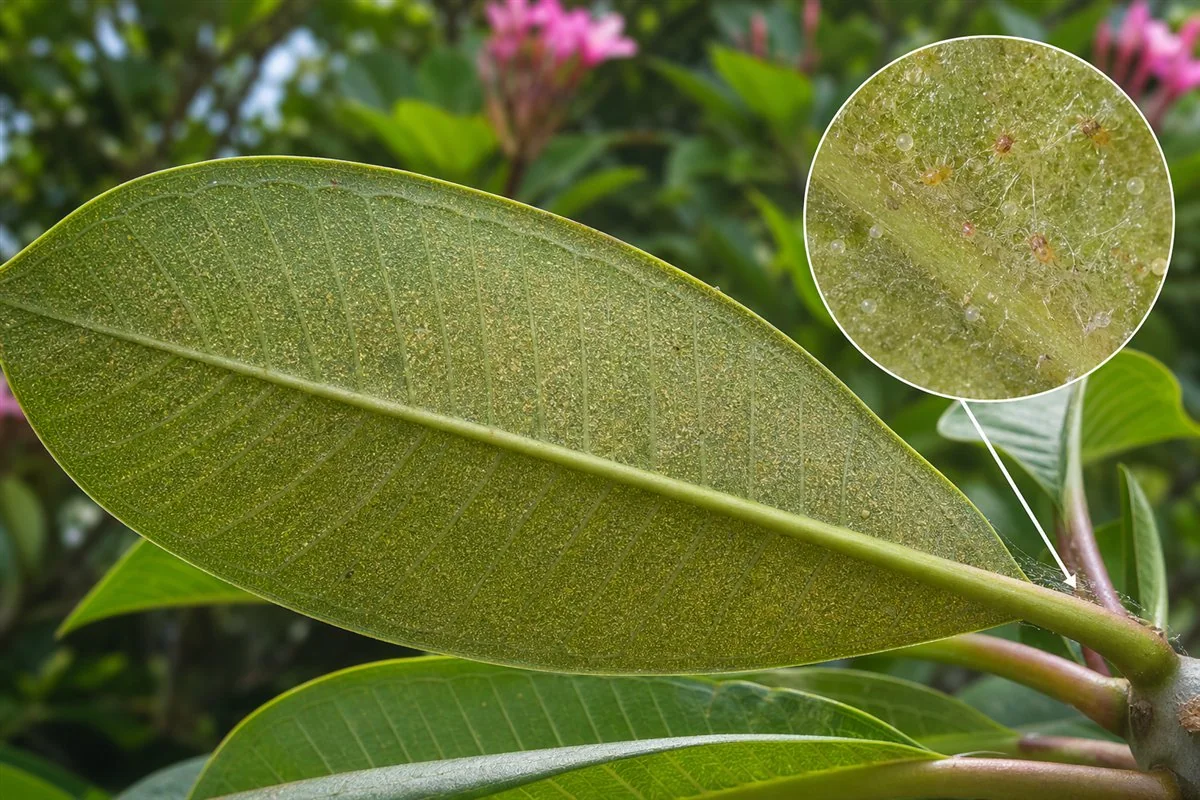 Condition reference
 Healthy baseline
- LocationCheck which plant part, age of growth, and exposed or protected side is affected.
- TextureDecide whether the evidence is dry, powdery, sticky, raised, translucent, soft, or intact.
- ProgressionPhotograph the same area so you can tell whether the pattern is stable, improving, or spreading.
Use more than one clue. Confirm the photo with recent conditions, roots, watering history, and the rest of the plant before acting.
Spider mites are a persistent and often invisible threat to plumeria health—especially during the warmer months. Because they reproduce rapidly in dry and dusty conditions, a single overlooked infestation can lead to significant leaf damage, bronzing, and even tip dieback. Fortunately, seasonal awareness and routine care can keep your plumeria spider mite-free.
Where This Page Fits
Spider mite monitoring checklist. Use this page as a recurring inspection checklist, especially during hot, dry, dusty weather or when plants are under cover.
- For diagnostic details, use How to Identify Spider Mite Damage on Plumeria. For treatment steps, use How to Treat Spider Mites on Plumeria. For the larger prevention strategy, use Plumeria Spider Mites Seasonal and Year-Round Tips.
Spider Mites Article Path
Use this group in order when possible: identify the problem, treat only when needed, then prevent repeat outbreaks or recurrence.
- Identify spider mite damage
How to Identify Spider Mite Damage on Plumeria - Treat spider mites
How to Treat Spider Mites on Plumeria (Organic & Chemical Methods) - Use seasonal mite guidance
Plumeria Spider Mites (Seasonal and Year-Round Tips) - Check seasonal mite timing
Seasonal Spider Mite Checklist for Plumeria Growers
Safety and diagnostics: before applying products, review the Treatment Safety Checklist. If symptoms do not match this group, return to the Pest & Disease Identification Guide.
This article provides an easy-to-follow, season-by-season checklist for identifying, preventing, and addressing spider mite issues before they become serious. Designed for beginners and experienced growers alike, it’s a tool to help you build a year-round defense.
Mite note: On plumeria, the most common practical spider mite problems are usually twospotted spider mite (Tetranychus urticae) and sixspotted spider mite (Eotetranychus sexmaculatus). Red spider mite is often a grower term for reddish spider mites rather than one exact species. If the newest growth is twisted, hardened, or bud-damaged instead of mostly stippled and bronzed, also consider broad mites (Polyphagotarsonemus latus) or cyclamen mites (Phytonemus pallidus) as look-alikes.
Spider Mite Guide Path
- Identify spider mite damage before treating.
- Treat active spider mites with rinsing, coverage, and follow-up inspection.
- Use seasonal prevention during hot, dry, dusty weather.
- Follow the seasonal checklist for routine monitoring.
Spring: Early Detection and Prevention Begins
Spring is when your plumeria begins to wake up from dormancy, pushing out new leaves and shoots. It’s also the ideal time to spot early pest activity.
Spring Checklist:
- Inspect new leaves weekly for stippling or dustiness
- Rinse foliage with water (undersides especially)
- Begin monthly neem oil or insecticidal soap spray
- Prune for airflow (remove crowded inner growth)
- Avoid high-nitrogen fertilizer during early flush
- Quarantine any new plants or cuttings for 7–10 days
- Watch for warm, dry spells – mites often emerge early
Tip: Early action in spring greatly reduces mite pressure during peak summer months.
Summer: Peak Risk Season
Hot, dry conditions make summer the most dangerous time for spider mite outbreaks. In many warm plumeria-growing regions, pressure often ramps up from late June and continues until cooler weather returns, so regular monitoring and consistent canopy-rinse prevention are critical.
Summer Checklist:
- Inspect all plumeria twice weekly for stippling or webbing
- Rinse the canopy with hose or sprayer 2-3 times per week, aiming at leaf undersides
- Continue neem oil or soap sprays every 10–14 days
- Apply horticultural oil if mites are spotted
- Keep the root zone evenly watered but well-drained to avoid drought stress without causing root problems
- Avoid pesticide sprays that harm beneficial mites
- Use shade cloth in extremely hot climates
- Monitor indoor or greenhouse plumeria daily
Canopy-rinse note: This means spraying the leaves and undersides to knock mites off the plant. It is separate from watering the soil, which should still be managed by drainage, pot size, and weather.
Tip: If webbing is visible, escalate to targeted miticides immediately.
Fall: Reduce Risk Before Dormancy
As temperatures begin to drop and days shorten, plumeria growth slows. This is the perfect time to clean up, inspect plants, and prepare them for dormancy.
Fall Checklist:
- Remove fallen leaves and debris from soil surface
- Rinse plants one last time with strong spray
- Apply final neem oil or horticultural oil spray
- Inspect leaf undersides and branch tips for mites or eggs
- Cut back water and fertilizer to prepare for dormancy
- Check potted plumeria before moving indoors
- Set up sticky traps if overwintering indoors
Tip: Dormant mites can survive on branch bark. A thorough cleaning in fall limits spring reemergence.
Winter: Indoor Monitoring and Dormancy Support
While many plumeria go dormant in winter, those in warmer climates or indoor grow setups may retain foliage. Spider mites can still remain active under dry indoor conditions.
Winter Checklist:
- Mist indoor plumeria foliage weekly to maintain humidity
- Check for mites monthly, even on bare stems
- Keep overwintered plants in well-ventilated, dry conditions
- Use sticky traps to monitor for flying pests
- Gently wipe or spray branches if any mites are spotted
- Clean grow lights and surrounding areas regularly
- Avoid overwatering during dormancy
Tip: Dry, heated indoor air is ideal for mite survival. Humidity is your ally in winter.
✅ Printable Year-Round Spider Mite Prevention Summary
| Season | Weekly Task | Monthly Task | Prevention Focus |
|---|---|---|---|
| Spring | Inspect new leaves; hose spray | Neem or soap spray; pruning | Stop early populations from establishing |
| Summer | Inspect full plant; rinse often | Continue sprays; introduce airflow | Maintain control during peak mite season |
| Fall | Inspect & clean leaves, soil | Apply final spray; prep for dormancy | Prevent overwintering of mites |
| Winter | Mist foliage; inspect tips | Use traps; clean surroundings | Suppress mites in indoor or warm storage |
Conclusion
Spider mites don’t take a break—but with this seasonal checklist, you’ll stay several steps ahead. By implementing simple inspections, canopy rinses, organic sprays, and smart seasonal timing, you’ll keep your plumeria vibrant and healthy all year long. Print this checklist, set calendar reminders, and treat seasonal prevention as part of your plumeria success plan.
Canopy Spraying Matters
For spider mites, hosing or spraying the canopy is different from watering the soil. Spider mites live and feed on leaves, especially the undersides, so physical removal from the foliage can reduce populations before products are used.
- Use a firm but safe water spray on leaf tops, leaf undersides, petioles, and growing tips.
- Repeat regularly during hot, dry mite season, especially from late June until cooler weather in many warm regions.
- Let foliage dry with good airflow so mite control does not turn into a fungal disease problem.
- Follow canopy spraying with inspection, not guessing. If mites remain active, then choose the next treatment step.
Related Guides
- How to Identify Spider Mite Damage on Plumeria
- How to Treat Spider Mites on Plumeria (Organic & Chemical Methods)
- Plumeria Spider Mites (Seasonal and Year-Round Tips)
- Treatment Safety Checklist
- Pest & Disease Identification Guide
Turn the explanation into an action plan
- Monitor
- Check the same marked leaves and nearby plants every three to seven days until no active pests or fresh damage remain.
- Change one thing
- Make the smallest justified correction, record the date, and avoid stacking treatments before you can see which one helped.
- Escalate when needed
- Seek local diagnostic help when damage accelerates despite treatment, borers enter major stems, or the pest cannot be identified.