
The Plumeria Pests and Diseases Guide is an essential resource for identifying, preventing, and treating the most common threats to plumeria plants, including pests, fungi, and environmental stressors. This guide offers detailed information on how to recognize early signs of trouble, from insect infestations to fungal infections, and provides practical solutions to address these issues. It also covers strategies for managing environmental factors such as excessive humidity, temperature fluctuations, and poor soil conditions, which can weaken plumeria. With expert tips on natural and chemical treatments, as well as proactive care practices, this guide ensures your plumeria remains healthy, resilient, and free from common ailments, allowing it to thrive season after season.
How to Treat Leaf Miners on Plumeria
What to check next
This guide helps you confirm that a living pest is present, identify where it is feeding, and choose a measured response without treating inactive damage. Read the detailed explanation, then use this sequence to decide what to do.
Confirm the evidence for leaf miners
- Look for
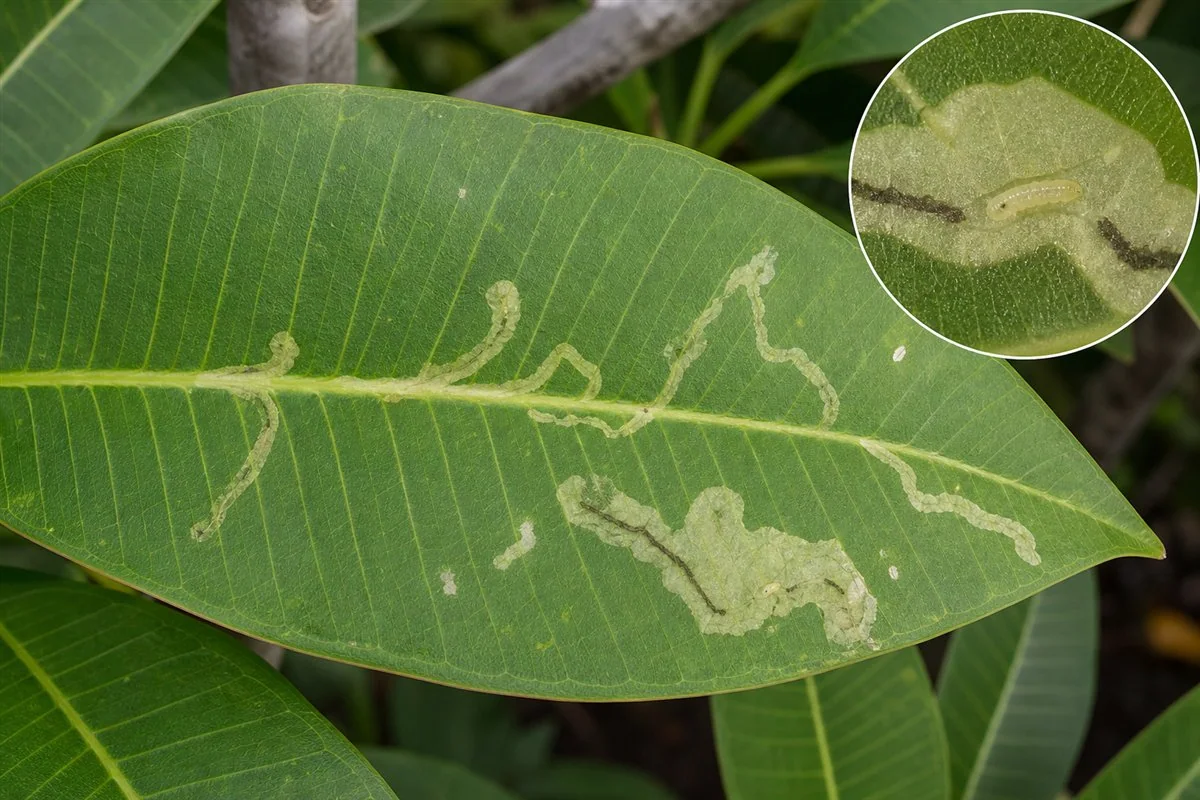
- Serpentine tunnels or expanding blotches within the leaf, often with a dark waste line or larva protected between surfaces.
- Compare with
- Fungal spots, physical scratches, edema, and surface-feeding insects do not create a continuous tunnel inside the leaf.
- Safest first response
- Remove a limited number of occupied leaves, inspect new growth, and target only the vulnerable stage if damage continues.
Microclimate clue: Warm periods can shorten generations; old mines remain visible after the insect has already left.
- 1
Inspect before treating
Use bright light and magnification on leaf undersides, tips, petioles, stems, and the soil line.
- 2
- 3
Identify the feeding pattern
Separate sucking, chewing, mining, boring, and root-zone damage.
- 4
Start with the least disruptive action
Isolate, wash, and use only a treatment labeled for the confirmed pest and plant.
- 5
Repeat the inspection
Eggs or protected life stages can survive the first response, so follow-up checks matter.
How microclimate changes this answer
Dry heat favors mites, protected humid growth favors some scale and mealybugs, and wet shade increases snail and slug activity.
Compare this leaf pattern with healthy growth
Use these references to confirm that this article matches the visible pattern before changing care or applying a treatment.
 Condition reference
 Healthy baseline
- LocationCheck which plant part, age of growth, and exposed or protected side is affected.
- TextureDecide whether the evidence is dry, powdery, sticky, raised, translucent, soft, or intact.
- ProgressionPhotograph the same area so you can tell whether the pattern is stable, improving, or spreading.
Use more than one clue. Confirm the photo with recent conditions, roots, watering history, and the rest of the plant before acting.
Leaf miners decision path: Confirm the defining evidence before treating.
- Confirm: Confirm winding tunnels or expanding blotches within the leaf, sometimes with a thin dark line of frass. Surface scars, chewing holes, and fungal spots are not mines.
- Start conservatively: Remove only heavily mined leaves when the plant has enough healthy foliage, seal discarded material, and monitor the next flush. Avoid removing large amounts of foliage from a stressed plant.
- Escalate only when justified: Use only a product labeled for the confirmed pest and treatment site. Follow the label for interval, coverage, temperature, protective equipment, and maximum applications.
- Protect flowers and beneficial insects: Avoid treating open blooms or applying while pollinators are active.
- Monitor: Inspect young leaves twice weekly during an active flush and distinguish old mines from fresh expanding trails.
Microclimate check: Consider recent weather, plant stage, container or in-ground culture, airflow, and saved growing-area conditions. This is a logical response based on evidence, not a guaranteed diagnosis.
Chewing and Leaf-Mining Pest Diagnostic Path
Use this path when plumeria leaves have holes, missing edges, skeletonized tissue, tunneling trails, blotches, frass, or overnight chewing. The bite pattern usually tells you which pest is active.
- Start with the pest and disease identification guide when symptoms are mixed or you are unsure whether the problem is insect, disease, or stress.
- Check caterpillars and frangipani worm when leaves disappear quickly, frass collects below leaves, or large larvae are visible.
- Check beetles when damage appears as night chewing, flower chewing, or irregular holes without tunnels.
- Check grasshoppers when large edge chunks, ragged missing sections, or jumping insects are present.
- Check snails and slugs when chewing appears overnight with slime trails, especially in damp or shaded areas.
- Check leaf miners when damage stays inside the leaf as pale winding trails, blotches, or tunnels.
Why it matters: Caterpillars, grasshoppers, beetles, slugs, and leaf miners all remove leaf tissue, but the best response is different for each one. Correct identification prevents wasted treatment and protects helpful insects.
Leaf Miner Guide Path
- Identify leaf miners when damage appears as winding trails, pale tunnels, blotches, or dark frass lines inside the leaf.
- Treat leaf miners when new mines are spreading on important young plants or heavy damage is reducing useful leaf area.
- Prevent leaf miners by monitoring new flushes, removing badly mined leaves when practical, and protecting beneficial insects that attack miner larvae.
Leaf miner treatment is different from treating open chewing damage. The larva feeds inside the leaf, so treatment decisions should be based on whether mines are new, spreading, and important enough to justify action.
Leaf Miners Article Path
Use this group in order when possible: identify the problem, treat only when needed, then prevent repeat outbreaks or recurrence.
- Identify leaf miners
How to Identify Leaf Miners on Plumeria - Treat leaf miners
How to Treat Leaf Miners on Plumeria - Prevent leaf miners
How to Prevent Leaf Miners on Plumeria
Safety and diagnostics: before applying products, review the Treatment Safety Checklist. If symptoms do not match this group, return to the Pest & Disease Identification Guide.
Before Applying Any Product
Use this article after the pest or disease has been identified. Before applying oils, soaps, sprays, drenches, fungicides, insecticides, miticides, systemics, copper, sulfur, peroxide products, biological products, or homemade mixtures, check the safety and application-method pages below.
- Treatment Safety Checklist
- Soil Drenches, Sprays, and Foliar Applications
- How to Mix and Apply Garden Products Safely
- When to Treat vs. Monitor Plumeria Pests
Why: the same product can help or harm depending on plant stress, weather, concentration, coverage, timing, beneficial insects, and whether the problem is active.
A few mines on older leaves usually do not require aggressive treatment. Heavy mining on seedlings, small plants, or important new flushes deserves closer attention because it removes useful leaf area.
Treat Active Mines, Not Old Trails
Leaf miner larvae are protected between the leaf surfaces. A visible trail may remain long after the larva has left, died, or become a pupa, so confirm that mines are fresh and expanding before treating.
| What you find | Preferred response | Important limit |
|---|---|---|
| Old dry mines that are not expanding | Monitor new leaves and photograph the old damage. | Spraying old trails will not repair the leaf or prove control. |
| One or a few active mines on a mature plant | Remove only the affected leaves when the plant has enough healthy foliage, or carefully destroy a visible larva without removing the whole leaf. | Do not strip a small plant or seedling of the leaves it needs for photosynthesis. |
| Active mines remain limited while parasitoid wasps are present | Protect the natural enemies and continue scheduled inspections. | Broad-spectrum insecticides can kill parasitoids and allow later outbreaks. |
| Fresh mines are increasing on new growth | Consider a selective product labeled for leaf miners, the plant or use site, and the active life stage. | Coverage, timing, repeat limits, and whether the product moves into leaf tissue determine effectiveness. |
| Spinosad is being considered | Use it only when the current label permits the target and site and lower-impact steps are insufficient. | Protect pollinators and beneficial insects and follow all bloom, drying, reentry, and repeat restrictions. |
| Seedling or newly rooted plant has active mines | Isolate, protect healthy leaf area, and test any permitted treatment on a small area or small group first. | Young leaves are sensitive, and treatment injury can be worse than limited mining. |
Best First Steps
- Remove heavily mined leaves when practical. The why: if larvae are still inside, removal can reduce the active population.
- Do not remove every lightly marked leaf. The why: plumeria need leaves for energy, and minor cosmetic damage may not justify defoliation.
- Check for fresh mines. The why: old mines stay visible after the insect is gone.
- Protect beneficial insects. The why: tiny parasitoid wasps and other natural enemies often help suppress leaf miners.
When Treatment May Be Worthwhile
- New mines appear repeatedly on fresh leaves.
- A small plant or seedling is losing too much functional leaf area.
- Mining is spreading across a group of container plants.
- Leaves are dropping early because mining is heavy.
If a product is considered, use only one labeled for leaf miners on the plant and site being treated, and read the label carefully. Many contact sprays work poorly after larvae are protected inside leaf tissue. Timing matters because exposed adults, eggs, or very young larvae are easier to affect than older larvae already deep in a mine.
What Not to Do
- Do not spray repeatedly without confirming new active mines. The why: old tunnels remain as scars.
- Do not strip a plant bare to remove cosmetic mining. The why: leaves feed the plant, and excessive leaf removal can slow recovery.
- Do not use broad controls casually. The why: leaf miner natural enemies are often more sensitive than the pest.
Follow-Up
- Mark or photograph affected leaves so you can tell old mines from new ones.
- Check new leaves weekly during active flushes.
- Improve plant vigor with correct watering, drainage, and nutrition rather than relying only on treatments.
- Use the treat vs. monitor guide when damage is minor.
Treat Active Mines Without Stripping the Plant
Confirm fresh mines or a living larva before treating. Old tunnels and blotches remain visible after control, so judge success by healthy new leaves and the absence of expanding mines.
| Situation | Logical next step |
|---|---|
| One or a few old, inactive mines | Monitor new leaves. Treatment is usually unnecessary when the trail is no longer expanding and no larva remains. |
| A few fresh mines on an established plant | Remove and seal only the actively mined leaves when the plant can spare them. Do not strip a small, stressed, newly rooted, or sparsely leafed plant merely to remove cosmetic damage. |
| Repeated active mining | Protect leaf-miner parasitoid wasps and other beneficial insects. Contact soaps and oils may affect exposed adults or eggs when labels permit, but they do not reliably reach larvae protected inside the leaf. |
| Continuing, damaging infestation | A labeled selective product such as spinosad or azadirachtin may be considered when permitted for the pest and ornamental use site. Timing against early stages matters. Follow bloom and pollinator restrictions exactly. |
| Severe, confirmed damage that persists | Use a systemic or broader chemical option only as a last resort and only when specifically labeled for the leaf miner and intended use site. Protect pollinators and parasitoids and prevent runoff. |
Do not combine products or increase rates to compensate for larvae being inside the leaf. Reinspect current growth after the labeled interval before repeating treatment.
Continue with the Complete Leaf Miner Guide
Use the complete guide to move from identification to treatment, prevention, and rechecking without losing your place.
Related Guides
- How to Identify Leaf Miners on Plumeria
- How to Prevent Leaf Miners on Plumeria
- Treatment Safety Checklist
- Beneficial Insects for Plumeria Pest Management
- Pest & Disease Identification Guide
Turn the explanation into an action plan
- Monitor
- Check the same marked leaves and nearby plants every three to seven days until no active pests or fresh damage remain.
- Change one thing
- Make the smallest justified correction, record the date, and avoid stacking treatments before you can see which one helped.
- Escalate when needed
- Seek local diagnostic help when damage accelerates despite treatment, borers enter major stems, or the pest cannot be identified.