
The Plumeria Pests and Diseases Guide is an essential resource for identifying, preventing, and treating the most common threats to plumeria plants, including pests, fungi, and environmental stressors. This guide offers detailed information on how to recognize early signs of trouble, from insect infestations to fungal infections, and provides practical solutions to address these issues. It also covers strategies for managing environmental factors such as excessive humidity, temperature fluctuations, and poor soil conditions, which can weaken plumeria. With expert tips on natural and chemical treatments, as well as proactive care practices, this guide ensures your plumeria remains healthy, resilient, and free from common ailments, allowing it to thrive season after season.
How to Identify Grasshopper Damage on Plumeria
What to check next
This guide helps you confirm that a living pest is present, identify where it is feeding, and choose a measured response without treating inactive damage. Read the detailed explanation, then use this sequence to decide what to do.
Confirm the evidence for grasshoppers and katydids
- Look for
- Large uneven bites from leaf margins, missing flower tissue, and mobile chewing insects active by day or evening.
- Compare with
- Caterpillars, beetles, snails, slugs, and physical tearing can overlap, but leave different trails, frass, or edge patterns.
- Safest first response
- Inspect during the time damage is fresh, hand-remove isolated insects, and manage nearby vegetation if repeated feeding continues.
Microclimate clue: Dry weather and nearby grasses or weeds can increase movement into plumeria plantings.
- 1
Inspect before treating
Use bright light and magnification on leaf undersides, tips, petioles, stems, and the soil line.
- 2
- 3
Identify the feeding pattern
Separate sucking, chewing, mining, boring, and root-zone damage.
- 4
Start with the least disruptive action
Isolate, wash, and use only a treatment labeled for the confirmed pest and plant.
- 5
Repeat the inspection
Eggs or protected life stages can survive the first response, so follow-up checks matter.
How microclimate changes this answer
Dry heat favors mites, protected humid growth favors some scale and mealybugs, and wet shade increases snail and slug activity.
Compare this insect or pest pattern with healthy growth
Use these references to confirm that this article matches the visible pattern before changing care or applying a treatment.
 Condition reference
 Healthy baseline
- LocationCheck which plant part, age of growth, and exposed or protected side is affected.
- TextureDecide whether the evidence is dry, powdery, sticky, raised, translucent, soft, or intact.
- ProgressionPhotograph the same area so you can tell whether the pattern is stable, improving, or spreading.
Use more than one clue. Confirm the photo with recent conditions, roots, watering history, and the rest of the plant before acting.
Grasshoppers decision path: Confirm the defining evidence before changing care or applying a product.
- Confirm: Look for large irregular bites from leaf margins and directly observe a grasshopper, especially during morning warmth. Similar chewing without the insect may come from beetles or caterpillars.
- Start conservatively: Hand-remove when practical, protect young plants with suitable screening, and reduce unmanaged weeds or hiding cover immediately around containers without stripping beneficial habitat from the wider garden.
- Escalate carefully: Use a pesticide, bait, biological control, or root treatment only when it is labeled for the pest and treatment site. Follow every dilution, timing, temperature, protective-equipment, and maximum-application direction.
- Protect the plant and garden: Avoid open blooms and pollinator activity, test foliar products on a small area, and never combine treatments unless both labels allow it.
- Monitor: Inspect early morning for a week and compare marked old damage with fresh feeding.
Growing-condition check: Use recent rain, heat, humidity, wind, plant stage, pot or in-ground status, and the saved microclimate as supporting evidence. This is a logical response based on the observations, not a guaranteed diagnosis.
Chewing and Leaf-Mining Pest Diagnostic Path
Use this path when plumeria leaves have holes, missing edges, skeletonized tissue, tunneling trails, blotches, frass, or overnight chewing. The bite pattern usually tells you which pest is active.
- Start with the pest and disease identification guide when symptoms are mixed or you are unsure whether the problem is insect, disease, or stress.
- Check caterpillars and frangipani worm when leaves disappear quickly, frass collects below leaves, or large larvae are visible.
- Check beetles when damage appears as night chewing, flower chewing, or irregular holes without tunnels.
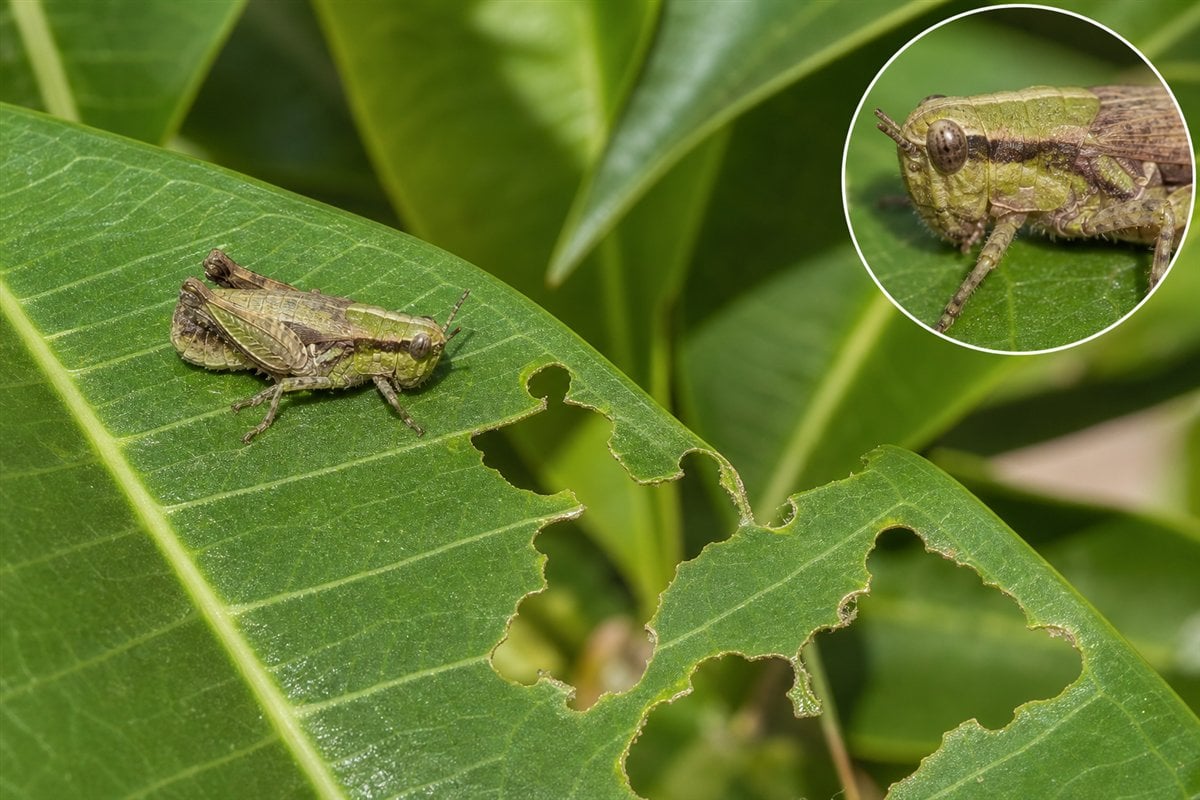
- Check grasshoppers when large edge chunks, ragged missing sections, or jumping insects are present.
- Check snails and slugs when chewing appears overnight with slime trails, especially in damp or shaded areas.
- Check leaf miners when damage stays inside the leaf as pale winding trails, blotches, or tunnels.
Why it matters: Caterpillars, grasshoppers, beetles, slugs, and leaf miners all remove leaf tissue, but the best response is different for each one. Correct identification prevents wasted treatment and protects helpful insects.
Grasshoppers and related chewing insects can damage plumeria by removing large pieces of leaf tissue. Their feeding usually looks rougher and more irregular than leaf miner trails or mite stippling. The key is to connect the damage pattern with direct evidence of grasshoppers nearby.
Grasshoppers Article Path
Use this group in order when possible: identify the problem, treat only when needed, then prevent repeat outbreaks or recurrence.
- Identify grasshopper damage
How to Identify Grasshopper Damage on Plumeria - Treat grasshoppers
How to Treat Grasshoppers on Plumeria - Prevent grasshoppers
How to Prevent Grasshoppers on Plumeria
Safety and diagnostics: before applying products, review the Treatment Safety Checklist. If symptoms do not match this group, return to the Pest & Disease Identification Guide.
Identity note: Grasshoppers belong to the order Orthoptera. Many species feed on a wide range of plants, so exact species identification is usually less important for home growers than confirming the chewing pattern, timing, and source area.
Grasshopper Guide Path
- Identify grasshopper damage when leaves have ragged missing edges, large chunks, or damage that begins near weedy edges.
- Treat grasshoppers when active insects are feeding and young plants or new leaves are being damaged.
- Prevent grasshopper damage by managing nearby weeds, monitoring warm dry periods, and protecting vulnerable plants before populations build.
Confirm the Insect, Not Only the Chewing
| What you observe | Closest match | How to separate it |
|---|---|---|
| Active jumping insect with enlarged hind legs and relatively short antennae | Grasshopper | Watch the plant during daylight and photograph the insect with the fresh damage. |
| Large, slow-moving black grasshopper with bright orange, red, or yellow markings in the southeastern United States | Eastern lubber grasshopper may be involved | Photograph nymphs and adults. Young lubbers often gather and are easier to manage before they become large. |
| Green insect with very long threadlike antennae | Katydid or related long-horned insect | Compare antenna length, body shape, sound, and feeding time before naming it a grasshopper. |
| Large leaf sections missing but no insect found | Grasshopper is possible but unconfirmed | Inspect during the day, nearby weeds and ground cover, and the plant repeatedly for new damage. |
| Ragged holes with slime or feeding that appears overnight | Slugs or snails | Inspect after dark and beneath pots, boards, and debris. |
| Chewing with dark frass and a visible larva | Caterpillar | Inspect leaf undersides and branch forks and use the caterpillar guide. |
Grasshopper chewing can resemble beetle and caterpillar damage. A clear photograph of the insect beside the damaged leaf provides much stronger evidence than the leaf alone.
Quick ID
- Damage pattern: Ragged missing edges, large chunks, or irregular holes.
- Common clue: Damage may be worse near lawn, weeds, unmowed areas, fences, or field edges.
- Insect behavior: Grasshoppers jump or fly away quickly when disturbed.
- Timing: Damage often increases during warm, dry periods when nearby vegetation dries down.
- Plant risk: Small plants, seedlings, and recently rooted cuttings are more vulnerable than large established plants.
Grasshoppers vs. Look-Alikes
- Caterpillars: Often leave frass and visible larvae on leaves or stems.
- Beetles: May chew at night or damage flowers as well as leaves.
- Snails and slugs: Usually leave slime trails and favor damp protected areas.
- Leaf miners: Leave tunnels inside the leaf instead of open missing tissue.
- Wind or mechanical tearing: Usually follows a physical event and does not continue with new chewing.
How to Confirm
- Inspect plants during the warm part of the day when grasshoppers are active.
- Walk slowly near damaged plants and watch for jumping insects.
- Check weeds, grasses, and nearby border plants for nymphs or adults.
- Look for fresh edge chewing on leaves that were intact the day before.
- Compare several plants. Edge plants often show damage first.
What Not to Do
- Do not treat only the plumeria if the source is a weedy edge. The why: new grasshoppers can keep moving in from nearby vegetation.
- Do not confuse old wind tears with active feeding. The why: treatments only help if pests are still present.
- Do not wait on small plants if feeding is active. The why: a few large bites can remove much of a young plant’s leaf area.
Continue with the Complete Grasshopper Guide
After confirming fresh grasshopper or large-chewer evidence, use the complete guide to compare treatment, prevention, and recheck steps without losing your place.
Related Guides
- How to Treat Grasshoppers on Plumeria
- How to Prevent Grasshoppers on Plumeria
- How to Identify Beetle Damage on Plumeria
- Pest and Disease Inspection Checklist
- Treatment Safety Checklist
Turn the explanation into an action plan
- Monitor
- Check the same marked leaves and nearby plants every three to seven days until no active pests or fresh damage remain.
- Change one thing
- Make the smallest justified correction, record the date, and avoid stacking treatments before you can see which one helped.
- Escalate when needed
- Seek local diagnostic help when damage accelerates despite treatment, borers enter major stems, or the pest cannot be identified.