
The Plumeria Pests and Diseases Guide is an essential resource for identifying, preventing, and treating the most common threats to plumeria plants, including pests, fungi, and environmental stressors. This guide offers detailed information on how to recognize early signs of trouble, from insect infestations to fungal infections, and provides practical solutions to address these issues. It also covers strategies for managing environmental factors such as excessive humidity, temperature fluctuations, and poor soil conditions, which can weaken plumeria. With expert tips on natural and chemical treatments, as well as proactive care practices, this guide ensures your plumeria remains healthy, resilient, and free from common ailments, allowing it to thrive season after season.
How to Treat Snails and Slugs on Plumeria (Organic, Physical & Bait Methods)
What to check next
This guide helps you confirm that a living pest is present, identify where it is feeding, and choose a measured response without treating inactive damage. Read the detailed explanation, then use this sequence to decide what to do.
Confirm the evidence for snails and slugs
- Look for
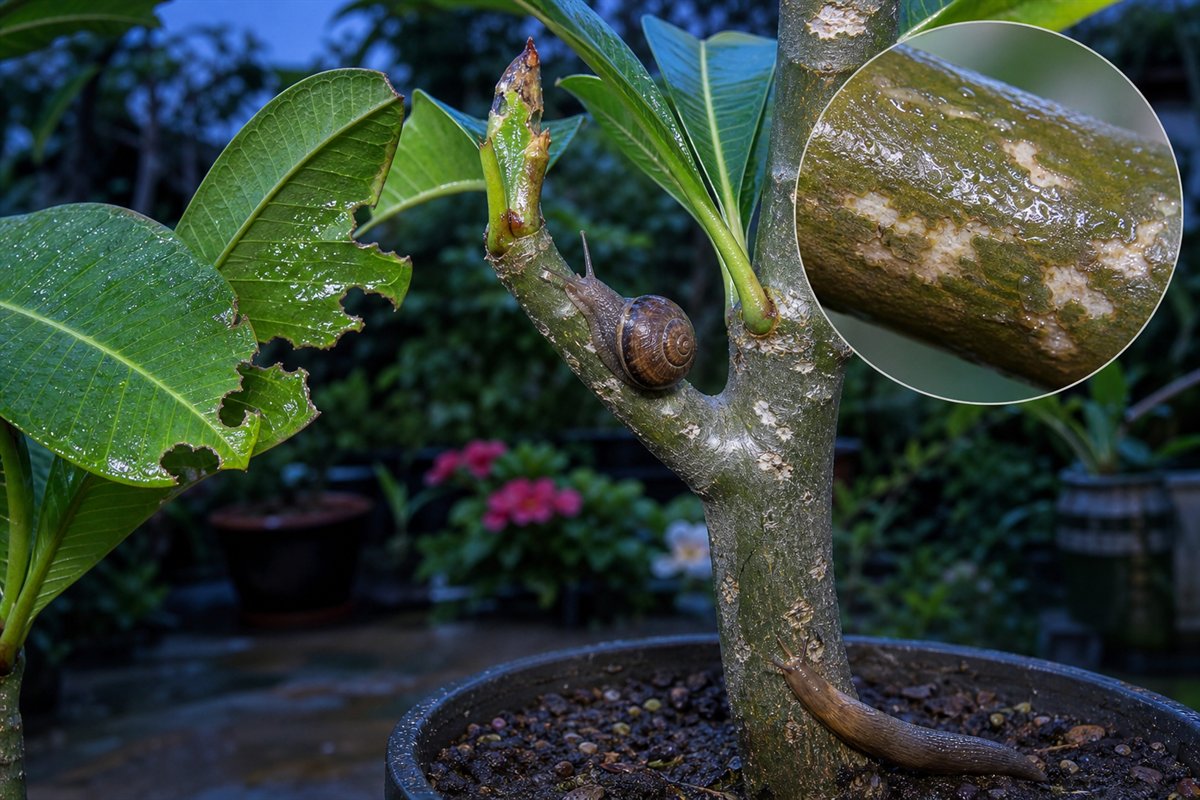
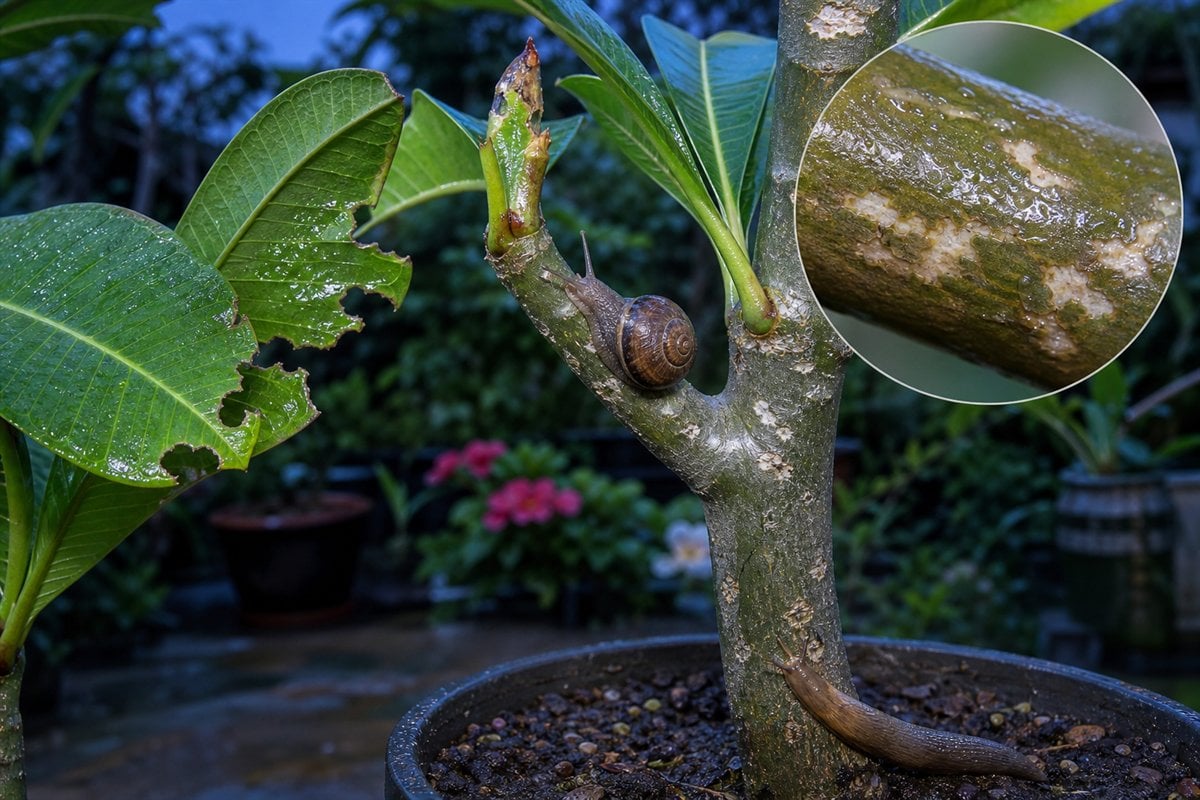
- Irregular nighttime chewing, rasped bark on trunks or branches, slime trails, and animals hiding under pots, debris, or dense growth.
- Compare with
- Caterpillars, beetles, rodents, sunscald, and mechanical scraping can damage leaves or bark without slime and nighttime activity.
- Safest first response
- Inspect after dark or early morning, remove hiding places and animals, protect bark, and use a labeled bait only with pet and wildlife safety in mind.
Microclimate clue: Rain, irrigation, humid shade, mulch, and objects touching containers can greatly increase snail and slug activity.
- 1
Inspect before treating
Use bright light and magnification on leaf undersides, tips, petioles, stems, and the soil line.
- 2
- 3
Identify the feeding pattern
Separate sucking, chewing, mining, boring, and root-zone damage.
- 4
Start with the least disruptive action
Isolate, wash, and use only a treatment labeled for the confirmed pest and plant.
- 5
Repeat the inspection
Eggs or protected life stages can survive the first response, so follow-up checks matter.
How microclimate changes this answer
Dry heat favors mites, protected humid growth favors some scale and mealybugs, and wet shade increases snail and slug activity.
Compare this insect or pest pattern with healthy growth
Use these references to confirm that this article matches the visible pattern before changing care or applying a treatment.
 Condition reference
 Healthy baseline
- LocationCheck which plant part, age of growth, and exposed or protected side is affected.
- TextureDecide whether the evidence is dry, powdery, sticky, raised, translucent, soft, or intact.
- ProgressionPhotograph the same area so you can tell whether the pattern is stable, improving, or spreading.
Use more than one clue. Confirm the photo with recent conditions, roots, watering history, and the rest of the plant before acting.
Snails and slugs decision path: Confirm the defining evidence before changing care or applying a product.
- Confirm: Look at night or early morning for the animal, slime trails, ragged leaf feeding, and shallow rasped scars on tender trunks or branches. The trunk and branch damage is an important plumeria clue.
- Start conservatively: Hand-remove at night, clear damp hiding places immediately around pots, elevate containers where appropriate, and correct persistent surface moisture without withholding needed root-zone water.
- Escalate carefully: Use a pesticide, bait, biological control, or root treatment only when it is labeled for the pest and treatment site. Follow every dilution, timing, temperature, protective-equipment, and maximum-application direction.
- Protect the plant and garden: Avoid open blooms and pollinator activity, test foliar products on a small area, and never combine treatments unless both labels allow it.
- Monitor: Inspect after dark and after rain or irrigation for 7 to 10 days. If bait is needed, use only a product labeled for the site and protect children, pets, and wildlife exactly as the label requires.
Growing-condition check: Use recent rain, heat, humidity, wind, plant stage, pot or in-ground status, and the saved microclimate as supporting evidence. This is a logical response based on the observations, not a guaranteed diagnosis.
Snail and slug treatment works best when hand removal, habitat cleanup, barriers, and bait are used together. These pests return when damp hiding places remain, so treatment should not be only about scattering bait.
Snails and Slugs Article Path
Use this group in order when possible: identify the problem, treat only when needed, then prevent repeat outbreaks or recurrence.
- Identify snails and slugs
How to Identify Snails and Slugs on Plumeria – Signs, Damage & Where to Look - Treat snails and slugs
How to Treat Snails and Slugs on Plumeria (Organic, Physical & Bait Methods) - Prevent snails and slugs
How to Prevent Snails and Slugs on Plumeria (Clean-Up, Barriers & Baiting Tips)
Safety and diagnostics: before applying products, review the Treatment Safety Checklist. If symptoms do not match this group, return to the Pest & Disease Identification Guide.
Before Applying Any Product
Use this article after the pest or disease has been identified. Before applying oils, soaps, sprays, drenches, fungicides, insecticides, miticides, systemics, copper, sulfur, peroxide products, biological products, or homemade mixtures, check the safety and application-method pages below.
- Treatment Safety Checklist
- Soil Drenches, Sprays, and Foliar Applications
- How to Mix and Apply Garden Products Safely
- When to Treat vs. Monitor Plumeria Pests
Why: the same product can help or harm depending on plant stress, weather, concentration, coverage, timing, beneficial insects, and whether the problem is active.
Treatment Action Snapshot
- Confirm first: Look for slime trails and night activity before baiting.
- Remove what you can: Hand-pick at night or lift trap boards in the morning.
- Reduce shelter: Remove unused boards, pots, wet leaves, dense mulch, and debris.
- Use bait carefully: Iron phosphate baits are generally safer than metaldehyde, but all baits must be used by label and kept away from children, pets, and wildlife.
- Protect young plants: Seedlings and tender cuttings may need barriers or raised placement.
Chewing Pest Guide Path
- Identify May/June beetle and other beetle damage when holes, ragged chewing, seasonal night feeding, or white grubs are suspected.
- Identify snail and slug damage when ragged holes appear with slime trails or wet-night feeding.
- Compare root weevils when leaf-edge notching appears with hidden root decline.
- Compare grasshoppers when larger daytime chewing or missing leaf sections are present.
- Use the main identification guide if chewing damage could be confused with disease, sunburn, mites, or sap-sucking pests.
Why this matters: Chewing damage can look similar at first. Timing, slime trails, frass, larvae, night activity, and root-zone clues help separate the cause.
Step-by-Step Treatment
- Inspect at night or early morning and remove visible snails and slugs.
- Set damp boards, cardboard, or overturned pots as traps, then check and remove pests daily while pressure is high.
- Clean up wet hiding places around pots, benches, trays, and low foliage.
- Apply a labeled snail/slug bait only where needed and according to label directions.
- Use copper barriers, raised benches, or protective collars around seedlings and high-value containers where practical.
Bait and Barrier Notes
| Method | Best Use | Why |
|---|---|---|
| Hand removal | Small to moderate outbreaks | Immediate reduction without chemical exposure. |
| Trap boards or cardboard | Locating hidden pests | Snails and slugs gather in damp protected places. |
| Iron phosphate bait | Persistent pressure when label directions fit the site | Stops feeding and is generally safer than metaldehyde, though still a pesticide. |
| Copper barriers | Containers, benches, and raised areas | Can discourage crossing when clean and continuous. |
| Habitat cleanup | All situations | Long-term control depends on removing shelter and moisture. |
What Not to Do
- Do not use salt on or near plumeria roots. Salt can damage roots, soil, and nearby plants.
- Do not rely on bait alone. Hiding places and moisture must also be reduced.
- Do not use metaldehyde casually. It can be dangerous to pets and wildlife; follow labels and local rules if used at all.
- Do not leave beer traps where pets or wildlife can access them. Traps must be managed and cleaned.
Follow-Up
Recheck after rain, irrigation changes, or humid nights. Old holes will remain, so judge progress by fewer new holes, fewer slime trails, and fewer pests under traps.
Related Guides
- How to Identify Snails and Slugs on Plumeria – Signs, Damage & Where to Look
- How to Prevent Snails and Slugs on Plumeria (Clean-Up, Barriers & Baiting Tips)
- Treatment Safety Checklist
- Pest & Disease Identification Guide
Do not overlook trunk and branch damage
Snails and slugs can climb plumeria trunks and branches and rasp the outer tissue. Fresh damage may look pale, scraped, shallowly pitted, or irregularly scarred. Repeated feeding can enlarge the affected area, especially on tender growth, seedlings, cuttings, and plants kept in humid or sheltered locations.
Turn the explanation into an action plan
- Monitor
- Check the same marked leaves and nearby plants every three to seven days until no active pests or fresh damage remain.
- Change one thing
- Make the smallest justified correction, record the date, and avoid stacking treatments before you can see which one helped.
- Escalate when needed
- Seek local diagnostic help when damage accelerates despite treatment, borers enter major stems, or the pest cannot be identified.