
The Plumeria Pests and Diseases Guide is an essential resource for identifying, preventing, and treating the most common threats to plumeria plants, including pests, fungi, and environmental stressors. This guide offers detailed information on how to recognize early signs of trouble, from insect infestations to fungal infections, and provides practical solutions to address these issues. It also covers strategies for managing environmental factors such as excessive humidity, temperature fluctuations, and poor soil conditions, which can weaken plumeria. With expert tips on natural and chemical treatments, as well as proactive care practices, this guide ensures your plumeria remains healthy, resilient, and free from common ailments, allowing it to thrive season after season.
How to Identify Nematode Damage in Plumeria
What to check next
This guide helps you confirm that a living pest is present, identify where it is feeding, and choose a measured response without treating inactive damage. Read the detailed explanation, then use this sequence to decide what to do.
Confirm the evidence for root-zone pests
- Look for
- Active insects, larvae, wax, feeding lesions, poor roots, ants, or adults associated consistently with the potting mix and root decline.
- Compare with
- Wet media, ordinary soil organisms, fertilizer salts, compaction, and root rot often cause decline without a damaging pest population.
- Safest first response
- Confirm the pest in a root sample or trap before disturbing the plant, then correct excess moisture and use a life-stage-specific labeled control.
Microclimate clue: Persistently moist, organic, protected media favors fungus gnats and some root-zone pests; hot dry pots create different root symptoms.
- 1
Inspect before treating
Use bright light and magnification on leaf undersides, tips, petioles, stems, and the soil line.
- 2
- 3
Identify the feeding pattern
Separate sucking, chewing, mining, boring, and root-zone damage.
- 4
Start with the least disruptive action
Isolate, wash, and use only a treatment labeled for the confirmed pest and plant.
- 5
Repeat the inspection
Eggs or protected life stages can survive the first response, so follow-up checks matter.
How microclimate changes this answer
Dry heat favors mites, protected humid growth favors some scale and mealybugs, and wet shade increases snail and slug activity.
Root-Zone Pest Diagnostic Path
Use this path when plumeria decline starts below the soil line: weak growth, poor rooting, yellowing, unexplained wilting, pests near drain holes, root damage, or symptoms that do not match normal watering.
- Start with the soil-dwelling pest hub to compare fungus gnats, root mealybugs, root aphids, nematodes, root weevils, larvae, and root rot look-alikes.
- Check fungus gnats when small dark flies hover around wet media, seedling trays, rooting containers, or algae-prone surfaces.
- Check root mealybugs when white waxy or cottony residue appears around roots, pot walls, drainage holes, or media pockets.
- Check root aphids when mobile root-zone aphids, ants, or colonies appear without the cottony wax pattern of root mealybugs.
- Check nematodes when roots show galls, swollen knots, poor feeder roots, and chronic decline in warm soil or reused ground soil.
- Check root weevils when adult leaf-edge notching appears together with hidden root decline.
Why it matters: A foliar spray rarely solves a root-zone problem. Hidden pests require root inspection, clean media, clean containers, isolation, and pest-specific treatment choices.
Plant-parasitic nematodes are microscopic roundworms that feed on roots. On plumeria, the most recognizable pattern is root-knot type damage: swollen root galls, weak feeder roots, stunting, wilting, and chronic decline that does not respond normally to watering or fertilizer.
Nematodes Article Path
Use this group in order when possible: identify the problem, treat only when needed, then prevent repeat outbreaks or recurrence.
- Identify nematode damage
How to Identify Nematode Damage in Plumeria - Treat nematode damage
How to Treat Nematodes in Plumeria - Prevent nematodes
How to Prevent Nematodes in Plumeria
Safety and diagnostics: before applying products, review the Treatment Safety Checklist. If symptoms do not match this group, return to the Pest & Disease Identification Guide.
Because nematodes are too small to identify by sight, diagnosis depends on root symptoms, growing history, and, when possible, a lab sample. Root galls are an important clue, but not every weak root system is caused by nematodes.
Photo and Confirmation Checklist
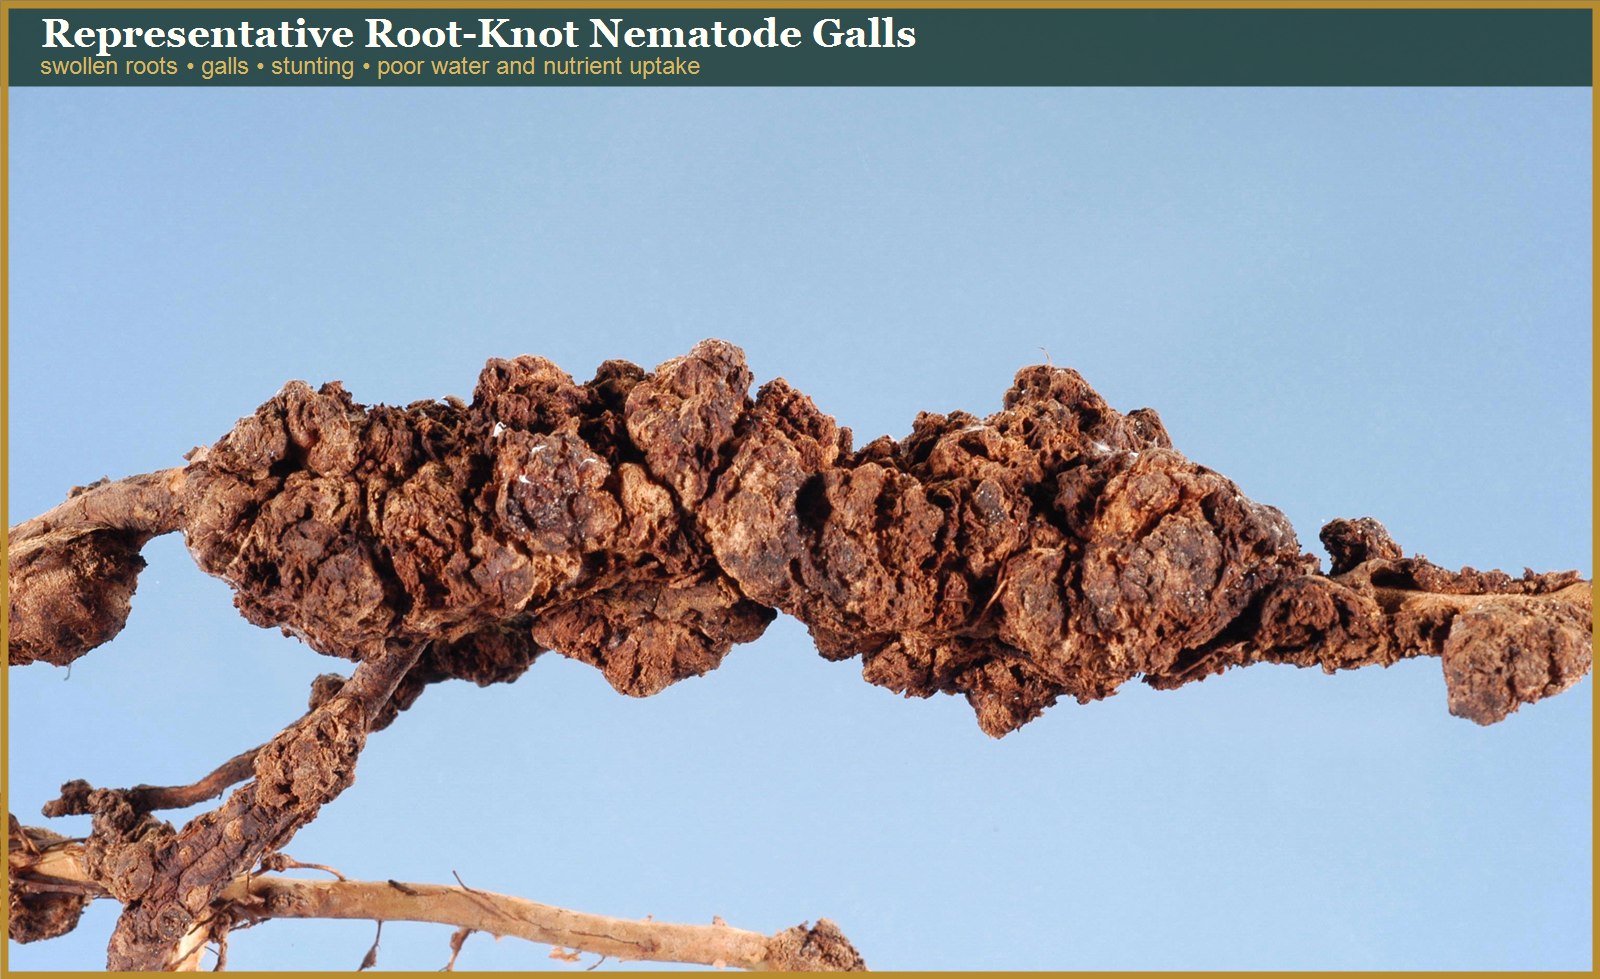
- Inspect roots for swollen galls, knots, poor feeder roots, or stunted root systems.
- Compare with root rot, root mealybugs, root aphids, dry roots, and fertilizer stress.
- Consider soil history, reused media, native soil exposure, and warm ground conditions.
- Use lab testing when diagnosis matters for valuable plants or repeated problems.
Nematode Guide Path
- Identify nematode damage when root galls, weak feeder roots, stunting, wilting, and chronic decline appear together.
- Treat nematode problems by reducing spread, replacing contaminated media when possible, and rebuilding root health.
- Prevent nematode problems by avoiding contaminated soil, reused problem media, and dirty containers.
Separate Suspicion From Confirmation
| Evidence | How strongly it supports nematodes | Next step |
|---|---|---|
| General stunting, yellowing, wilt, or poor flowering | Weak by itself | Check moisture, drainage, pH, fertilizer, root volume, rot, and other pests first. |
| Root galls or knots that are part of the root tissue | Supports root-knot nematodes but is not species confirmation | Photograph the whole root system and close-ups; compare with callus, branching, crown gall, and physical swelling. |
| Dark lesions and loss of fine feeder roots | Could fit lesion nematodes, rot, salts, or other root injury | Keep roots and surrounding soil or medium available for diagnostic sampling. |
| Several plants decline in the same soil area | A shared soilborne cause becomes more plausible | Map the affected area and compare susceptible and unaffected plants before moving soil or tools. |
| Symptoms repeat after ordinary care corrections | Testing becomes more valuable | Contact a plant diagnostic or nematology laboratory before collecting samples so roots and soil are packaged correctly. |
| Nematodes are found by a qualified laboratory | Confirmed for the submitted sample | Use the species or group, population level, plant stage, and local recommendations to choose management. |
Do not diagnose nematodes from a photograph of the leaves alone. Avoid unnecessary root disturbance in unrooted cuttings, newly rooted cuttings, and weak plants unless the diagnostic value is greater than the handling risk.
Important Distinction
Plant-parasitic nematodes damage roots. Beneficial entomopathogenic nematodes sold for some insect larvae are different organisms. Keep these two ideas separate when diagnosing or treating root problems.
What Not to Do
- Do not diagnose nematodes from stunting alone. The why: many root problems stunt plumeria.
- Do not move contaminated soil into clean containers. The why: soil movement is one of the easiest ways to spread root problems.
- Do not confuse beneficial nematodes with plant-parasitic nematodes. The why: they are used for different purposes.
Nematode Diagnosis Notes
Nematodes are microscopic roundworms. Some are beneficial, some are neutral, and some are plant-parasitic. Root-knot nematodes are commonly grouped under Meloidogyne species and may cause root galls, weak feeder roots, stunting, and poor water or nutrient uptake. Exact confirmation may require a lab, extension office, or microscope.
- Look for root galls or swollen roots. Why: above-ground yellowing alone does not confirm nematodes.
- Compare with root rot and poor drainage. Why: both can cause weak roots and decline.
- Check whether symptoms repeat in the same soil or location. Why: nematode pressure can persist in infested ground or reused media.
- Do not confuse beneficial nematodes with plant-parasitic nematodes. Why: they are different organisms used for different purposes.
Use the Treatment Decision Guide when deciding whether to monitor, repot, replace media, isolate, or seek lab confirmation.
Representative Image Note
Some root-zone pest images are representative references rather than perfect plumeria-specific examples. Use them to understand the general pest or symptom pattern, but confirm the diagnosis by inspecting the actual rootball, potting mix, drainage, root condition, and plant symptoms together.
- Look for the pest itself when possible, not just weak growth above the soil line.
- Compare root symptoms with watering stress, root rot, fertilizer burn, transplant damage, poor drainage, and old perlite or organic residue.
- Photograph the whole plant, pot, rootball, and close-up evidence if you are documenting the problem.
Photo note: plumeria-specific root-zone pest photos are still needed. See the Plumeria Pest & Disease Photo Contribution Guide.
Continue with the Complete Plant-Parasitic Nematode Guide
Use the complete guide to move from laboratory confirmation to treatment, prevention, and the beneficial-nematode comparison without losing your place.
Related Guides
- How to Treat Nematodes in Plumeria
- How to Prevent Nematodes in Plumeria
- How to Identify Soil-Dwelling Pests on Plumeria
- Pest and Disease Photo Contribution Guide
- Treatment Safety Checklist
Turn the explanation into an action plan
- Monitor
- Check the same marked leaves and nearby plants every three to seven days until no active pests or fresh damage remain.
- Change one thing
- Make the smallest justified correction, record the date, and avoid stacking treatments before you can see which one helped.
- Escalate when needed
- Seek local diagnostic help when damage accelerates despite treatment, borers enter major stems, or the pest cannot be identified.