
The Plumeria Pests and Diseases Guide is an essential resource for identifying, preventing, and treating the most common threats to plumeria plants, including pests, fungi, and environmental stressors. This guide offers detailed information on how to recognize early signs of trouble, from insect infestations to fungal infections, and provides practical solutions to address these issues. It also covers strategies for managing environmental factors such as excessive humidity, temperature fluctuations, and poor soil conditions, which can weaken plumeria. With expert tips on natural and chemical treatments, as well as proactive care practices, this guide ensures your plumeria remains healthy, resilient, and free from common ailments, allowing it to thrive season after season.
How to Prevent Soil-Dwelling Pests on Plumeria
What to check next
This guide helps you confirm that a living pest is present, identify where it is feeding, and choose a measured response without treating inactive damage. Read the detailed explanation, then use this sequence to decide what to do.
Confirm the evidence for root-zone pests
- Look for
- Active insects, larvae, wax, feeding lesions, poor roots, ants, or adults associated consistently with the potting mix and root decline.
- Compare with
- Wet media, ordinary soil organisms, fertilizer salts, compaction, and root rot often cause decline without a damaging pest population.
- Safest first response
- Confirm the pest in a root sample or trap before disturbing the plant, then correct excess moisture and use a life-stage-specific labeled control.
Microclimate clue: Persistently moist, organic, protected media favors fungus gnats and some root-zone pests; hot dry pots create different root symptoms.
- 1
Inspect before treating
Use bright light and magnification on leaf undersides, tips, petioles, stems, and the soil line.
- 2
- 3
Identify the feeding pattern
Separate sucking, chewing, mining, boring, and root-zone damage.
- 4
Start with the least disruptive action
Isolate, wash, and use only a treatment labeled for the confirmed pest and plant.
- 5
Repeat the inspection
Eggs or protected life stages can survive the first response, so follow-up checks matter.
How microclimate changes this answer
Dry heat favors mites, protected humid growth favors some scale and mealybugs, and wet shade increases snail and slug activity.
Compare this insect or pest pattern with healthy growth
Use these references to confirm that this article matches the visible pattern before changing care or applying a treatment.
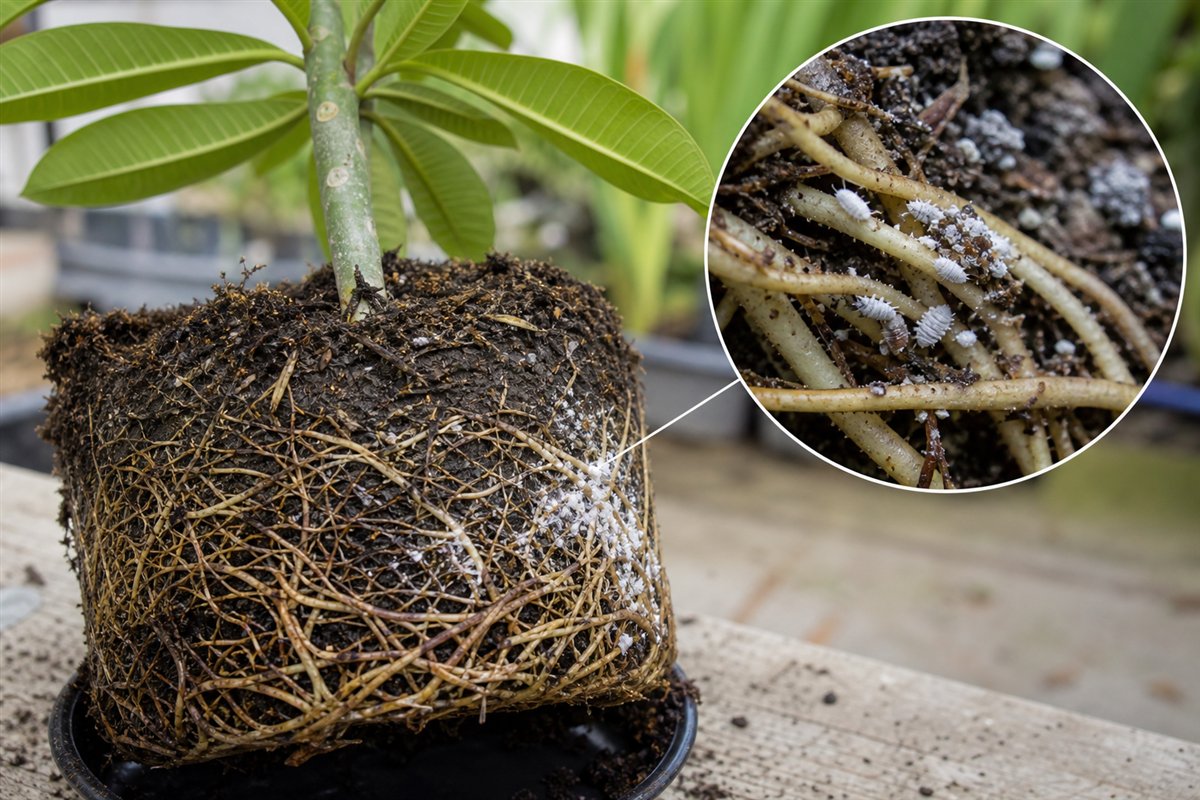 Condition reference
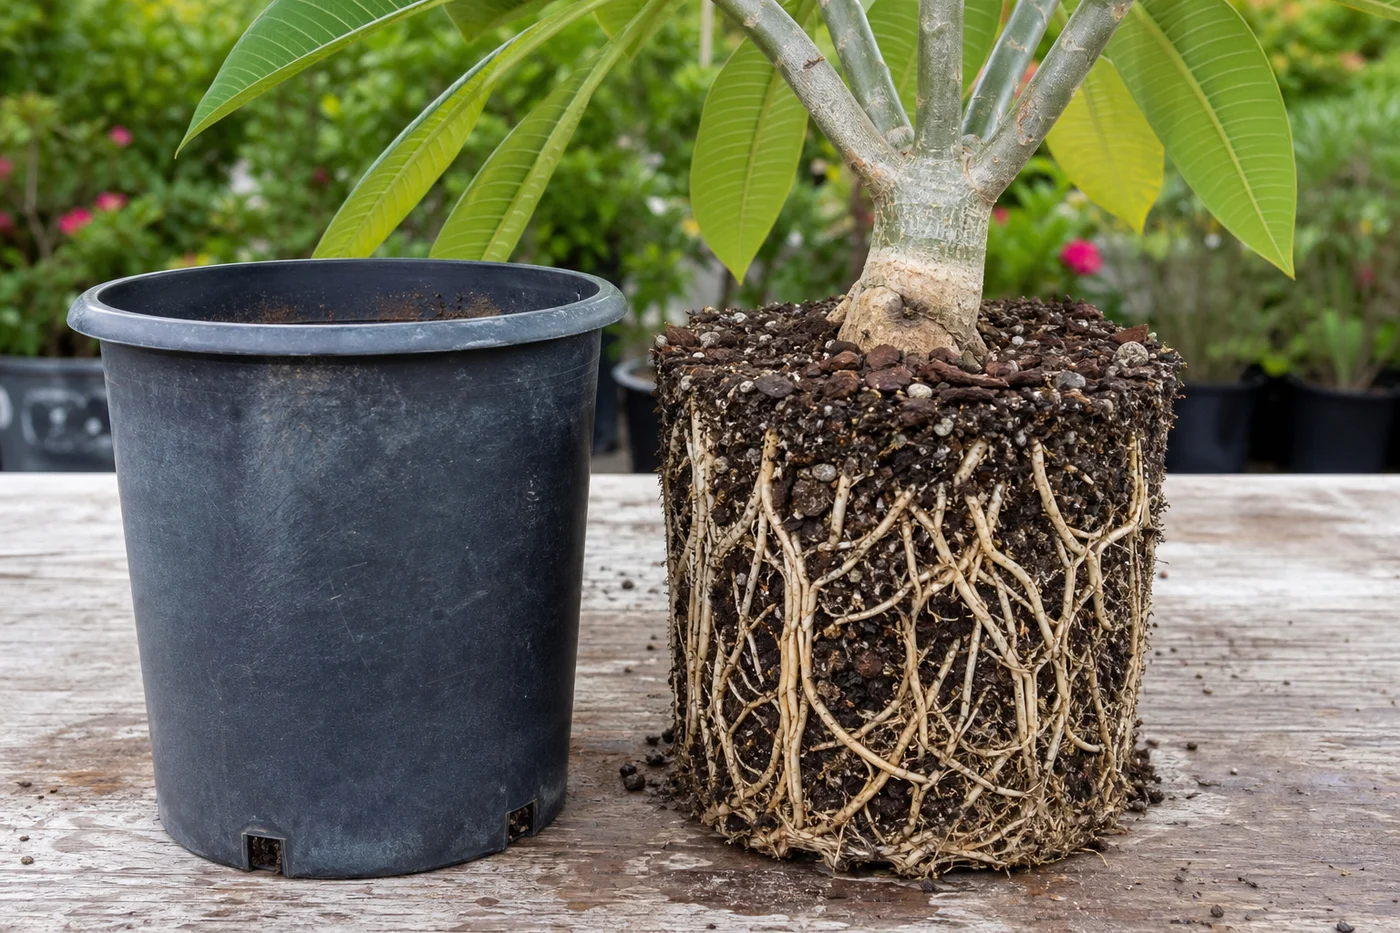 Healthy baseline
- LocationCheck which plant part, age of growth, and exposed or protected side is affected.
- TextureDecide whether the evidence is dry, powdery, sticky, raised, translucent, soft, or intact.
- ProgressionPhotograph the same area so you can tell whether the pattern is stable, improving, or spreading.
Use more than one clue. Confirm the photo with recent conditions, roots, watering history, and the rest of the plant before acting.
Root-Zone Pest Prevention Path
Use this prevention path for plumeria grown in pots, seedling trays, rooting containers, benches, patios, greenhouses, or warm outdoor beds where pests can hide in the media before symptoms show above the soil line.
- Keep media fast-draining and open. Why: wet, compacted, organic-heavy media favors fungus gnats, weak roots, and rot-like decline.
- Let the upper media dry appropriately between watering. Why: many root-zone pests and larvae are easier to suppress when the surface is not constantly damp.
- Quarantine new plants and inspect roots when risk is high. Why: root mealybugs, root aphids, nematodes, and larvae can arrive hidden in the pot.
- Use clean containers, clean benches, and fresh or sanitized media. Why: old media and reused pots can carry eggs, larvae, pests, algae, and disease pressure into the next plant.
- Watch the earliest clues. Why: weak growth, unexplained wilting, small flies, ants, loose media, poor rooting, and slow recovery often appear before the pest is obvious.
Best rule: prevent the conditions that protect pests, then confirm the pest before treating. A root-zone problem usually needs root-zone action, not just a foliar spray.
Soil-dwelling pests are harder to notice than insects on leaves because the first damage happens around the roots, media, drain holes, and pot walls. Prevention is important because plumeria roots recover slowly once they are damaged. Keeping the root zone clean, airy, and easy to inspect can prevent many problems before a grower has to repot, drench, prune, or discard a plant.
A Clean Root-Zone Prevention Routine
| Control point | Prevention action | Why it helps |
|---|---|---|
| New plant | Use an observation area and inspect foliage, pot rims, drainage holes, media surface, and roots only when safely visible. | Hidden adults, larvae, snails, ants, or contaminated medium can enter with the plant. |
| Potting medium | Use clean, appropriately draining material from a reliable source. Keep open bags dry, covered, and off contaminated ground. | Clean storage reduces insect entry, weed seeds, and waterlogging problems that favor fungus gnats. |
| Containers and tools | Clean reused pots, saucers, stakes, scoops, and tools before using them with another plant. | Soil, eggs, larvae, and root fragments can travel on shared equipment. |
| Water and runoff | Keep drainage open and avoid shared standing water or reservoirs between suspect and healthy plants. | Shared water can move organisms and keeps surfaces suitable for fungus gnat breeding. |
| Debris and hiding places | Remove dead roots, fallen leaves, boards, weeds, stacked pots, and decaying material beside vulnerable containers. | These materials can shelter adults, snails, slugs, and other root-zone pests. |
| Plant-stage watering | Follow the specific moisture rule for seedlings, unrooted cuttings, newly rooted cuttings, and established plants. | One universal watering schedule can create either root stress or persistent wetness that increases pest risk. |
| Before preventive treatment | Confirm the target, local risk, life stage, product label, and whether the treatment adds water or harms beneficial organisms. | Routine drenches are not a substitute for clean media, inspection, drainage, and quarantine. |
Best Prevention Priorities
- Use a fast-draining plumeria mix. Why: oxygen around the roots discourages the wet, stagnant conditions that invite fungus gnats, root decline, and rot confusion.
- Avoid constantly wet seedling and cutting media. Why: young roots and callused cuttings are especially vulnerable when larvae, algae, or sour media build up.
- Remove dropped leaves, flowers, weeds, and old organic debris. Why: debris keeps the surface damp and gives pests protected places to feed, breed, and hide.
- Inspect new plants before placing them near the collection. Why: soil pests often travel in nursery pots where the foliage may still look healthy.
- Lift and inspect questionable pots early. Why: pests near drain holes, white residue on pot walls, grubs, root galls, or sour-smelling media can confirm that the problem is below the surface.
- Use yellow sticky cards when tiny flies appear. Why: sticky cards help track fungus gnat adults, but the real prevention target is the wet media that supports larvae.
- Improve airflow around pots and trays. Why: stagnant, shaded, crowded conditions keep surfaces damp and make small pest problems harder to see.
- Rotate, clean, or replace contaminated growing areas. Why: benches, saucers, ground contact, and reused tray areas can keep pest pressure cycling back into clean plants.
Growing Conditions That Increase Risk
| Condition | Likely Risk | Why It Matters |
|---|---|---|
| Wet or slow-drying media | Fungus gnats, weak roots, rot-like symptoms | Moist organic matter protects larvae and lowers oxygen around roots. |
| Warm, reused ground soil | Nematodes, larvae, root decline | Soil pests can persist and damage feeder roots before foliage symptoms appear. |
| Crowded greenhouse or patio benches | Fungus gnats, root mealybugs, root aphids | Protected spaces reduce rain wash-off and allow pests to move pot to pot. |
| New plants added without quarantine | Hidden root pests | Root mealybugs, root aphids, and larvae may be present before the top looks stressed. |
| Plants sitting in saucers or runoff | Root stress, fungus gnats, secondary disease | Standing water keeps the lower root zone too wet and can spread contamination. |
| Stressed or poorly rooted plants | Faster decline from minor pest pressure | Weak roots have less reserve to recover from feeding damage. |
What Not to Use as Routine Prevention
- Do not rely on random soil drenches. Why: drenches can stress roots if the pest is not confirmed, and they may miss the real cause if the problem is watering, rot, or compacted media.
- Do not use hydrogen peroxide as a regular pest-prevention routine. Why: it can disturb root-zone biology and irritate tender roots; it is not a substitute for drainage, sanitation, quarantine, and correct diagnosis.
- Do not keep topping wet media with more organic material. Why: a damp, decomposing surface feeds the same conditions that attract fungus gnats and root-zone problems.
- Do not move suspect media into clean pots, beds, or compost piles near plumeria. Why: eggs, larvae, root pests, and contaminated material can spread the problem.
- Do not treat only the leaves when the symptoms begin below the soil line. Why: foliar sprays will not solve larvae, root mealybugs, root aphids, nematodes, or decaying media around the roots.
Quick Prevention Checklist
- Use fresh, fast-draining media for vulnerable plants.
- Keep pots off wet ground when possible.
- Avoid standing water in saucers and trays.
- Clean pot walls, benches, tools, trays, and propagation areas between batches.
- Quarantine new or suspect plants before adding them to the main collection.
- Inspect drain holes, pot walls, and root balls when growth stalls without an obvious leaf problem.
- Use pest-specific prevention pages when a likely pest pattern appears.
When Prevention Is Not Enough
If the plant is already declining, prevention alone may not be enough. Move to diagnosis first, then treatment. Check the root ball, photograph what you find, isolate the plant, and compare the evidence with the likely pest group before applying products or repotting.
Root-zone diagnostic differences
Soil-dwelling pests are easy to confuse because the first visible symptom may simply be weak growth, wilting, or poor response after watering.
- Fungus gnats: adults fly from wet media; larvae are slender, pale, and often have dark heads.
- Root aphids: cluster around roots and may appear waxy or powdery; sticky cards alone do not confirm them.
- Root mealybugs: leave cottony white material in the root zone or along pot edges.
- Root weevil grubs: chew roots and may be found as curved white larvae in the mix.
- Nematodes: usually require root inspection or lab confirmation; look for abnormal root swelling, poor feeder roots, or unexplained decline.
When a plant declines without a clear leaf pest, slip the root ball from the pot and inspect the root zone before increasing fertilizer or water.
Related Guides
- How to Identify Soil-Dwelling Pests on Plumeria
- How to Treat Soil-Dwelling Pests on Plumeria
- How to Prevent Fungus Gnats in Plumeria
- How to Prevent Root Aphids in Plumeria
- How to Prevent Root Mealybugs in Plumeria
- How to Prevent Nematodes in Plumeria
- How to Prevent Root Weevils in Plumeria
- How to Prevent Root Rot in Plumeria
Turn the explanation into an action plan
- Monitor
- Check the same marked leaves and nearby plants every three to seven days until no active pests or fresh damage remain.
- Change one thing
- Make the smallest justified correction, record the date, and avoid stacking treatments before you can see which one helped.
- Escalate when needed
- Seek local diagnostic help when damage accelerates despite treatment, borers enter major stems, or the pest cannot be identified.