
The Plumeria Pests and Diseases Guide is an essential resource for identifying, preventing, and treating the most common threats to plumeria plants, including pests, fungi, and environmental stressors. This guide offers detailed information on how to recognize early signs of trouble, from insect infestations to fungal infections, and provides practical solutions to address these issues. It also covers strategies for managing environmental factors such as excessive humidity, temperature fluctuations, and poor soil conditions, which can weaken plumeria. With expert tips on natural and chemical treatments, as well as proactive care practices, this guide ensures your plumeria remains healthy, resilient, and free from common ailments, allowing it to thrive season after season.
Root Aphids on Plumeria: Identification, Treatment and Prevention
What to check next
This guide helps you confirm that a living pest is present, identify where it is feeding, and choose a measured response without treating inactive damage. Read the detailed explanation, then use this sequence to decide what to do.
Confirm the evidence for aphids
- Look for
- Clusters of soft-bodied insects on tender tips, buds, and leaf undersides, plus curled growth, cast skins, honeydew, or ants.
- Compare with
- Thrips, leafhoppers, heat-distorted tips, and nutrient-related curling can resemble aphid injury without visible colonies.
- Safest first response
- Rinse or remove concentrated colonies, protect beneficial insects, and use a labeled treatment only if active populations continue.
Microclimate clue: Mild weather and soft new growth can support rapid aphid reproduction; heavy rain may temporarily knock colonies down.
- 1
Inspect before treating
Use bright light and magnification on leaf undersides, tips, petioles, stems, and the soil line.
- 2
- 3
Identify the feeding pattern
Separate sucking, chewing, mining, boring, and root-zone damage.
- 4
Start with the least disruptive action
Isolate, wash, and use only a treatment labeled for the confirmed pest and plant.
- 5
Repeat the inspection
Eggs or protected life stages can survive the first response, so follow-up checks matter.
How microclimate changes this answer
Dry heat favors mites, protected humid growth favors some scale and mealybugs, and wet shade increases snail and slug activity.
Compare this insect or pest pattern with healthy growth
Use these references to confirm that this article matches the visible pattern before changing care or applying a treatment.
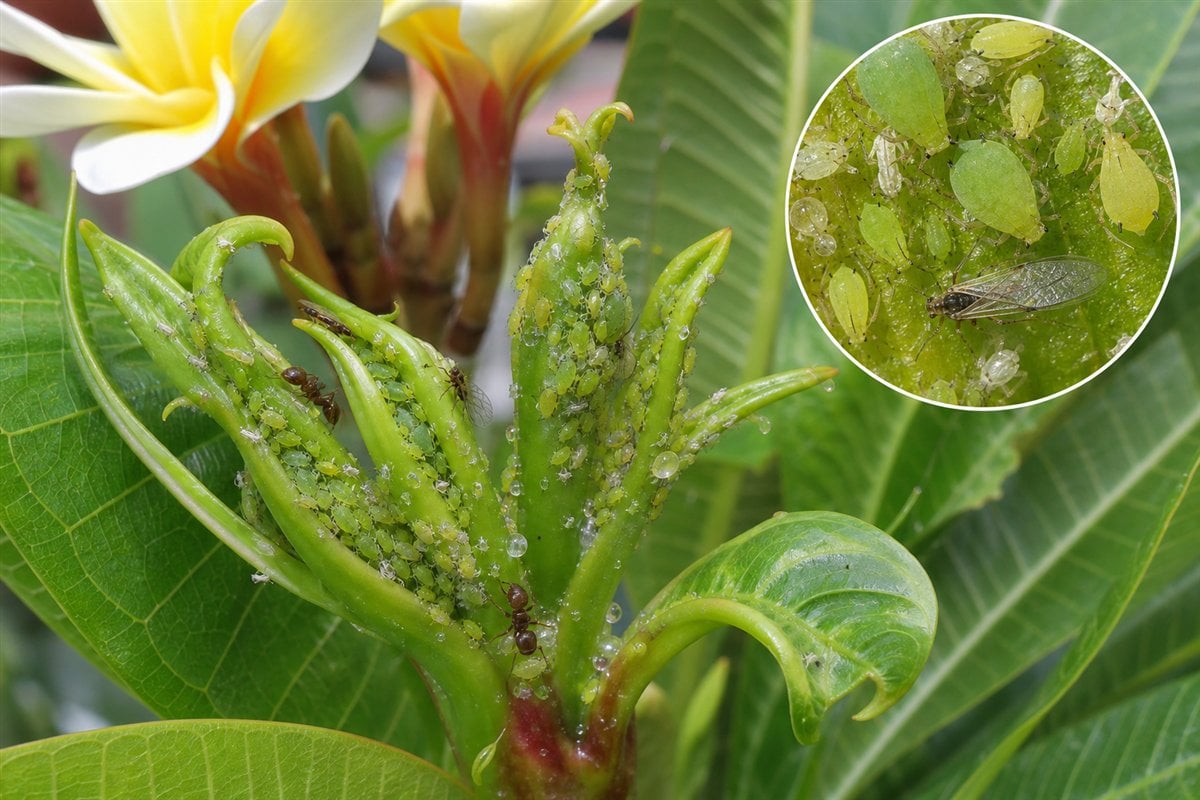 Condition reference
 Healthy baseline
- LocationCheck which plant part, age of growth, and exposed or protected side is affected.
- TextureDecide whether the evidence is dry, powdery, sticky, raised, translucent, soft, or intact.
- ProgressionPhotograph the same area so you can tell whether the pattern is stable, improving, or spreading.
Use more than one clue. Confirm the photo with recent conditions, roots, watering history, and the rest of the plant before acting.
Root aphids are sap-feeding insects that live around roots and inside potting media. Their symptoms can resemble overwatering, root rot, fertilizer injury, fungus gnats, root mealybugs, and ordinary transplant stress. Confirm living aphids before disturbing the root system or applying a soil treatment.
1. Confirm Root Aphids
| Evidence | What it means |
|---|---|
| Living pear-shaped insects clustered on roots or within moist media pockets | Strong evidence when movement and body shape are confirmed with magnification |
| White shed skins, sticky residue, or ants repeatedly entering the root zone | Supports a sap-feeding colony but is not a diagnosis by itself |
| Cottony or waxy masses coating roots | Compare carefully with root mealybugs, which are uncommon on plumeria but possible |
| Small flies and clear larvae with dark head capsules | More consistent with fungus gnats than root aphids |
| Weak growth or yellowing without an insect found | Check drainage, roots, salts, nutrition, and recent transplant history first |
Inspect the root ball over a clean light-colored surface and photograph the insects through magnification when possible. Avoid diagnosing root aphids from ants or plant decline alone.
2. Use the Least Disruptive Effective Treatment
- Isolate and confirm: Separate the plant, inspect nearby pots, and confirm active aphids in more than one root-zone location.
- Remove the main source: For a suitable established container plant, discard infested media without spreading it, clean the container, remove only dead roots, and repot in clean fast-draining media. Handle seedlings and newly rooted plants more cautiously because major root disturbance can be damaging.
- Manage ants: Reduce ant access and nesting sites when ants are protecting or moving sap-feeding insects.
- Consider a labeled lower-impact option: Use a contact, botanical, or biological soil treatment only when its current label specifically permits the plant, pest, site, and application method. A foliar spray will not reach a hidden root colony.
- Reserve systemic treatment: A systemic insecticide is a last resort for a confirmed damaging population. Use it only where legally available and specifically labeled, and consider flowers, pollinators, runoff, pets, children, and the total number of applications allowed.
Keep the Watering Rule Safe
- Unrooted cutting: Water once at the beginning of rooting, then do not water again until two or three full-sized leaves have grown. Mist the stem only if a firm cutting looks dehydrated.
- Newly rooted cutting: Water sparingly and let the mix approach dry before watering again.
- Seedling: Keep the media lightly and evenly moist, never saturated.
3. Prevent Introduction and Spread
- Quarantine incoming plants and inspect drain holes, pot walls, and root balls before placing them with the collection.
- Use clean media, clean containers, and sanitized tools. Do not reuse suspect media.
- Keep pots off contaminated ground where practical and clean shared work surfaces.
- Manage ants without routine preventive soil insecticide.
- Do not keep cuttings or mature plants chronically wet in an attempt to protect them from root pests.
4. Recheck the Roots and Nearby Pots
Inspect at the product-label interval or on a regular monitoring schedule. Look for living aphids, new shed skins, continuing ant activity, and root recovery. Old yellow leaves or slow growth can remain after the insects are gone, so base repeat treatment on active evidence.
Use the Root and Soil Checker Use the Insect and Pest Checker
Turn the explanation into an action plan
- Monitor
- Check the same marked leaves and nearby plants every three to seven days until no active pests or fresh damage remain.
- Change one thing
- Make the smallest justified correction, record the date, and avoid stacking treatments before you can see which one helped.
- Escalate when needed
- Seek local diagnostic help when damage accelerates despite treatment, borers enter major stems, or the pest cannot be identified.