
Welcome to the Plumeria Cultivation & Planting Guide. This is your definitive starting point for turning rooted cuttings, seedlings, or mature specimens into thriving, bloom-laden trees. Inside, you’ll learn how to choose the ideal micro-climate. You will craft well-draining soil mixes. Mastering container-versus-in-ground decisions is also included. You will time each planting task to your growing zone. Step-by-step instructions guide each aspect of planting. Troubleshooting checkpoints help resolve common issues. Nutrition tips based on science ensure your plumeria has strong roots, vigorous growth, and abundant flowers. Whether you garden on a balcony or use raised beds, this guide offers decades of practical experience. It is also helpful if you maintain a full grove. It turns that knowledge into practical, easy-to-follow advice. The guide empowers beginners and seasoned collectors alike to cultivate with confidence.
How to Distinguish Mosaic Virus from Other Diseases:
What to check next
This guide helps you connect growth habit, light, roots, water, nutrition, season, and cultivar traits before trying to correct the whole plant. Read the detailed explanation, then use this sequence to decide what to do.
- 1
Describe the whole pattern
Compare height, branching, canopy density, leaf size, flowering, leaning, and vigorous areas.
- 2
Check the foundation
Inspect anchorage, container size, roots, drainage, and the amount and direction of light.
- 3
Compare season and cultivar
Confirm whether the habit is new, worsening, seasonal, or normal for the variety.
- 4
Correct the strongest limiter
Address the clearest root, light, structural, moisture, or nutrition limitation first.
- 5
Measure new growth
Use dated photos, internode length, branching, and the next leaf flush to judge progress.
How microclimate changes this answer
A sheltered wall, partial canopy, wind, container heat, and winter storage can shape the plant more than its regional Zone.
Compare this disease or rot pattern with healthy growth
Use these references to confirm that this article matches the visible pattern before changing care or applying a treatment.
 Condition reference
 Healthy baseline
- LocationCheck which plant part, age of growth, and exposed or protected side is affected.
- TextureDecide whether the evidence is dry, powdery, sticky, raised, translucent, soft, or intact.
- ProgressionPhotograph the same area so you can tell whether the pattern is stable, improving, or spreading.
Use more than one clue. Confirm the photo with recent conditions, roots, watering history, and the rest of the plant before acting.
START WITH THE COMPLETE GUIDE
Frangipani Mosaic Virus on Plumeria
This article covers one focused part of the subject. Begin with the complete Frangipani Mosaic Virus guide for the main identification, treatment, testing, and prevention or management path.
How to Distinguish Mosaic Virus from Other Diseases:
Common Mistakes in Identifying Mosaic Virus in Plumeria
Mosaic virus is one of the least understood and most frequently misdiagnosed conditions in plumeria. While true viral infections like Plumeria mosaic virus do exist, they are relatively rare—and many growers mistakenly attribute nutrient deficiencies, pest damage, or fungal leaf diseases to viral causes. This not only leads to unnecessary plant disposal but also allows the real underlying issue to go untreated.
This guide highlights the key differences between mosaic virus and other look-alike conditions, and breaks down the most common mistakes plumeria growers make when trying to diagnose viral symptoms.
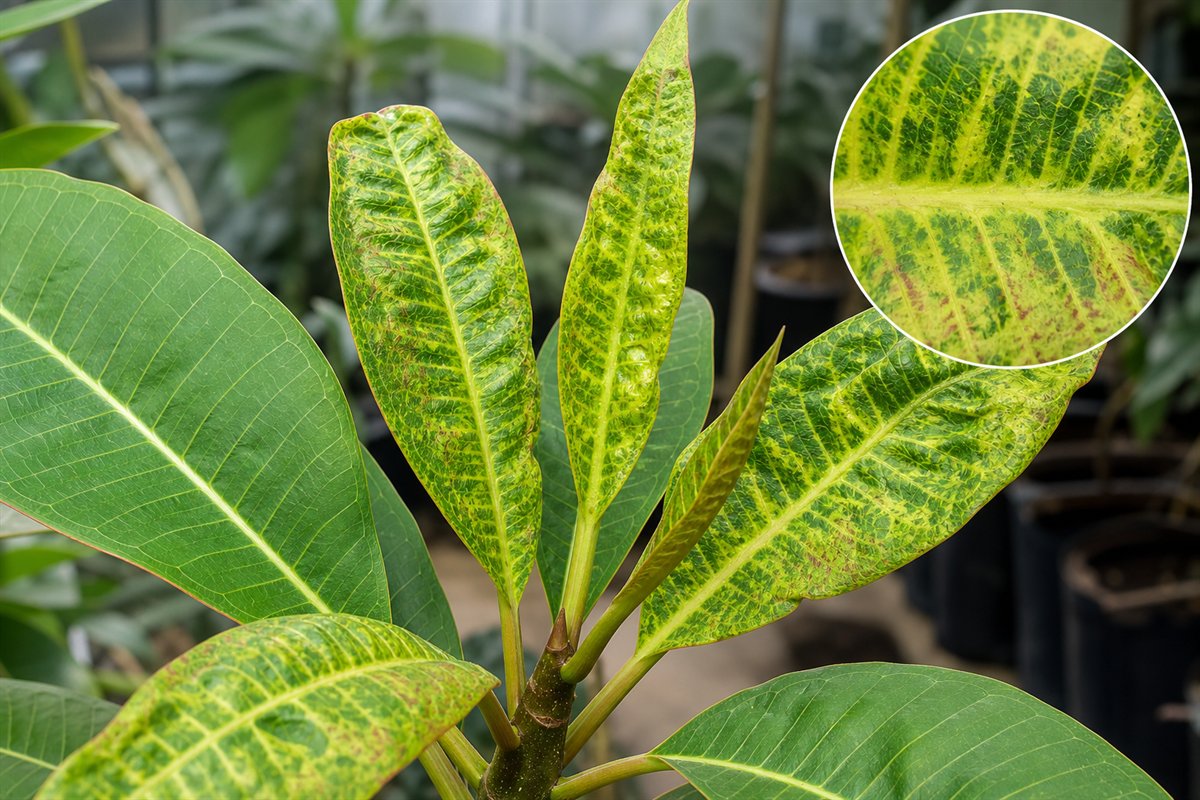
Mosaic Virus in Plumeria: What It Actually Looks Like
| Feature | Description |
|---|---|
| Mottled or marbled yellow-green pattern | Irregular “mosaic” blotches across leaf surface |
| Non-symmetrical distribution | Only certain leaves or branches show symptoms |
| No necrotic spots or black lesions | Color variation without tissue death |
| Vein clearing or feathering | Pale veins or lines may be visible |
| Symptoms persist across seasons | Often unchanged or gradually worse over time |
| No rubbing off of residue | Not caused by fungi or mites |
Mistakes Commonly Made When Misidentifying Mosaic Virus
❌ Mistake 1: Confusing Nutrient Deficiencies with Virus
| Look-Alike | Key Difference |
|---|---|
| Iron deficiency | Uniform yellowing between veins on new leaves; improves with chelated iron |
| Magnesium deficiency | Yellowing on older leaves, usually more symmetrical |
| Sulfur or nitrogen deficiency | Overall leaf yellowing without mottling |
Fix: Feed with balanced fertilizer (like Excalibur), observe 2–3 weeks for changes. Viruses don’t respond to nutrients—deficiencies do.
❌ Mistake 2: Misreading Pest Damage as Viral Symptoms
| Pest | Mimics | Clues |
|---|---|---|
| Rust mites | Mottled or bronzed leaves | Surface feels rough; often misread as discoloration |
| Thrips | Silvery streaks or twisting | Streaks follow feeding pattern, not random blotches |
| Aphids or whiteflies | Curling or stunted leaves | Also leave honeydew → sooty mold |
Fix: Use a magnifier. Viruses won’t show insects, but mites or thrips will.
❌ Mistake 3: Confusing Fungal Leaf Spot with Mosaic Patterns
| Disease | Key Clue |
|---|---|
| Cercospora/Phyllosticta leaf spot | Has defined brown lesions or halos |
| Anthracnose | Produces sunken, spreading blotches—not just surface mottling |
| Bacterial blight | Leaves appear oily or water-soaked; sometimes angular in shape |
Fix: Fungal and bacterial issues often come with leaf necrosis or decay. Mosaic virus never causes tissue death—just color distortion.
❌ Mistake 4: Reacting Too Quickly with Discard or Isolation
- Many plumeria show temporary mottling during stress
- Mosaic-like patterns can appear due to heat, wind, transplant shock, or uneven watering
- These issues self-correct with environmental recovery or consistent care
Fix: Observe over time. Virus symptoms are consistent and persistent—not fleeting or improving with cultural changes.
Diagnostic Checklist: Is It Really Mosaic Virus?
| Question | Mosaic Virus Likely? |
|---|---|
| Pattern irregular, not just between veins? | ✅ |
| Symptoms don’t respond to feeding or foliar nutrients? | ✅ |
| No visible pests on leaves or under lens? | ✅ |
| No necrotic spots, lesions, or tissue death? | ✅ |
| Symptoms persist or slowly worsen over months? | ✅ |
| More than one branch or area involved—but not entire plant? | ✅ |
| Appeared after receiving cuttings from unknown source? | ✅ |
If most of the above are yes, mosaic virus is possible. If no, it’s likely something else.
Confirming Mosaic Virus: When to Test
- Send a sample to a plant pathology lab for PCR or ELISA testing
- Use only if:
- You’re a nursery or seller
- You plan to propagate or graft
- You want a definitive diagnosis before removing rare material
What to Do if You’re Unsure
| Action | Why |
|---|---|
| Isolate the plant | Prevent potential spread by vectors |
| Improve growing conditions | Stress can mimic viral symptoms |
| Treat for pests (thrips, mites, aphids) | Cheap insurance—even if not visible |
| Watch for spread to other plants | Mosaic virus moves slowly, if at all |
| Document leaf changes with photos | Compare over time |
Conclusion
Most cases of “mosaic virus” in plumeria are misdiagnosed, caused instead by nutrient deficiencies, pest damage, or fungal leaf diseases. True viral infections are rare but persistent. By learning how to spot the differences, resist overreacting, and test when appropriate, you’ll make more informed decisions about how to care for your plants—and avoid tossing a perfectly savable plumeria.
Turn the explanation into an action plan
- Monitor
- Compare whole-plant photographs monthly during active growth and at each seasonal transition.
- Change one thing
- Make the smallest justified correction, record the date, and avoid stacking treatments before you can see which one helped.
- Escalate when needed
- Inspect roots and major stems promptly when decline is sudden, anchorage fails, or several branches soften or die back.