
Welcome to the Plumeria Cultivation & Planting Guide. This is your definitive starting point for turning rooted cuttings, seedlings, or mature specimens into thriving, bloom-laden trees. Inside, you’ll learn how to choose the ideal micro-climate. You will craft well-draining soil mixes. Mastering container-versus-in-ground decisions is also included. You will time each planting task to your growing zone. Step-by-step instructions guide each aspect of planting. Troubleshooting checkpoints help resolve common issues. Nutrition tips based on science ensure your plumeria has strong roots, vigorous growth, and abundant flowers. Whether you garden on a balcony or use raised beds, this guide offers decades of practical experience. It is also helpful if you maintain a full grove. It turns that knowledge into practical, easy-to-follow advice. The guide empowers beginners and seasoned collectors alike to cultivate with confidence.
Sooty Mold & Honeydew Residue
What to check next
This guide helps you connect growth habit, light, roots, water, nutrition, season, and cultivar traits before trying to correct the whole plant. Read the detailed explanation, then use this sequence to decide what to do.
- 1
Describe the whole pattern
Compare height, branching, canopy density, leaf size, flowering, leaning, and vigorous areas.
- 2
Check the foundation
Inspect anchorage, container size, roots, drainage, and the amount and direction of light.
- 3
Compare season and cultivar
Confirm whether the habit is new, worsening, seasonal, or normal for the variety.
- 4
Correct the strongest limiter
Address the clearest root, light, structural, moisture, or nutrition limitation first.
- 5
Measure new growth
Use dated photos, internode length, branching, and the next leaf flush to judge progress.
How microclimate changes this answer
A sheltered wall, partial canopy, wind, container heat, and winter storage can shape the plant more than its regional Zone.
Compare this leaf pattern with healthy growth
Use these references to confirm that this article matches the visible pattern before changing care or applying a treatment.
 Condition reference
 Healthy baseline
- LocationCheck which plant part, age of growth, and exposed or protected side is affected.
- TextureDecide whether the evidence is dry, powdery, sticky, raised, translucent, soft, or intact.
- ProgressionPhotograph the same area so you can tell whether the pattern is stable, improving, or spreading.
Use more than one clue. Confirm the photo with recent conditions, roots, watering history, and the rest of the plant before acting.
Sooty Mold & Honeydew Residue
How to Remove the Black Coating on Leaves and Control the Insects That Cause It
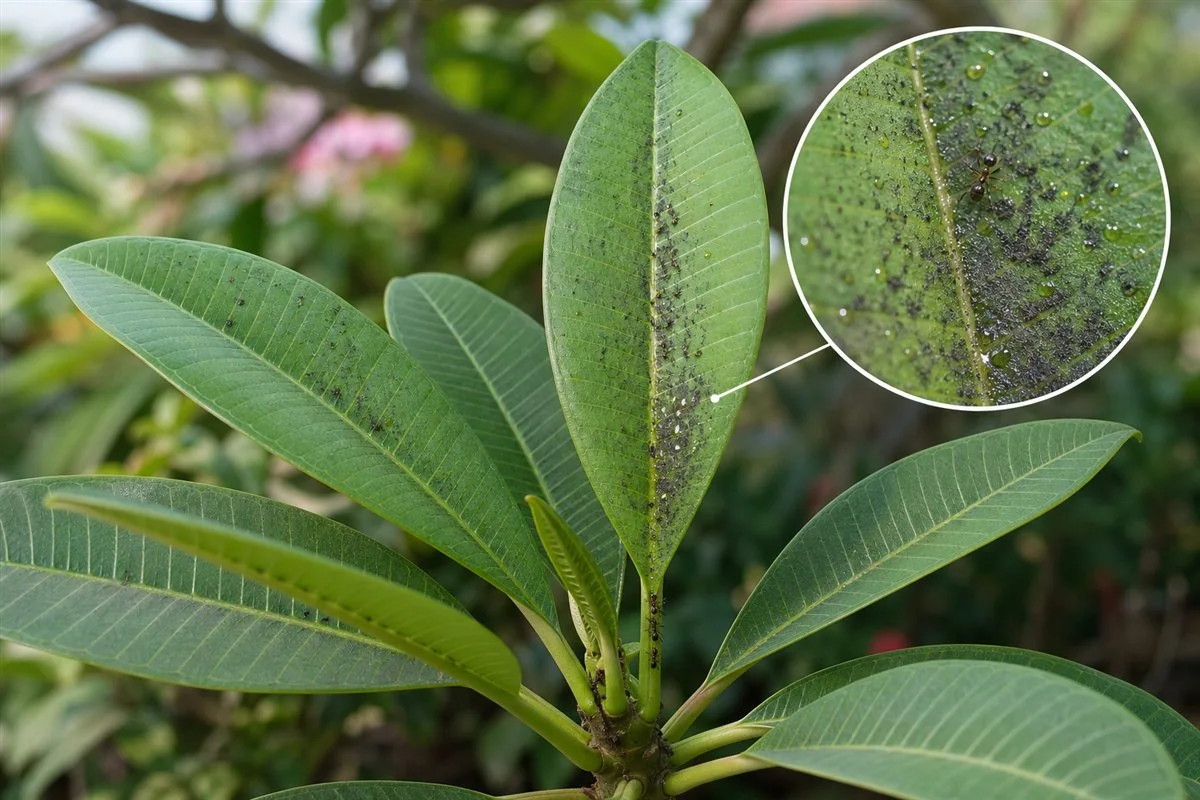
Sooty mold is a black, powdery fungal coating that develops on plumeria leaves and stems, not as a direct infection of the plant, but as a result of insect infestations that leave behind sticky honeydew. While sooty mold itself doesn’t attack plumeria tissue, it blocks sunlight, clogs leaf pores, and serves as a warning sign of underlying pest problems.
This guide explains how to remove sooty mold, eliminate the insects that cause it, and prevent recurrence by creating a less inviting environment for both pests and fungi.
What Causes Sooty Mold?
Sooty mold is caused by fungi such as Capnodium that grow on honeydew, a sugary secretion excreted by sap-sucking insects like:
- Aphids
- Mealybugs
- Whiteflies
- Soft scale insects
- Leafhoppers (occasionally)
- Planthoppers and psyllids
The mold colonizes the sticky residue, turning affected leaves black, dull, and sometimes distorted.
Identifying Sooty Mold on Plumeria
| Symptom | Description |
|---|---|
| Black or dark gray coating on leaves and stems | Wipes off with a damp cloth |
| Sticky or glossy feel underneath black layer | Indicates active honeydew |
| Presence of pests | Check undersides of leaves and branch nodes |
| Yellowing or wilting leaves | Due to blocked light and gas exchange |
| Ants crawling on stems | Often farming and protecting honeydew-producing insects |
Sooty mold is usually cosmetic at first, but can affect blooming and leaf health if left untreated.
Step-by-Step: How to Remove Sooty Mold
1. Wash Leaves
- Use a soft cloth or sponge with lukewarm water + a drop of mild dish soap
- Gently wipe affected leaves and stems
- Rinse with clean water to avoid soap buildup
2. Use Insecticidal Soap or Neem Oil
- Apply a foliar spray every 5–7 days for 2–3 weeks
- Target undersides of leaves and stem joints where pests hide
- Avoid oil-based sprays during high heat (above 85°F)
3. Improve Airflow
- Thin dense canopies
- Space containers 2–3 feet apart
- Reduce shading from nearby plants or structures
Pest Control: Stopping the Honeydew Source
| Pest | Preferred Control |
|---|---|
| Aphids | Neem oil, insecticidal soap, lacewing larvae |
| Mealybugs | Rubbing alcohol on cotton swab, systemic insecticide if severe |
| Whiteflies | Yellow sticky traps, soap sprays, predatory wasps (Encarsia) |
| Scale | Horticultural oil, manual scraping, systemic control (imidacloprid) |
| Leafhoppers | Pyrethrin or spinosad sprays, remove surrounding weeds |
Treat pests in multiple cycles to break breeding and prevent reinfestation.
Natural Remedies and Enhancers
| Method | Use |
|---|---|
| Diluted horticultural oil (1–2%) | Smothers spores and insects |
| Compost tea (foliar spray) | Encourages beneficial microbes on leaf surfaces |
| Essential oil sprays (thyme, rosemary) | Light antifungal and pest deterrent |
| Water + baking soda rinse (1 tsp per quart) | Adjusts leaf surface pH to discourage mold |
Preventive Tips
| Action | Purpose |
|---|---|
| Control ant populations | Ants protect honeydew producers and spread infestation |
| Wash foliage regularly in warm months | Removes early-stage mold and residue |
| Avoid high-nitrogen feeding during outbreaks | Reduces lush, pest-prone growth |
| Monitor weekly for insects during spring and summer | Early detection = easier control |
| Prune overcrowded growth | Increases sunlight and airflow, reduces fungal spread |
Myth vs. Fact
| Myth | Reality |
|---|---|
| “Sooty mold is a disease attacking the plant” | ❌ False—it grows on honeydew, not in tissue |
| “It wipes off easily, so it’s harmless” | ⚠️ False—left untreated, it can weaken photosynthesis |
| “More water will rinse it away” | ❌ False—mold persists unless pests are removed |
| “Spraying fungicide alone will fix it” | ❌ False—won’t work unless the insect source is addressed first |
Conclusion
Sooty mold may start as a cosmetic issue, but it’s a clear signal that insect pests are feeding on your plumeria. By addressing both the mold and the source—using gentle cleaning, targeted pest control, and improved growing conditions, you’ll restore leaf health, prevent spread, and help your plumeria thrive with clean, sun-catching foliage.
Turn the explanation into an action plan
- Monitor
- Compare whole-plant photographs monthly during active growth and at each seasonal transition.
- Change one thing
- Make the smallest justified correction, record the date, and avoid stacking treatments before you can see which one helped.
- Escalate when needed
- Inspect roots and major stems promptly when decline is sudden, anchorage fails, or several branches soften or die back.