
Welcome to the Plumeria Cultivation & Planting Guide. This is your definitive starting point for turning rooted cuttings, seedlings, or mature specimens into thriving, bloom-laden trees. Inside, you’ll learn how to choose the ideal micro-climate. You will craft well-draining soil mixes. Mastering container-versus-in-ground decisions is also included. You will time each planting task to your growing zone. Step-by-step instructions guide each aspect of planting. Troubleshooting checkpoints help resolve common issues. Nutrition tips based on science ensure your plumeria has strong roots, vigorous growth, and abundant flowers. Whether you garden on a balcony or use raised beds, this guide offers decades of practical experience. It is also helpful if you maintain a full grove. It turns that knowledge into practical, easy-to-follow advice. The guide empowers beginners and seasoned collectors alike to cultivate with confidence.
Bacterial Blight: Sanitation & Treatment Steps
What to check next
This guide helps you connect growth habit, light, roots, water, nutrition, season, and cultivar traits before trying to correct the whole plant. Read the detailed explanation, then use this sequence to decide what to do.
- 1
Describe the whole pattern
Compare height, branching, canopy density, leaf size, flowering, leaning, and vigorous areas.
- 2
Check the foundation
Inspect anchorage, container size, roots, drainage, and the amount and direction of light.
- 3
Compare season and cultivar
Confirm whether the habit is new, worsening, seasonal, or normal for the variety.
- 4
Correct the strongest limiter
Address the clearest root, light, structural, moisture, or nutrition limitation first.
- 5
Measure new growth
Use dated photos, internode length, branching, and the next leaf flush to judge progress.
How microclimate changes this answer
A sheltered wall, partial canopy, wind, container heat, and winter storage can shape the plant more than its regional Zone.
Compare this disease or rot pattern with healthy growth
Use these references to confirm that this article matches the visible pattern before changing care or applying a treatment.
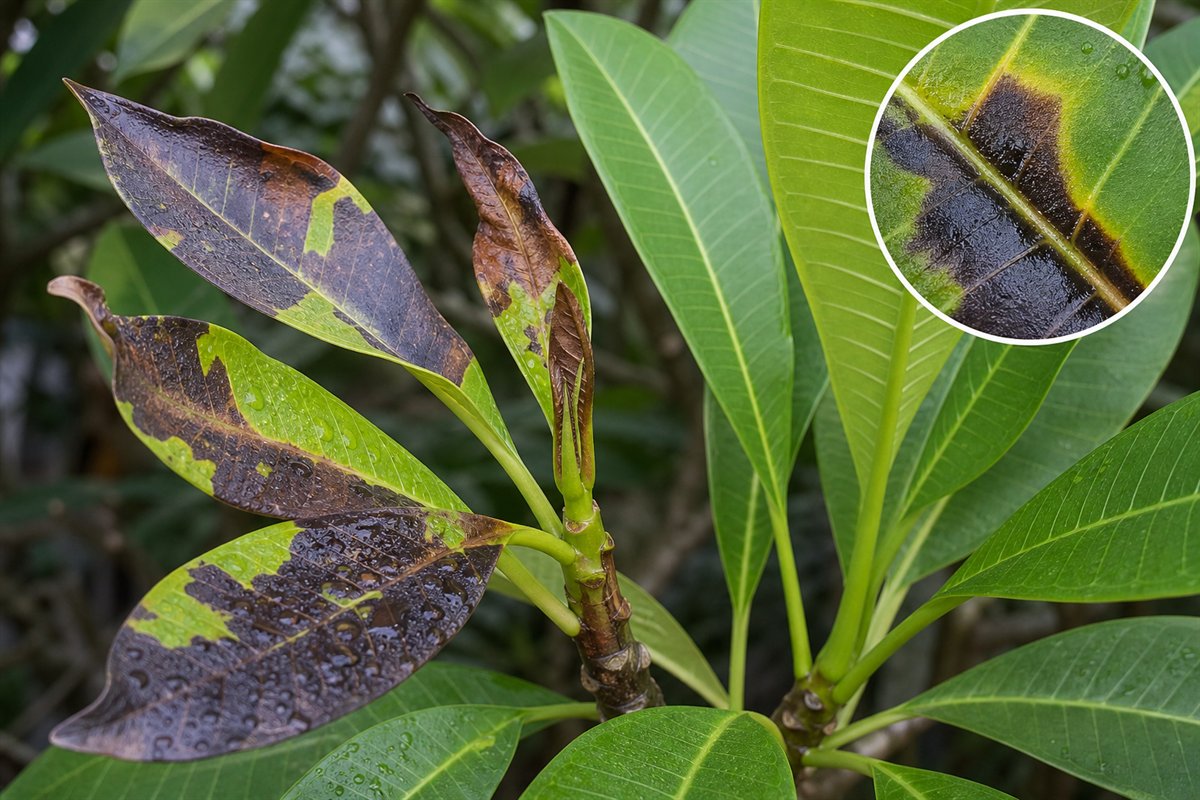 Condition reference
 Healthy baseline
- LocationCheck which plant part, age of growth, and exposed or protected side is affected.
- TextureDecide whether the evidence is dry, powdery, sticky, raised, translucent, soft, or intact.
- ProgressionPhotograph the same area so you can tell whether the pattern is stable, improving, or spreading.
Use more than one clue. Confirm the photo with recent conditions, roots, watering history, and the rest of the plant before acting.
START WITH THE COMPLETE GUIDE
Bacterial Blight on Plumeria
This article covers one focused part of the subject. Begin with the complete Bacterial Blight guide for the main identification, treatment, testing, and prevention or management path.
Bacterial Blight: Sanitation & Treatment Steps
How to Recognize, Remove, and Prevent One of Plumeria’s Most Aggressive Leaf Diseases
Bacterial blight is a destructive disease that causes rapid leaf spotting, distortion, and drop, often spreading invisibly through water splash, pruning tools, and infected plant debris. Unlike fungal leaf spot, bacterial blight can spread aggressively in wet, humid, or poorly ventilated conditions, and misdiagnosis often delays proper action.
This guide outlines how to identify bacterial blight on plumeria, provides step-by-step sanitation and treatment techniques, and shares best practices to keep your collection disease-free.
What Is Bacterial Blight?
Bacterial blight in plumeria is commonly attributed to opportunistic species such as Xanthomonas or Pseudomonas. These bacteria enter the plant through:
- Micro-tears in leaves from wind or pests
- Pruning wounds
- Contaminated water or tools
- Infected nearby plants or wet mulch
Unlike fungal infections, bacterial blight spreads within plant tissues and through water films, making it highly mobile during irrigation or rain events.
Symptoms of Bacterial Blight
| Symptom | Description |
|---|---|
| Irregular dark brown or black spots | Often angular or water-soaked in appearance |
| Yellow halos around lesions | Classic sign of bacterial margin spread |
| Spots coalesce into blotches, causing leaf curling or collapse | |
| Oily or wet-looking lesions | Especially on young leaves |
| Rapid leaf drop | More aggressive than fungal leaf spot |
| No powdery residue | Helps differentiate from rust or mildew |
Bacterial lesions often start small but spread quickly, especially during warm, humid mornings.
Step-by-Step Treatment & Sanitation Protocol
1. Remove Infected Leaves Immediately
- Use sterilized scissors or pruning shears
- Bag and dispose—do not compost
- Remove fallen or nearby debris from the soil surface
2. Disinfect Tools Between Every Plant
- Use isopropyl alcohol (70–90%) or a 10% bleach solution
- Clean both blades and handles thoroughly
3. Avoid All Overhead Watering
- Water at the base only
- Prevent splashing by using drip systems or bottom trays
4. Improve Airflow
- Space plants further apart
- Prune lightly to allow better light and wind through the canopy
- Move containers to areas with a consistent breeze
Treatment Options
Organic Approaches:
- Copper-based bactericides (e.g., copper octanoate) – apply weekly
- Hydrogen peroxide (3%) diluted 1:3 – light spray to reduce surface bacteria
- Neem oil (mild suppressive action) – alternate every 7 days with copper
- Compost tea sprays (if healthy) – may introduce competitive microbes
Chemical Options:
- Fixed copper fungicide – follow label rates; apply in dry periods only
- Streptomycin or kasugamycin-based bactericides may be available for ornamental use in some regions; rotate to avoid resistance
Apply treatments early in the morning and allow to dry before nightfall. Do not mix copper and peroxide together—rotate between applications.
Prevention Practices
| Best Practice | Why It Helps |
|---|---|
| Use only clean, well-draining soil | Reduces bacterial growth |
| Never prune in damp or rainy weather | Bacteria travel on water droplets |
| Disinfect hands and gloves between plants | Prevents accidental transfer |
| Remove and discard leaves weekly | Stops early infection cycles |
| Maintain mulch-free zone 2–3″ from stem base | Prevents spore splash and stem wicking |
| Use sulfur or cinnamon on all pruning wounds | Discourages microbial entry |
Bacterial Blight vs. Fungal Leaf Spot
| Feature | Bacterial Blight | Fungal Leaf Spot |
|---|---|---|
| Spread pattern | Irregular, angular, rapidly expanding | Round to oval, slow-growing |
| Halo | Yellow margins common | Sometimes faint or absent |
| Leaf feel | May be wet, oily, or sunken | Dry, papery, or brittle |
| Spore dust | ❌ None present | ✅ Sometimes black or brown spores |
| Control | Requires copper + sanitation | Responds well to neem, sulfur, fungicides |
When to Isolate or Discard
- If 70%+ of the canopy is infected
- If multiple nearby plants show symptoms
- If blight recurs after full treatment and pruning
- Isolate the plant 15+ feet away and monitor for 2–3 weeks
Conclusion
Bacterial blight can be devastating, but with swift removal of infected leaves, tool sanitation, airflow improvement, and copper-based treatments, most plumeria can recover fully. The key is early intervention and strict hygiene. A proactive sanitation schedule and correct diagnosis will keep bacterial infections from derailing your growing season.
Turn the explanation into an action plan
- Monitor
- Compare whole-plant photographs monthly during active growth and at each seasonal transition.
- Change one thing
- Make the smallest justified correction, record the date, and avoid stacking treatments before you can see which one helped.
- Escalate when needed
- Inspect roots and major stems promptly when decline is sudden, anchorage fails, or several branches soften or die back.