
What to check next
This guide helps you separate a true water shortage from slow drainage, damaged roots, seasonal slowdown, and weather-driven changes before changing the watering routine. Read the detailed explanation, then use this sequence to decide what to do.
- 1
Inspect below the surface
Check moisture at root depth instead of judging only by the surface.
- 2
Confirm drainage and roots
Look for blocked holes, compacted media, odor, soft roots, or a root ball pulled from the pot.
- 3
Compare recent demand
Account for heat, wind, rain, humidity, container size, active growth, and dormancy.
- 4
Change one variable
Correct drainage or watering amount first instead of changing fertilizer, soil, and location together.
- 5
Track the next dry-down
Record how long the root zone takes to move from evenly moist to ready for water again.
How microclimate changes this answer
Hot, windy container sites may dry much faster than the USDA Zone suggests. Humid, sheltered, cool, or rainy sites can remain wet much longer.
Compare this disease or rot pattern with healthy growth
Use these references to confirm that this article matches the visible pattern before changing care or applying a treatment.
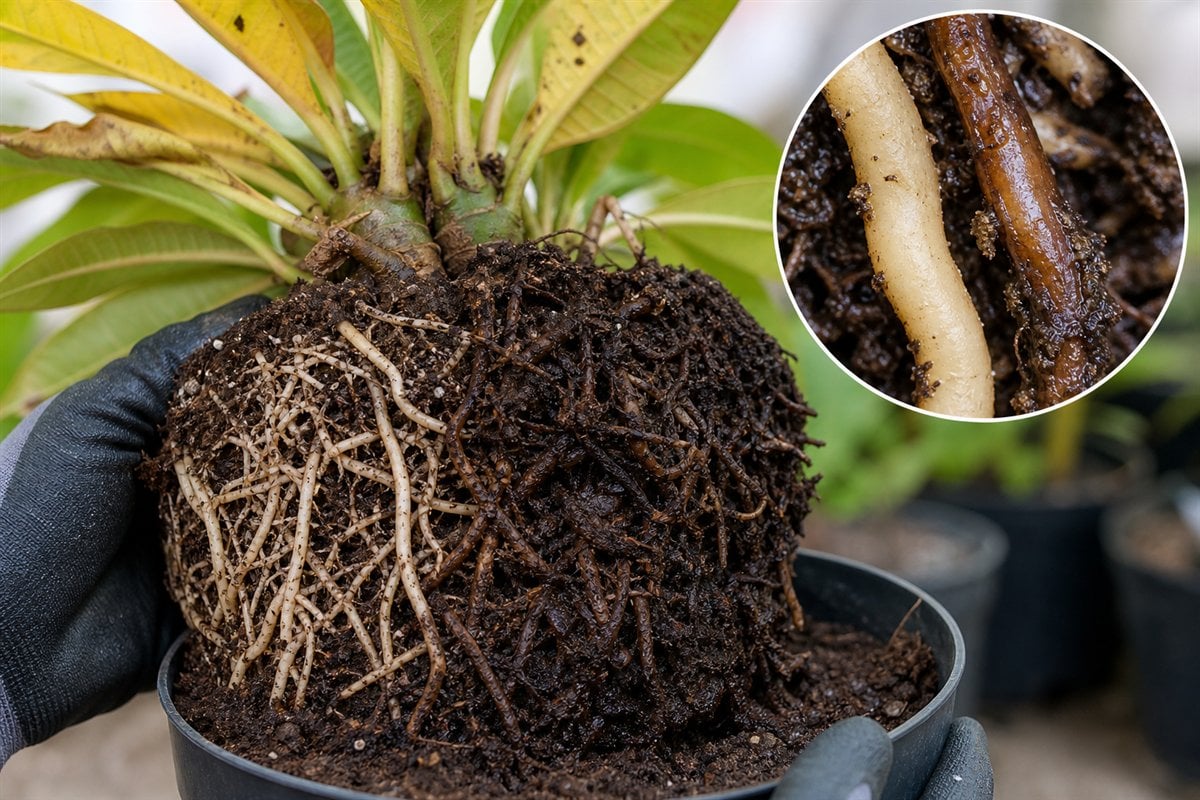 Condition reference
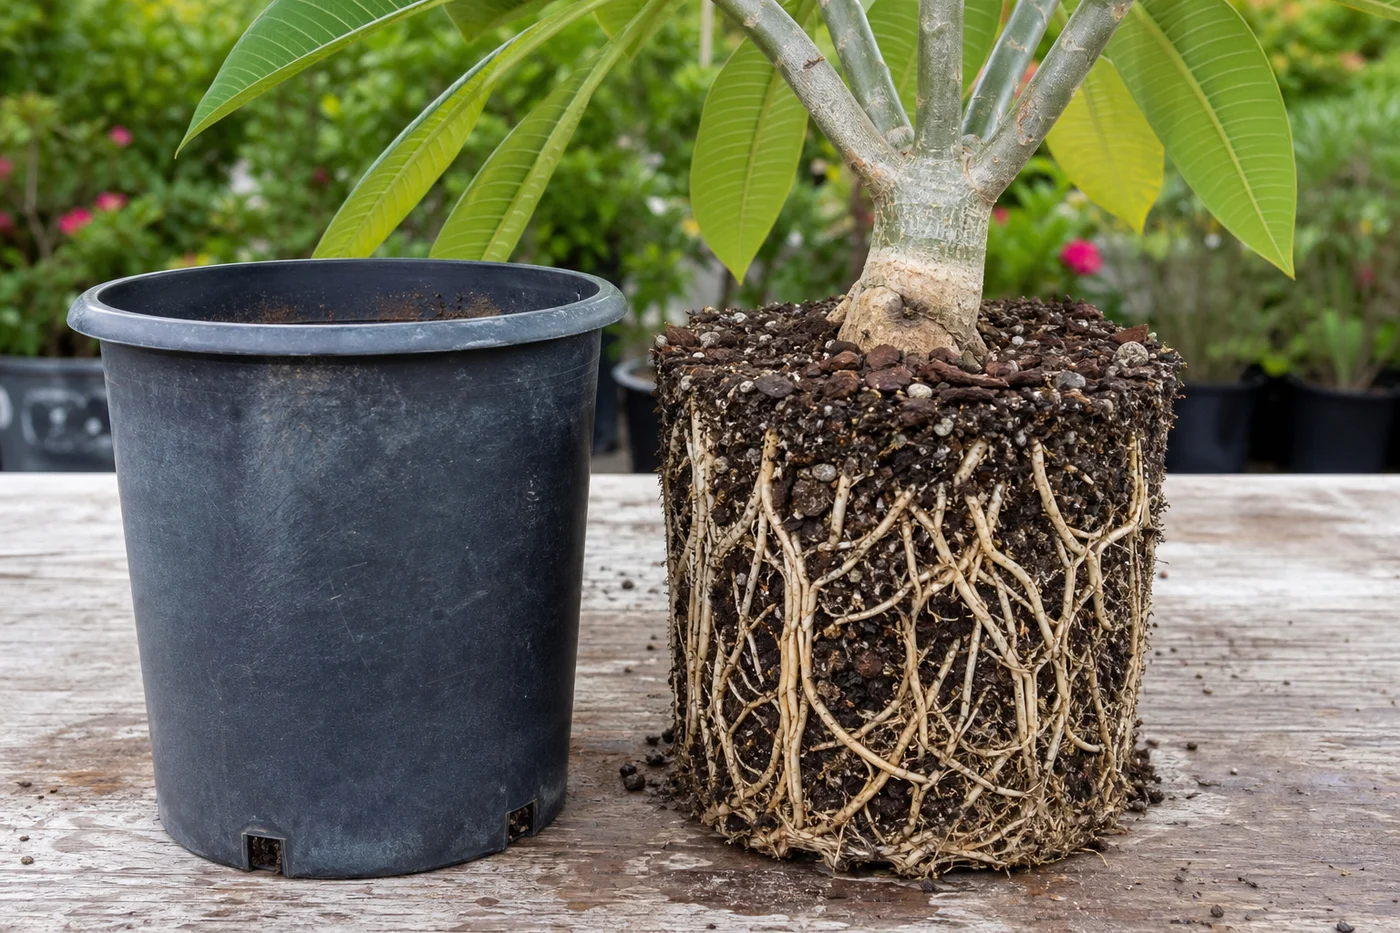 Healthy baseline
- LocationCheck which plant part, age of growth, and exposed or protected side is affected.
- TextureDecide whether the evidence is dry, powdery, sticky, raised, translucent, soft, or intact.
- ProgressionPhotograph the same area so you can tell whether the pattern is stable, improving, or spreading.
Use more than one clue. Confirm the photo with recent conditions, roots, watering history, and the rest of the plant before acting.
START WITH THE COMPLETE GUIDE
Root Rot on Plumeria
This article covers one focused part of the subject. Begin with the complete Root Rot guide to confirm the problem, choose the correct treatment path, and reach the related identification and prevention steps.
Important: Root color alone does not confirm rot. Healthy roots may be pale, tan, or soil-stained brown. Rot becomes more likely when loss of firmness, mushy or hollow tissue, detachment, odor, poor anchoring, persistent wetness, and plant decline occur together.
Reviewed August 1, 2026. This guide provides a ranked, logical course of action. A laboratory diagnosis may be needed to identify a particular pathogen, and any pesticide must be registered or labeled for the plant, site, and target problem.
Begin with the safer checks
- Complete the Overwatering vs. Underwatering Checklist.
- Measure moisture below the surface and note how long the lower root zone has remained wet.
- Check drainage openings, standing water, soil collapse, and irrigation overlap.
- Check stem-base firmness, odor, anchoring, leaf pattern, tip activity, and recent weather.
- Review recent repotting, root pruning, shipping, cold, flooding, fertilizer, pesticide drenches, and physical injury.
- Use the Root Health Checklist before deciding to unpot or excavate roots.
Rank the likelihood of root rot
Higher concern: several signs agree
- The lower root zone remains wet for an unusually long time.
- The plant wilts or declines while soil remains wet.
- The base or roots are soft, mushy, hollow, sloughing, or easily detached.
- A sour, fermented, or decaying odor is present.
- An established plant is unexpectedly loose or poorly anchored.
- Dark or soft tissue is spreading into the lower stem.
- The plant continues declining after excess water and drainage problems are corrected.
Lower concern: monitor before disturbing roots
- The plant remains firm and anchored.
- No sour odor or soft tissue is present.
- The root zone is drying at an improving rate.
- Leaf changes match dormancy, recent relocation, heat, cold, or another documented stress.
- New roots or healthy tip activity are present.
Plant-stage rules before treatment
- Unrooted or actively rooting cutting: water once at the beginning of the rooting process, then do not water the mix again until two or three full-sized leaves have grown. Light misting is acceptable if the firm cutting looks dehydrated.
- Confirmed newly rooted cutting: water sparingly and allow the soil to dry before watering again.
- Seedling: preserve healthy fine roots and avoid both saturated media and prolonged complete dryness.
- Established plant: compare visible root condition with moisture history, drainage, anchoring, and top growth.
- Recently repotted or root-pruned plant: reduced water use and temporary stalled growth can occur without active rot.
- Dormant plant: low water use and leaf loss are expected; soft tissue, odor, or collapse are not.
When physical root inspection is justified
Inspect roots physically when several warning signs agree, drainage cannot be corrected otherwise, or the plant is already being repotted for a justified reason. Do not unpot a stable plant merely to check root color.
Prepare before removing the plant
- Prepare a clean work area, clean cutting tools, fresh suitable mix, and a clean correctly sized container.
- Photograph the plant, stem base, soil surface, and drainage conditions.
- Support the trunk and root ball. Do not pull the plant out by its branches.
- Keep healthy roots shaded and protected from unnecessary drying or breakage.
Examine roots by structure, not color alone
- More consistent with healthy roots: firm, attached, flexible rather than mushy, distributed through the working root zone, and without a decaying odor.
- More consistent with dead or decayed roots: mushy, hollow, sloughing, foul-smelling, detached, collapsing, or lacking firm internal tissue.
- Uncertain tissue: firm roots that are merely tan, brown, or soil-stained should not be removed on color alone.
Step-by-step treatment when rot is confirmed
- Stop the moisture source. Remove standing water, irrigation overlap, and unnecessary rain exposure.
- Remove loose contaminated media only as needed. Do not automatically wash every healthy fine root bare.
- Remove clearly dead tissue. Cut back to firm, stable tissue. Preserve every healthy root possible.
- Clean tools between cuts and between plants. Use an appropriate tool disinfectant and follow its contact-time directions.
- Assess what remains. A plant with a useful firm root system follows a root-recovery path. A firm top with almost no viable roots may need to be treated as a cutting. Rot entering the trunk requires the Disease and Rot Condition Checker and possible salvage above the affected tissue.
- Correct the growing environment. Use fresh, well-aerated mix and a clean draining container sized to the remaining roots, or correct in-ground drainage without burying the trunk deeper.
- Allow clean cut surfaces to dry appropriately. Keep them shaded, clean, and protected; the time needed depends on the size of the cuts and local conditions.
- Replant without overpotting. Support the plant so movement does not repeatedly damage new roots.
- Hold fertilizer. Wait for stable firmness, predictable dry-down, and healthy active growth.
- Record and recheck. Monitor the base, odor, anchoring, moisture, and new growth before making another major change.
Product and fungicide guidance
A fungicide is not automatically required, and it cannot correct a saturated, oxygen-poor root zone. Different fungi, water molds, bacteria, and noninfectious injuries can produce similar decay. Use a product only when it is registered or labeled for the plant, application site, and target problem, and follow the label exactly.
- Do not treat household bleach, hydrogen peroxide, cinnamon, Epsom salt, neem oil, or copper as a universal root-rot cure.
- Do not combine products unless the labels specifically allow it.
- Do not apply a pesticide more often or at a stronger concentration than the label permits.
- If the plant is valuable, decline continues, or the cause is uncertain, seek a local diagnostic laboratory, Extension service, or qualified plant professional.
Watering after treatment
- Plant converted to an unrooted cutting: follow the one-watering-at-the-start rule and do not water again until two or three full-sized leaves have grown.
- Newly rooted or severely root-reduced plant: water sparingly and let the mix dry appropriately before watering again.
- Established plant with a useful healthy root system: water only when root-depth moisture, plant stage, and weather support it; apply evenly and confirm drainage.
- In-ground plant: keep irrigation away until the affected zone is ready, then use measured water within the remaining root area rather than flooding a broad zone.
Recovery checkpoints
- First 72 hours: no spreading softness, new odor, collapse, or renewed saturation.
- Week 1: stem and base remain firm; the plant stays supported; the mix begins a predictable dry-down.
- Weeks 2-4: no new decay; healthy root or tip activity appears when season and temperature support growth.
- Escalate immediately: softness spreads upward, the trunk collapses, odor increases, or the plant remains wilted while the root zone is wet.
Prevent another episode
- Use the Soil Moisture Checklist before watering.
- Test drainage and dry-down after repotting, major rain, or a seasonal change.
- Match container size and soil structure to the working root system and local microclimate.
- Reduce irrigation when leaf area, temperature, light, or root activity declines.
- Keep a saved Growing Area record and note each watering, rainfall event, treatment, and response.
Continue with the right support
- Use the Overwatering Rehabilitation Guide when the plant is wet but decay is not confirmed.
- Rank root and soil causes.
- Review the Growing Area microclimate.
- Submit or compare a photo for a guided review.
Turn the explanation into an action plan
- Monitor
- Recheck moisture and tissue firmness daily at first, then compare the next two watering cycles.
- Change one thing
- Make the smallest justified correction, record the date, and avoid stacking treatments before you can see which one helped.
- Escalate when needed
- Inspect roots promptly when wilt continues in wet media, the stem base softens, or the root zone develops a sour odor.