
The Plumeria Pests and Diseases Guide is an essential resource for identifying, preventing, and treating the most common threats to plumeria plants, including pests, fungi, and environmental stressors. This guide offers detailed information on how to recognize early signs of trouble, from insect infestations to fungal infections, and provides practical solutions to address these issues. It also covers strategies for managing environmental factors such as excessive humidity, temperature fluctuations, and poor soil conditions, which can weaken plumeria. With expert tips on natural and chemical treatments, as well as proactive care practices, this guide ensures your plumeria remains healthy, resilient, and free from common ailments, allowing it to thrive season after season.
Root Rot on Plumeria: Identification, Treatment and Prevention
What to check next
This guide helps you separate infectious disease from pests, exposure injury, nutrition symptoms, and normal aging before pruning or treating. Read the detailed explanation, then use this sequence to decide what to do.
Confirm the evidence for root, stem, or trunk rot
- Look for
- Soft or discolored tissue, poor anchorage, sour odor, dead roots, internal browning, or advancing collapse associated with prolonged moisture or injury.
- Compare with
- Dormancy, dehydration, cold damage, sunburn, loose potting mix, and normal corking can mimic parts of the pattern.
- Safest first response
- Stop repeated watering, inspect the affected structure, stabilize the plant, remove unsalvageable decay cleanly, and correct the moisture cause.
Microclimate clue: Cool wet roots, oversized pots, heavy mixes, prolonged rain, and poor airflow greatly increase rot risk.
- 1
Stabilize and isolate
Keep questionable plants away from healthy collections and avoid splashing water or sharing tools.
- 2
Describe the tissue
Note whether damage is dry, powdery, water-soaked, sunken, soft, foul-smelling, or one-sided.
- 3
Map the progression
Photograph and mark the edge so you can tell whether the condition is spreading.
- 4
Confirm the closest match
Compare the defining sign, not only leaf color, and use laboratory testing when needed.
- 5
Intervene narrowly
Remove only unsalvageable tissue, sanitize tools, and treat only when the diagnosis supports it.
How microclimate changes this answer
Long leaf wetness, warm humidity, poor airflow, and cool wet roots increase disease pressure; intense sun and cold create look-alikes.
Compare this disease or rot pattern with healthy growth
Use these references to confirm that this article matches the visible pattern before changing care or applying a treatment.
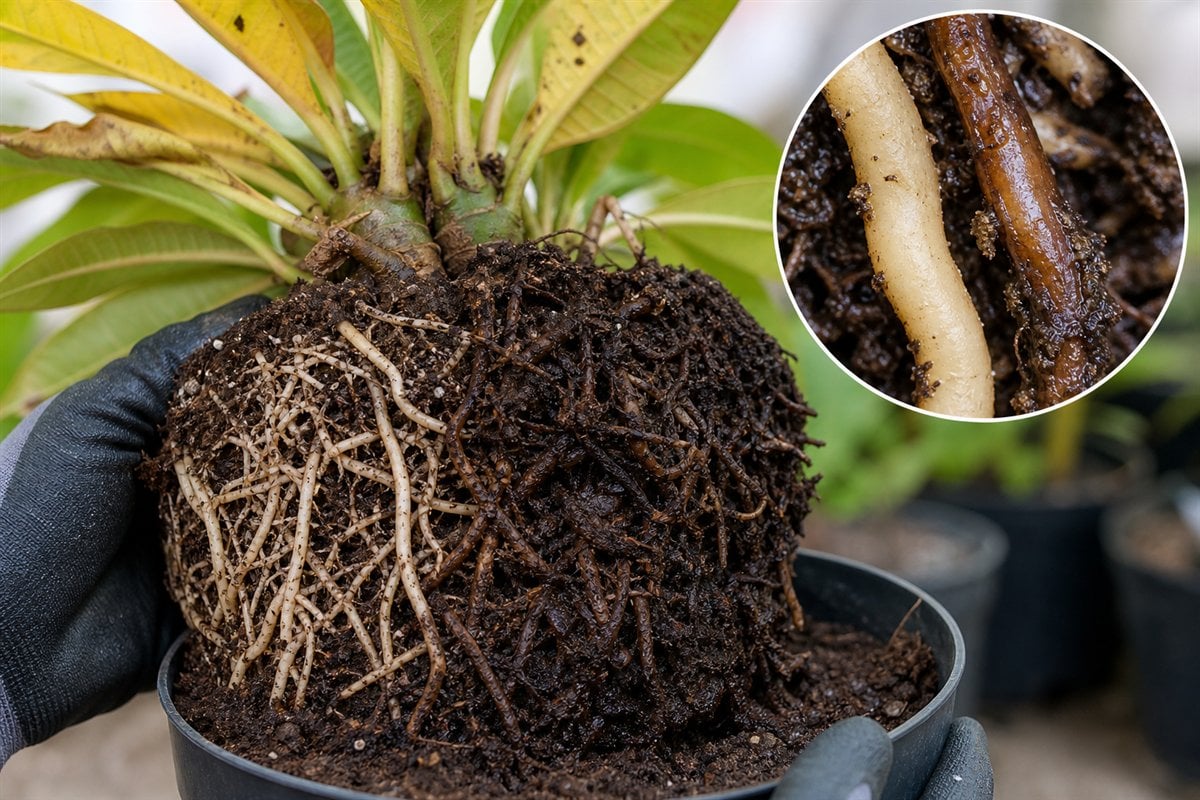 Condition reference
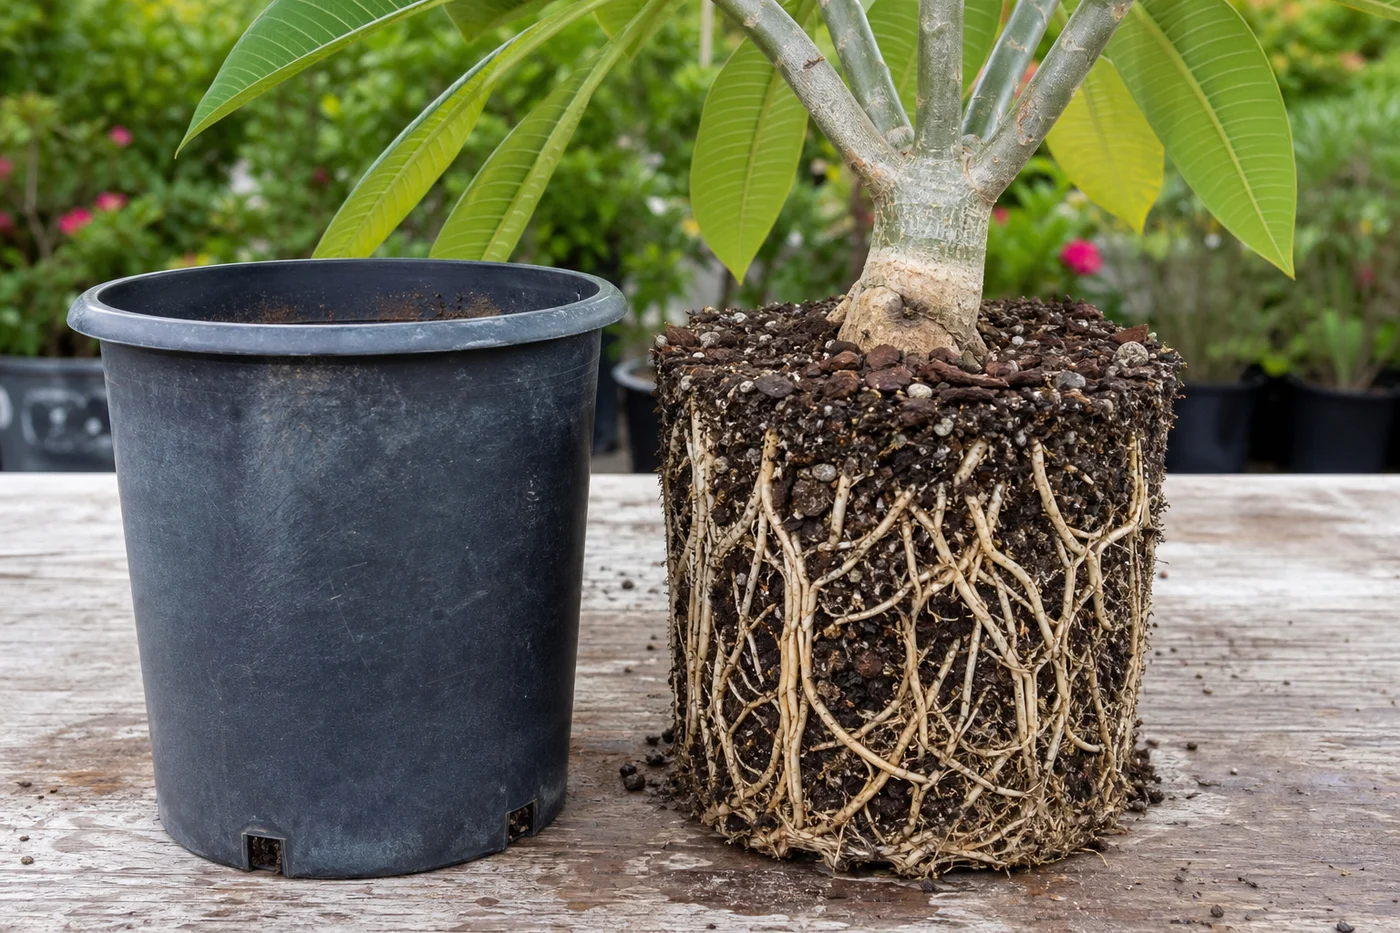 Healthy baseline
- LocationCheck which plant part, age of growth, and exposed or protected side is affected.
- TextureDecide whether the evidence is dry, powdery, sticky, raised, translucent, soft, or intact.
- ProgressionPhotograph the same area so you can tell whether the pattern is stable, improving, or spreading.
Use more than one clue. Confirm the photo with recent conditions, roots, watering history, and the rest of the plant before acting.
Plumeria can wilt or yellow from both too much and too little usable water. Root rot becomes likely only when the root zone shows failing tissue, persistent saturation, poor drainage, crown damage, or roots that are soft, hollow, dark, sloughing, or foul-smelling.
Confirm root damage below the soil line
Root rot is confirmed by failing root tissue, not by yellow leaves alone. Healthy plumeria roots are generally firm and pale to tan. Rotten roots may be dark, soft, hollow, foul-smelling, or lose their outer tissue when handled. Soil staining alone does not prove rot.
Fast decision table
| What you find | What it suggests | Next step |
|---|---|---|
| Wet mix, wilt, sour odor, soft or sloughing roots | Active root-zone decay is likely. | Unpot, inspect, remove dead roots, and correct the root environment. |
| Dry mix, shriveled stem, firm pale roots | Underwatering or failed wetting may be more likely. | Check whether water reaches the center before treating rot. |
| Wet mix but roots remain firm | Risk is present, but rot is not yet confirmed. | Correct drainage and document the dry-down before unnecessary cutting. |
| Lower stem or crown is soft | Decay may have moved beyond roots. | Use the Stem Rot Guide and act promptly. |
| White wax, insects, larvae, or feeding damage in roots | A root pest may be primary or contributing. | Use the soil-dwelling pest guide before choosing a disease product. |
| Established in-ground plant in a low or saturated site | Site drainage or seasonal water table may control the outcome. | Run the in-ground percolation test and assess grade and runoff. |
Step-by-step recovery
- Record the baseline: note plant stage, pot or site, recent rain and watering, temperature, time since repotting, and how long the root zone remains wet.
- Check drainage first: inspect blocked holes, standing water, compacted or collapsed mix, an oversized pot, buried crown, runoff from roofs or slopes, and low areas.
- Inspect when justified: unpot a container plant when persistent wetness, odor, crown softness, or decline makes root damage likely. Avoid repeatedly disturbing a stable plant.
- Separate living from dead roots: retain firm roots. Remove roots that are mushy, hollow, foul, collapsing, or sloughing with a clean sanitized tool.
- Correct the environment: use clean fast-draining structural mix, an appropriately sized container with open holes, and a firm crown kept above wet media.
- Restart water cautiously: do not saturate a reduced root system on a calendar. Check moisture at root depth and adjust for current weather and microclimate.
- Delay fertilizer: wait for stability and healthy root-supported growth. Fertilizer does not rebuild rotten roots and salts can add stress.
Watering rules by plant stage
- Rooting cutting: water once at the beginning of rooting, then do not water again until two or three full-sized leaves have grown. Lightly mist only if the firm cutting looks dehydrated.
- Newly rooted cutting: water sparingly and allow the mix to dry before watering again.
- Seedling: protect fine roots from both saturation and complete prolonged drought; use a small aerated root zone with even moisture.
- Established potted plant: water from actual moisture and pot weight, not a fixed schedule.
- Established in-ground plant: combine the percolation result with rainfall, grade, soil texture, and the seasonal water table.
Treatment choices
| Choice | When it fits | Limit |
|---|---|---|
| Drainage and watering correction | Roots remain firm but the root zone stays wet too long. | Do not wait for collapse when the crown is already soft. |
| Unpot, prune, and repot | Dead roots or failing media are confirmed. | Keep firm living roots and avoid an oversized replacement pot. |
| Site correction or raised root zone | In-ground drainage, grade, or compaction is the cause. | A loose amended hole inside dense clay can collect water. |
| Labeled disease product | A supported pathogen diagnosis and current ornamental label fit the site and target. | Products do not replace drainage correction or removal of dead roots. |
| Laboratory or Extension diagnosis | Valuable plants, repeated losses, rapid collapse, or uncertain pathogen involvement. | Submit representative roots and crown tissue before repeated treatments alter the evidence. |
Follow-up schedule
- Today: photograph, record moisture and drainage, isolate questionable plants, and inspect the crown.
- After repotting: keep the plant warm, stable, and protected from heavy rain; do not force growth.
- Every 24 hours initially: check crown firmness, odor, pot weight, and new spread.
- Weekly: record dry-down and signs of healthy root-supported leaves.
- Before the next wet or cool season: retest drainage and adjust placement, pot, mix, and watering.
Microclimate: humidity, rain, cool nights, wind, shade, container temperature, and winter storage can change dry-down dramatically. Use the saved Growing Area and current weather, but confirm what is happening at root depth.
Continue with the focused guides
Reference basis: UC Statewide IPM root and crown rot guidance, UC IPM ornamental nursery guidance, and the EPA introduction to pesticide labels.
Turn the explanation into an action plan
- Monitor
- Mark lesion borders and photograph the plant every two to three days during rapid change, or weekly when stable.
- Change one thing
- Make the smallest justified correction, record the date, and avoid stacking treatments before you can see which one helped.
- Escalate when needed
- Act quickly when soft decay moves into the trunk, foul odor appears, blackening advances daily, or several plants show the pattern.