
Welcome to the Plumeria Cultivation & Planting Guide. This is your definitive starting point for turning rooted cuttings, seedlings, or mature specimens into thriving, bloom-laden trees. Inside, you’ll learn how to choose the ideal micro-climate. You will craft well-draining soil mixes. Mastering container-versus-in-ground decisions is also included. You will time each planting task to your growing zone. Step-by-step instructions guide each aspect of planting. Troubleshooting checkpoints help resolve common issues. Nutrition tips based on science ensure your plumeria has strong roots, vigorous growth, and abundant flowers. Whether you garden on a balcony or use raised beds, this guide offers decades of practical experience. It is also helpful if you maintain a full grove. It turns that knowledge into practical, easy-to-follow advice. The guide empowers beginners and seasoned collectors alike to cultivate with confidence.
Rust Mites vs. Rust Fungus: Know the Difference
What to check next
This guide helps you connect growth habit, light, roots, water, nutrition, season, and cultivar traits before trying to correct the whole plant. Read the detailed explanation, then use this sequence to decide what to do.
- 1
Describe the whole pattern
Compare height, branching, canopy density, leaf size, flowering, leaning, and vigorous areas.
- 2
Check the foundation
Inspect anchorage, container size, roots, drainage, and the amount and direction of light.
- 3
Compare season and cultivar
Confirm whether the habit is new, worsening, seasonal, or normal for the variety.
- 4
Correct the strongest limiter
Address the clearest root, light, structural, moisture, or nutrition limitation first.
- 5
Measure new growth
Use dated photos, internode length, branching, and the next leaf flush to judge progress.
How microclimate changes this answer
A sheltered wall, partial canopy, wind, container heat, and winter storage can shape the plant more than its regional Zone.
Compare this insect or pest pattern with healthy growth
Use these references to confirm that this article matches the visible pattern before changing care or applying a treatment.
 Condition reference
 Healthy baseline
- LocationCheck which plant part, age of growth, and exposed or protected side is affected.
- TextureDecide whether the evidence is dry, powdery, sticky, raised, translucent, soft, or intact.
- ProgressionPhotograph the same area so you can tell whether the pattern is stable, improving, or spreading.
Use more than one clue. Confirm the photo with recent conditions, roots, watering history, and the rest of the plant before acting.
Rust Mites vs. Rust Fungus: Know the Difference
How to Accurately Diagnose and Treat Two Common Sources of Leaf Discoloration in Plumeria
If you’ve noticed bronzed, curled, or yellowing leaves on your plumeria, your first thought might be rust fungus. But there’s another lesser-known culprit: rust mites. While both cause visual damage to plumeria foliage and are often confused for one another, they are fundamentally different problems and require entirely different treatments.
This guide will help you accurately distinguish between rust fungus (a spore-based disease) and rust mites (microscopic insects), explain how to manage each, and prevent unnecessary misdiagnoses and treatment failures.
Why the Confusion?
Both rust mites and rust fungus produce:
- Bronze or yellow discoloration on leaves
- Leaf curling, premature drop, or distortion
- A gradual decline in bloom performance or tip health
However, the underlying cause, transmission method, and effective treatments are completely different.
Rust Fungus (Coleosporium plumeriae)
Overview:
Rust fungus is a spore-forming fungal disease that appears as orange or yellow powdery pustules, primarily on the underside of plumeria leaves. It thrives in warm, moist, and low-airflow conditions, especially during late summer and fall.
Symptoms:
| Feature | Description |
|---|---|
| Orange powder on underside of leaves | Rubs off easily |
| Yellow spots on top surface | Mirror the spore zones underneath |
| Starts on lower leaves | Moves upward if untreated |
| Leads to leaf drop in severe cases | Can defoliate entire plant |
Transmission:
- Windborne spores
- Rain splash
- Poor airflow and overcrowding
Rust Mites (Aceria plumeriae)
Overview:
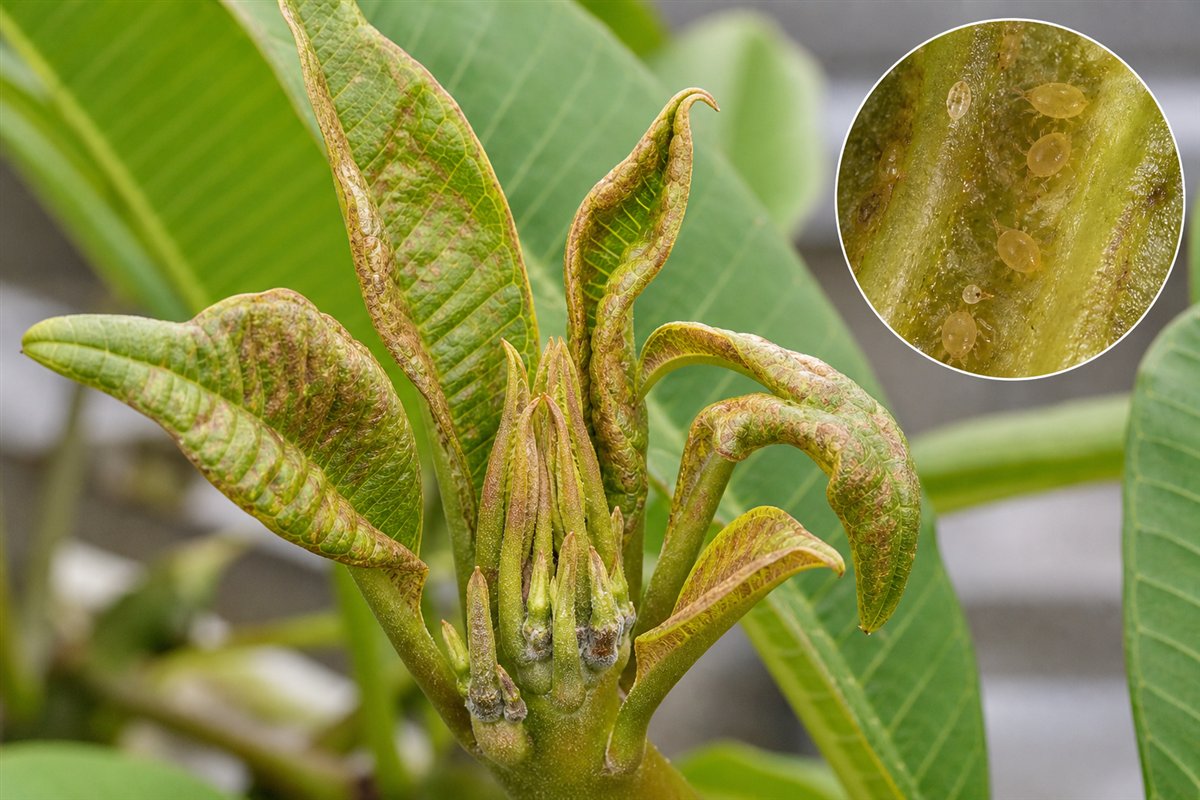
Rust mites are microscopic, wormlike insects that feed on the leaf surface, causing cell damage and bronzing. Unlike fungus, they don’t produce spores and can’t be seen with the naked eye—only with magnification (30x–60x).
Symptoms:
| Feature | Description |
|---|---|
| Bronzed or dull leaf surface | May have slight curl but no spots |
| No powdery residue | Cannot be rubbed off |
| Affects both upper and lower surfaces | Mites move freely |
| Stunted new growth | Sometimes with mild tip damage |
| Leaves feel rough or sandpapery | Due to damaged cells |
Transmission:
- Wind
- Contaminated tools
- Spread by ants, birds, or contact
Rust Mites vs. Rust Fungus: Comparison Table
| Feature | Rust Fungus | Rust Mites |
|---|---|---|
| Cause | Fungal spores | Microscopic mites |
| Visible orange spots/pustules | ✅ Yes | ❌ No |
| Rubs off on fingers | ✅ Yes | ❌ No |
| Bronzing or dulling of leaf surface | ❌ Minimal | ✅ Yes |
| Webbing present | ❌ No | ❌ No |
| Easily seen with magnifier | ❌ No spores or bodies | ✅ Mites visible under 30x+ |
| Primary season | Humid, rainy periods | Dry, warm, stagnant air |
| Spreads via | Spores (air/rain) | Contact, tools, wind |
✅ Treatment Options
For Rust Fungus:
| Method | Application |
|---|---|
| Remove infected leaves | Cut and dispose—do not compost |
| Improve airflow | Space plants, prune interior |
| Apply fungicides: |
- Copper-based sprays
- Chlorothalonil
- Sulfur (cool weather only)
| Avoid overhead watering | Keep foliage dry
For Rust Mites:
| Method | Application |
|---|---|
| Spray with sulfur dust or sulfur spray | Best early morning, below 85°F |
| Apply horticultural oil or neem oil | Smothers mites and eggs |
| Use miticides (e.g., Abamectin) | For severe infestations |
| Rotate treatments | Prevent resistance |
| Wash leaves weekly during outbreak | Reduces mite populations |
Note: Fungicides do not control mites, and miticides do not treat rust fungus—misdiagnosis leads to wasted effort and poor results.
Prevention Tips for Both
| Practice | Benefit |
|---|---|
| Quarantine new plants for 2–3 weeks | Prevent hidden infestations |
| Clean tools between uses | Avoid cross-contamination |
| Space plumeria to ensure airflow | Helps prevent both pests and fungus |
| Remove leaf litter | Reduces spore and mite overwintering |
| Monitor undersides and tips weekly | Catch early signs |
Myths & Misdiagnoses
| Myth | Truth |
|---|---|
| “Rust is always caused by fungus” | Mites cause similar symptoms without spores |
| “Spraying fungicide will fix all rusting” | Not if mites are the real problem |
| “Orange powder = nutrient deficiency” | Orange dust is a classic fungal sign, not nutrition |
| “No powder = no problem” | Bronzing may signal mites instead |
Conclusion
Rust mites and rust fungus are two of the most commonly misidentified issues in plumeria. Both cause leaf discoloration and stress, but they stem from entirely different sources—and require entirely different control strategies. By learning to distinguish the signs, inspect closely, and use the right products, you can prevent wasted treatments and keep your plumeria healthy, productive, and free from false diagnoses.
Turn the explanation into an action plan
- Monitor
- Compare whole-plant photographs monthly during active growth and at each seasonal transition.
- Change one thing
- Make the smallest justified correction, record the date, and avoid stacking treatments before you can see which one helped.
- Escalate when needed
- Inspect roots and major stems promptly when decline is sudden, anchorage fails, or several branches soften or die back.