
Welcome to the Plumeria Cultivation & Planting Guide. This is your definitive starting point for turning rooted cuttings, seedlings, or mature specimens into thriving, bloom-laden trees. Inside, you’ll learn how to choose the ideal micro-climate. You will craft well-draining soil mixes. Mastering container-versus-in-ground decisions is also included. You will time each planting task to your growing zone. Step-by-step instructions guide each aspect of planting. Troubleshooting checkpoints help resolve common issues. Nutrition tips based on science ensure your plumeria has strong roots, vigorous growth, and abundant flowers. Whether you garden on a balcony or use raised beds, this guide offers decades of practical experience. It is also helpful if you maintain a full grove. It turns that knowledge into practical, easy-to-follow advice. The guide empowers beginners and seasoned collectors alike to cultivate with confidence.
Caterpillar & Snail Defense Tactics
What to check next
This guide helps you connect growth habit, light, roots, water, nutrition, season, and cultivar traits before trying to correct the whole plant. Read the detailed explanation, then use this sequence to decide what to do.
- 1
Describe the whole pattern
Compare height, branching, canopy density, leaf size, flowering, leaning, and vigorous areas.
- 2
Check the foundation
Inspect anchorage, container size, roots, drainage, and the amount and direction of light.
- 3
Compare season and cultivar
Confirm whether the habit is new, worsening, seasonal, or normal for the variety.
- 4
Correct the strongest limiter
Address the clearest root, light, structural, moisture, or nutrition limitation first.
- 5
Measure new growth
Use dated photos, internode length, branching, and the next leaf flush to judge progress.
How microclimate changes this answer
A sheltered wall, partial canopy, wind, container heat, and winter storage can shape the plant more than its regional Zone.
Compare this insect or pest pattern with healthy growth
Use these references to confirm that this article matches the visible pattern before changing care or applying a treatment.
 Condition reference
 Healthy baseline
- LocationCheck which plant part, age of growth, and exposed or protected side is affected.
- TextureDecide whether the evidence is dry, powdery, sticky, raised, translucent, soft, or intact.
- ProgressionPhotograph the same area so you can tell whether the pattern is stable, improving, or spreading.
Use more than one clue. Confirm the photo with recent conditions, roots, watering history, and the rest of the plant before acting.
Caterpillar & Snail Defense Tactics
How to Identify, Deter, and Eliminate Leaf-Eating Pests on Plumeria
While most plumeria pests are small and sap-sucking, caterpillars and snails pose a different threat: they chew through leaves, buds, and even young stems, often causing dramatic damage in a short time. These pests are especially active in warm, humid seasons and in shaded or mulched areas, making early detection and response critical.
This guide explains how to identify the most common chewing pests on plumeria and outlines both organic and non-organic strategies to control and prevent damage from caterpillars, snails, and slugs.
🐛 Common Chewing Pests on Plumeria
1. Tetrio Sphinx Caterpillar (Pseudosphinx tetrio)
- Large (4–6″), black with yellow rings and red head
- Feeds in groups, quickly defoliating entire branches
- Native to the Caribbean and South Florida
- Becomes a large brown moth
2. Looper Caterpillars
- Inch-long, green or brown “inchworms”
- Feed on tender new leaves
- Cause notching or holes along leaf edges
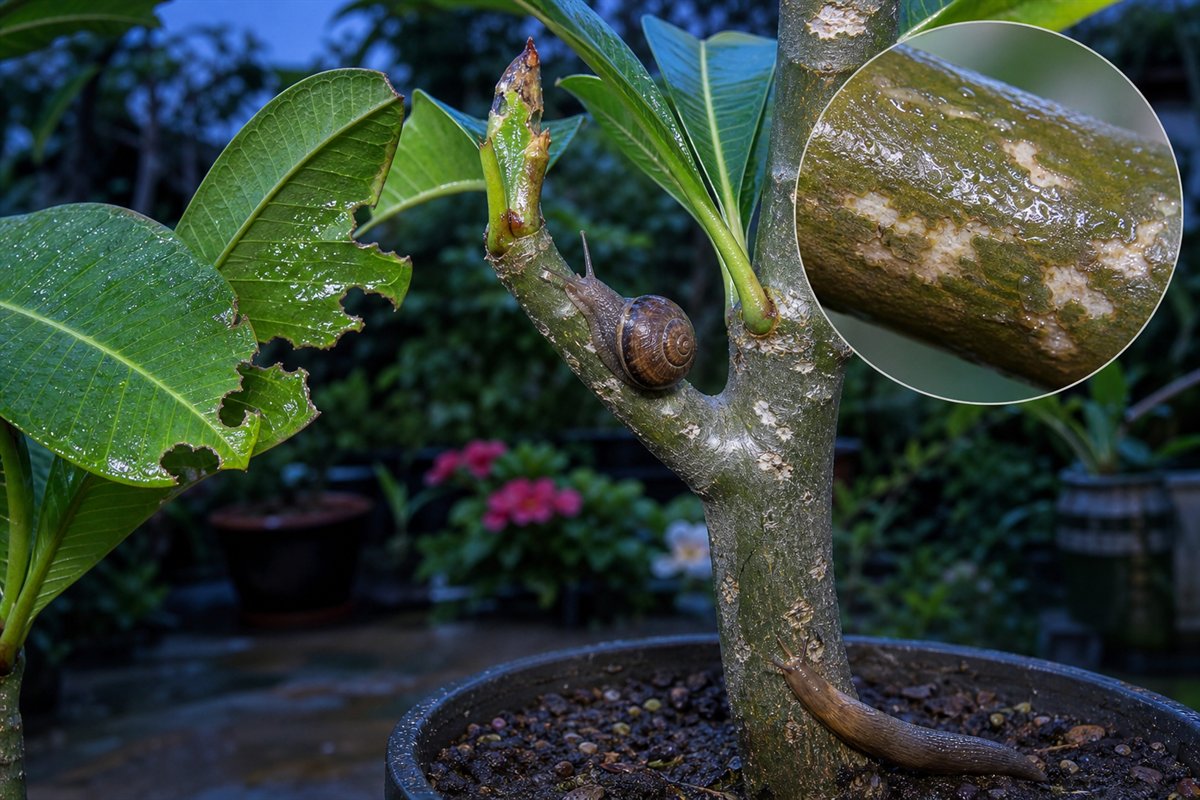
3. Snails & Slugs
- Nocturnal feeders
- Leave ragged edges and large irregular holes in leaves
- Leave behind shiny slime trails
- Shelter in mulch, under pots, or damp shade
Identifying Chewing Damage
| Symptom | Likely Cause |
|---|---|
| Entire leaves eaten or midrib left | Tetrio caterpillar |
| Holes in young leaves or buds | Loopers or small caterpillars |
| Chewed leaf edges + slime trails | Slugs or snails |
| Feeding at night or early morning | Snails or moth larvae |
| Clumps of frass (droppings) on lower leaves | Caterpillar infestation |
Unlike mites or mealybugs, these pests don’t hide—manual inspection at dawn or dusk is the best detection method.
✅ Organic Control Strategies
1. Manual Removal
- Inspect early morning or evening
- Pick off and drop into soapy water
- Especially effective for Tetrio and large caterpillars
2. Bacillus thuringiensis (BT)
- A natural bacterial insecticide that targets caterpillars only
- Ingested by the pest → stops feeding and kills within days
- Safe for pollinators and pets
- Reapply every 7–10 days or after heavy rain
3. Iron Phosphate Baits (for Slugs/Snails)
- Brands: Sluggo, Garden Safe, etc.
- Sprinkle around base of plumeria and along walkways
- Disrupts digestion and kills within 2–3 days
- Safe around pets and wildlife
4. Copper Tape or Wire (Barrier)
- Creates a mild electric charge that repels snails and slugs
- Wrap around pot rims or raised beds
- Combine with mulch management for best effect
5. Diatomaceous Earth (DE)
- Fine silica powder that abrades soft-bodied pests
- Dust around plant base and affected leaves
- Must stay dry—reapply after watering or rain
- Use caution to avoid inhalation
Non-Organic Control Options
Use these for severe outbreaks or where organic methods have failed.
1. Spinosad-Based Sprays (e.g., Captain Jack’s Deadbug)
- Fermented compound that targets caterpillars and leaf-chewers
- Kills within 1–2 days; safe for most beneficials
- Reapply every 7–10 days
2. Carbaryl (Sevin)
- Contact insecticide that kills caterpillars, slugs, and many chewing pests
- Avoid spraying near pollinators or during bloom
- Residual action can disrupt beneficial insect populations
3. Metaldehyde Baits (for Snails/Slugs)
- Stronger than iron phosphate but toxic to pets, birds, and wildlife
- Use in bait stations or in restricted areas
- Handle with caution and store securely
🛡️ Prevention Tips
| Practice | Effect |
|---|---|
| Clean up fallen leaves and frangipani flowers | Removes egg-laying sites |
| Keep mulch away from trunk base | Reduces snail and slug shelter |
| Raise pots or install trays filled with gravel or copper | Physical barrier |
| Encourage natural predators (e.g., birds, frogs, lizards) | Balance the garden ecosystem |
| Rotate inspection times (morning/dusk) | Catch pests when active |
🌿 Companion Tactics
- Spray foliage every 2 weeks with BT during warm season
- Set beer traps for slugs: bury a shallow dish filled with beer at soil level
- Avoid overwatering or dense canopies that encourage moist hiding places
- Quarantine new plants before adding to the collection
Final Thoughts
Chewing pests like Tetrio caterpillars, loopers, snails, and slugs can devastate plumeria foliage—but they’re also easy to control when caught early. Whether you use organic tools like BT, iron phosphate, and hand-picking, or resort to chemical baits and sprays for heavy infestations, the key is vigilant monitoring and prompt response.
By combining early detection with smart controls, you’ll protect your plumeria’s canopy and blooming potential all season long.
Turn the explanation into an action plan
- Monitor
- Compare whole-plant photographs monthly during active growth and at each seasonal transition.
- Change one thing
- Make the smallest justified correction, record the date, and avoid stacking treatments before you can see which one helped.
- Escalate when needed
- Inspect roots and major stems promptly when decline is sudden, anchorage fails, or several branches soften or die back.