
The Plumeria Pests and Diseases Guide is an essential resource for identifying, preventing, and treating the most common threats to plumeria plants, including pests, fungi, and environmental stressors. This guide offers detailed information on how to recognize early signs of trouble, from insect infestations to fungal infections, and provides practical solutions to address these issues. It also covers strategies for managing environmental factors such as excessive humidity, temperature fluctuations, and poor soil conditions, which can weaken plumeria. With expert tips on natural and chemical treatments, as well as proactive care practices, this guide ensures your plumeria remains healthy, resilient, and free from common ailments, allowing it to thrive season after season.
Plumeria Rust: Identification, Treatment and Prevention
What to check next
This guide helps you separate infectious disease from pests, exposure injury, nutrition symptoms, and normal aging before pruning or treating. Read the detailed explanation, then use this sequence to decide what to do.
Confirm the evidence for plumeria rust
- Look for
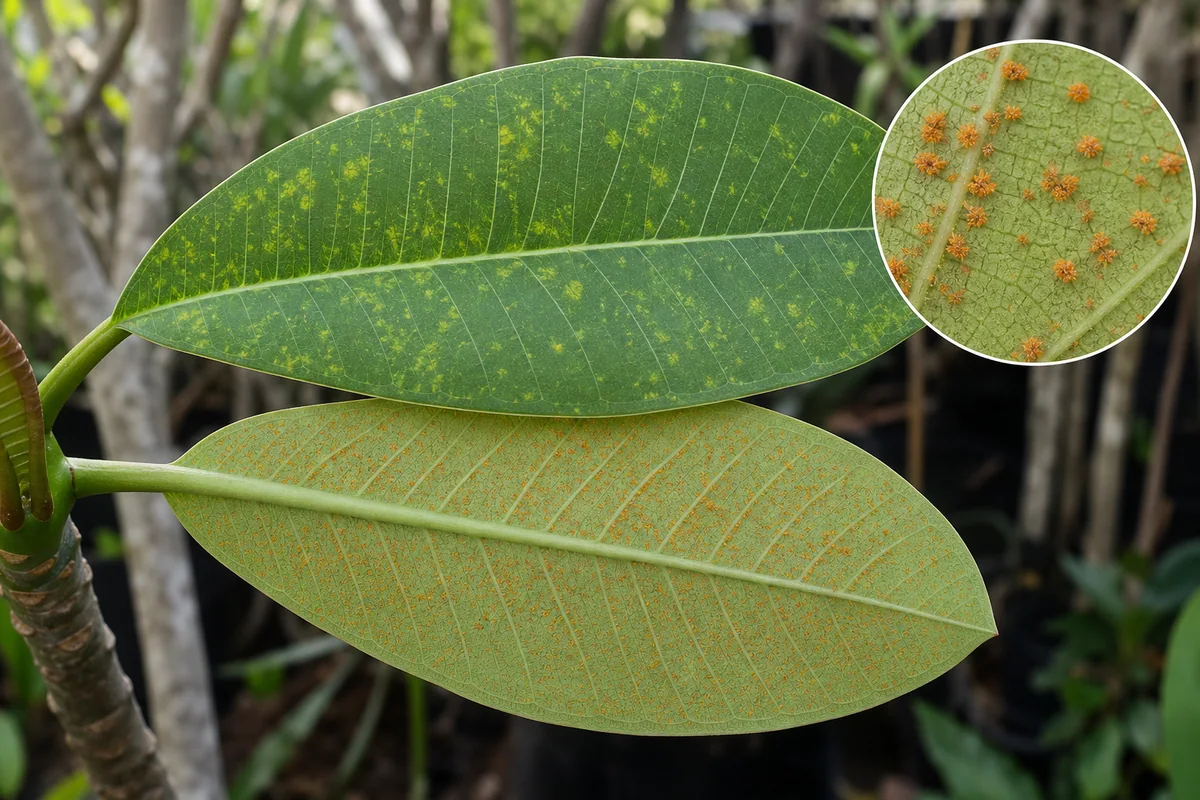
- Orange powdery pustules concentrated on leaf undersides, corresponding yellow spots above, and progressive leaf yellowing or drop.
- Compare with
- Spider mites, fertilizer splash, other leaf spots, and natural aging do not produce the characteristic orange spores beneath leaves.
- Safest first response
- Confirm underside spores, remove heavily infected fallen material, improve airflow and leaf-drying conditions, then follow a labeled fungicide plan if justified.
Microclimate clue: Warm humidity, prolonged leaf wetness, crowded canopies, and persistent infected leaves increase rust pressure.
- 1
Stabilize and isolate
Keep questionable plants away from healthy collections and avoid splashing water or sharing tools.
- 2
Describe the tissue
Note whether damage is dry, powdery, water-soaked, sunken, soft, foul-smelling, or one-sided.
- 3
Map the progression
Photograph and mark the edge so you can tell whether the condition is spreading.
- 4
Confirm the closest match
Compare the defining sign, not only leaf color, and use laboratory testing when needed.
- 5
Intervene narrowly
Remove only unsalvageable tissue, sanitize tools, and treat only when the diagnosis supports it.
How microclimate changes this answer
Long leaf wetness, warm humidity, poor airflow, and cool wet roots increase disease pressure; intense sun and cold create look-alikes.
Compare this leaf pattern with healthy growth
Use these references to confirm that this article matches the visible pattern before changing care or applying a treatment.
 Condition reference
 Healthy baseline
- LocationCheck which plant part, age of growth, and exposed or protected side is affected.
- TextureDecide whether the evidence is dry, powdery, sticky, raised, translucent, soft, or intact.
- ProgressionPhotograph the same area so you can tell whether the pattern is stable, improving, or spreading.
Use more than one clue. Confirm the photo with recent conditions, roots, watering history, and the rest of the plant before acting.
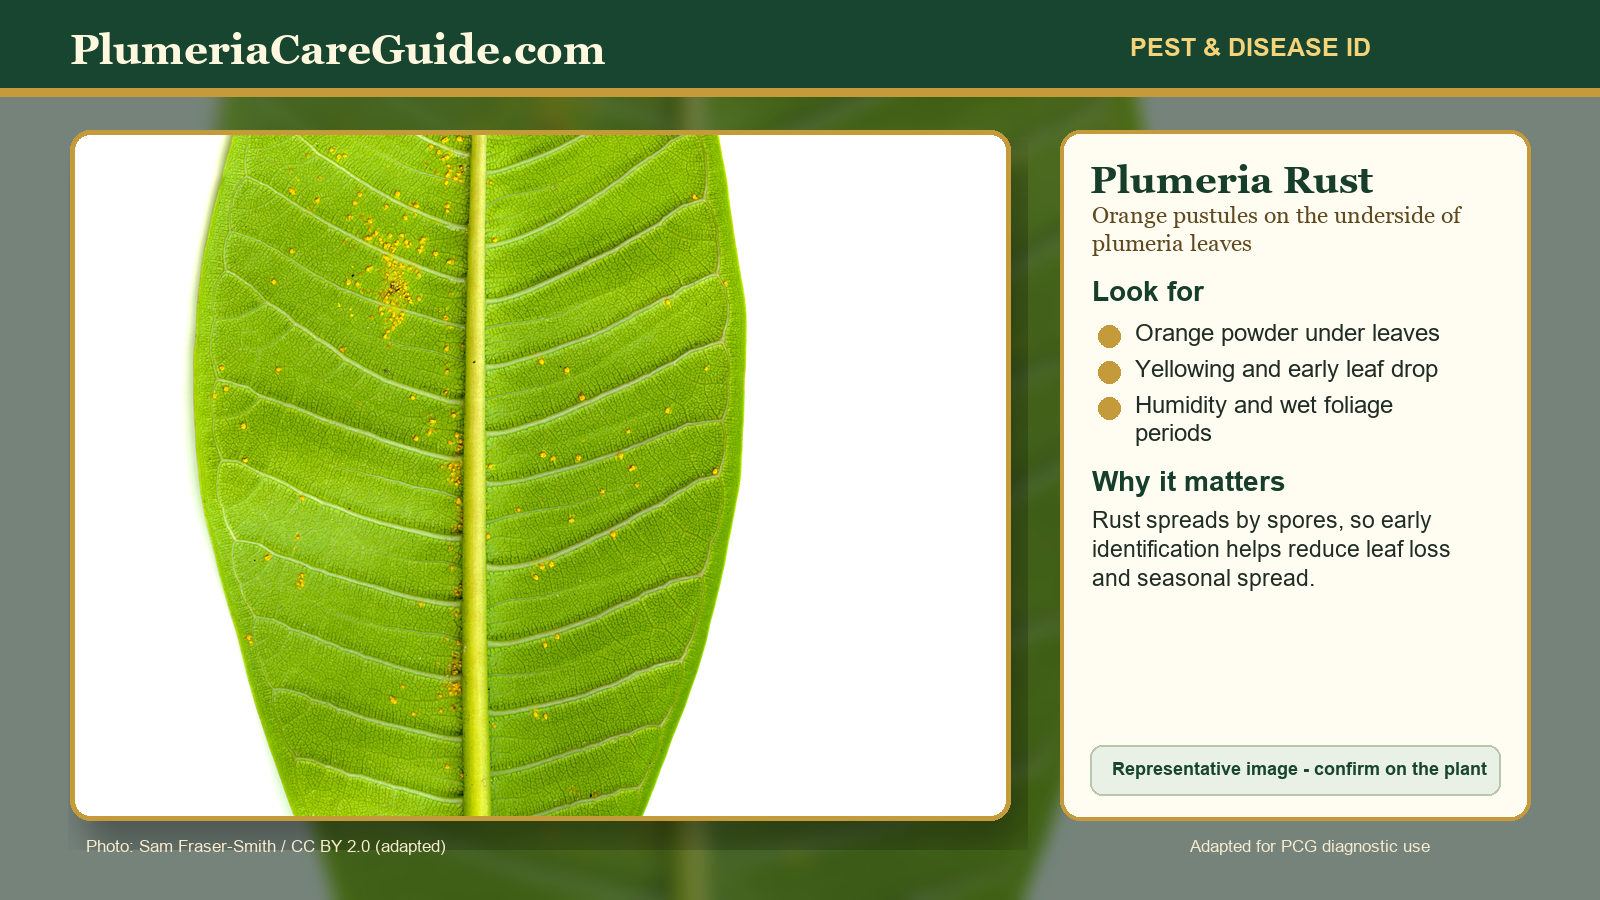
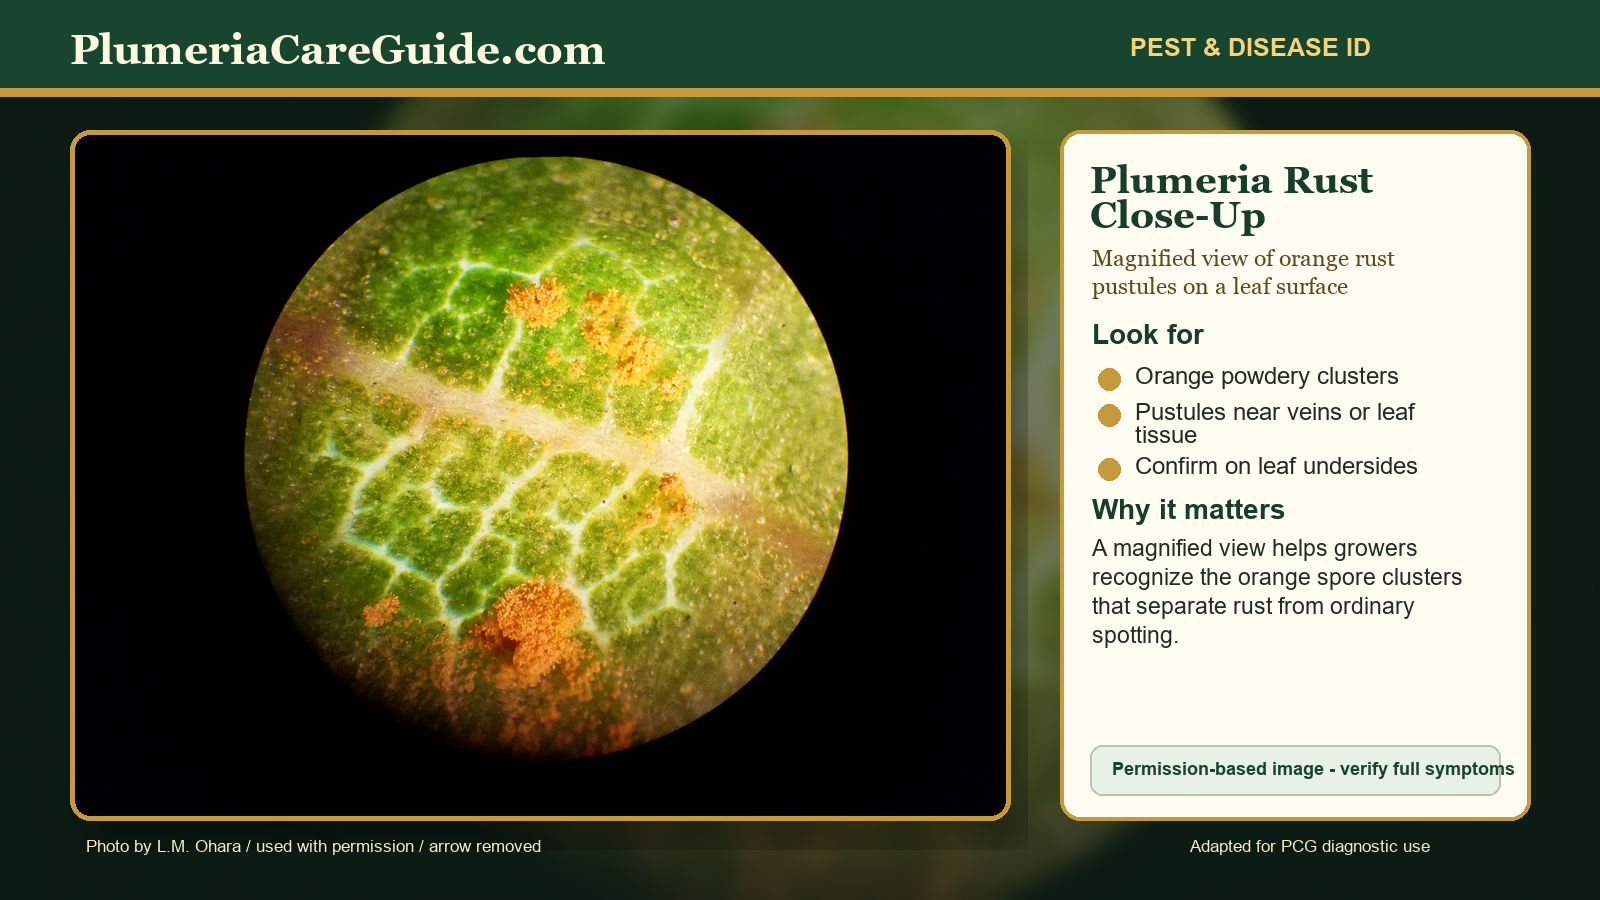
Plumeria rust is a fungal leaf disease caused by Coleosporium plumeriae. It is recognized by powdery yellow-orange pustules, usually on the underside of leaves, with yellow spots often visible above them. Severe infection can curl, brown, and drop leaves, but this rust does not infect plumeria stems or flowers.
Confirm rust on the underside of the leaf
Yellow spots on the upper leaf surface are a clue, not a complete diagnosis. Turn the leaf over. Powdery yellow-orange pustules beneath the matching spots are the strongest practical evidence of fungal plumeria rust.
Fast confirmation table
| What you observe | How strongly it supports rust | What to do next |
|---|---|---|
| Powdery yellow-orange pustules beneath a leaf | Strong evidence of fungal plumeria rust. | Photograph both surfaces and begin sanitation. |
| Yellow spots above with matching orange pustules below | Classic paired evidence. | Use the treatment path and check nearby plants. |
| Yellow spots only, with no underside powder | Weak evidence by itself. | Compare watering, nutrition, leaf spots, mites, and normal seasonal change. |
| Bronzing, stippling, or distorted new growth without orange powder | More consistent with mites or thrips than fungal rust. | Use the insect and mite comparison guides. |
| Dry bleached or scorched patches on the exposed side | More consistent with sunburn or environmental injury. | Review exposure and recent weather or relocation. |
| Orange or brown damage on stems or flowers | Not the normal infection pattern of plumeria rust. | Evaluate physical injury, rot, insects, or another disease. |
Step-by-step treatment decision
- Confirm before treating: inspect several leaves and photograph the upper and lower surfaces. Orange powder beneath the leaf is the key evidence.
- Limit spore movement: handle infected plants gently and avoid shaking or carrying wet infected leaves through the collection.
- Remove the main source: collect fallen leaves and remove heavily infected leaves early. Seal them for disposal; do not leave them beneath the plant or compost them beside the growing area.
- Improve leaf drying: increase spacing and airflow, control weeds, and avoid unnecessary overhead watering or late-day wetting. Keep the root zone appropriately watered.
- Judge whether sanitation is enough: a minor infection on a mature plant may be monitored after cleanup. Seedlings, recurring outbreaks, valuable collections, or rapidly increasing infection may justify a labeled fungicide.
- Select by label, not advertising: use only a current product labeled for ornamental rust and the intended site. University guidance has listed active ingredients such as myclobutanil and azoxystrobin as examples; availability and permitted uses change.
- Apply carefully: follow the label for rate, coverage, protective equipment, weather, interval, maximum applications, and reentry. Test a small area first and avoid treating heat-stressed plants unless the label specifically permits it.
- Protect future growth: fungicides are generally more useful for protecting uninfected tissue than repairing a leaf that is already damaged. If repeated applications are allowed and needed, rotate labeled modes of action to reduce resistance pressure.
Treatment choices from lowest to highest intervention
| Choice | When it fits | Important limit |
|---|---|---|
| Leaf and debris removal | Every confirmed case, especially early or limited infection. | Continue inspecting because windborne spores may arrive again. |
| Airflow and leaf-drying changes | Crowded, humid, sheltered, or frequently wet growing areas. | Do not create drought stress while trying to keep leaves dry. |
| Organic-program approach | Growers prioritizing physical, cultural, biological, or certified inputs. | Sanitation is the foundation. Verify that any product is both appropriate for ornamental rust and accepted by the organic standard being followed. |
| Labeled contact or protectant fungicide | Preventing new infection where rust is confirmed and likely to continue. | Coverage and timing matter; rain and new growth may shorten protection. |
| Labeled systemic fungicide | Recurring or important outbreaks when the current label permits ornamental use. | Do not assume a landscape, greenhouse, nursery, or residential use is interchangeable. |
Follow-up schedule
- Today: record the symptoms, remove fallen and heavily infected leaves, and improve spacing or airflow.
- In 3 to 4 days: check nearby plumeria and inspect the undersides of leaves for new pustules.
- Weekly and after wet weather: compare new leaves with the original photographs and repeat sanitation as needed.
- After treatment: judge success by whether new infection slows. Existing spots and damaged leaves may not return to normal.
- At seasonal leaf drop: remove infected debris so the next cycle does not begin beneath the plant.
How microclimate changes the plan
Warm, humid, crowded conditions and long periods of leaf wetness make infection and spread more likely. A breezy, rapidly drying growing area may need sanitation and monitoring, while a sheltered wet area may need earlier prevention. Use the saved Growing Area as context, but confirm the actual leaf evidence before selecting a treatment.
Continue with the focused guides
- How to Identify Plumeria Rust – leaf evidence, progression, and look-alikes.
- How to Treat Plumeria Rust – sanitation, treatment choices, label checks, and follow-up.
- How to Prevent Plumeria Rust – seasonal hygiene, airflow, moisture, and monitoring.
- Rust in Plumeria Seedlings – decisions for young plants with limited leaf area.
- Fungal Leaf Spot vs. Rust vs. Sunburn – a side-by-side symptom comparison.
Reference basis: University of Hawaii CTAHR Plumeria Rust guidance, UF/IFAS Rusts on Ornamentals guidance, and the EPA introduction to pesticide labels.
Watering and Leaf-Drying Safeguard by Plant Stage
Plumeria rust develops on susceptible foliage and can spread when humidity, leaf moisture, and infected fallen leaves remain around the plant. Check leaf undersides for yellow-orange to rusty pustules before choosing treatment.
- Unrooted cutting: Water once at the beginning of rooting, then do not water again until 2-3 full-sized leaves have grown. Mist only the stem of a firm cutting if it appears dehydrated. With no leaves present, foliar rust treatment is not applicable.
- Newly rooted cutting: Water sparingly and allow the mix to approach dry before watering again. Apply water to the growing medium and avoid keeping new foliage wet.
- Established plant: Water according to root-zone moisture, drainage, weather, season, and active growth. Water early and near soil level, remove infected fallen leaves, and regularly inspect leaf undersides.
- Seedling: Keep the medium lightly and evenly moist, never saturated. Provide airflow and avoid prolonged leaf wetness. Use the dedicated seedling rust guide when young seedlings are affected.
Confirm rust before treating. Begin with sanitation and moisture management, and follow the product label for any fungicide used.
Turn the explanation into an action plan
- Monitor
- Mark lesion borders and photograph the plant every two to three days during rapid change, or weekly when stable.
- Change one thing
- Make the smallest justified correction, record the date, and avoid stacking treatments before you can see which one helped.
- Escalate when needed
- Act quickly when soft decay moves into the trunk, foul odor appears, blackening advances daily, or several plants show the pattern.