The Plumeria Pests and Diseases Guide is an essential resource for identifying, preventing, and treating the most common threats to plumeria plants, including pests, fungi, and environmental stressors. This guide offers detailed information on how to recognize early signs of trouble, from insect infestations to fungal infections, and provides practical solutions to address these issues. It also covers strategies for managing environmental factors such as excessive humidity, temperature fluctuations, and poor soil conditions, which can weaken plumeria. With expert tips on natural and chemical treatments, as well as proactive care practices, this guide ensures your plumeria remains healthy, resilient, and free from common ailments, allowing it to thrive season after season.
How to Treat Fungal Leaf Spot in Plumeria – Sanitation, Airflow, and Recovery
Use this article as part of a step-by-step diagnosis
This guide helps you separate infectious disease from pests, exposure injury, nutrition symptoms, and normal aging before pruning or treating. Read the detailed explanation, then use this sequence to decide what to do.
- 1
Stabilize and isolate
Keep questionable plants away from healthy collections and avoid splashing water or sharing tools.
- 2
Describe the tissue
Note whether damage is dry, powdery, water-soaked, sunken, soft, foul-smelling, or one-sided.
- 3
Map the progression
Photograph and mark the edge so you can tell whether the condition is spreading.
- 4
Confirm the closest match
Compare the defining sign, not only leaf color, and use laboratory testing when needed.
- 5
Intervene narrowly
Remove only unsalvageable tissue, sanitize tools, and treat only when the diagnosis supports it.
How microclimate changes this answer
Long leaf wetness, warm humidity, poor airflow, and cool wet roots increase disease pressure; intense sun and cold create look-alikes.
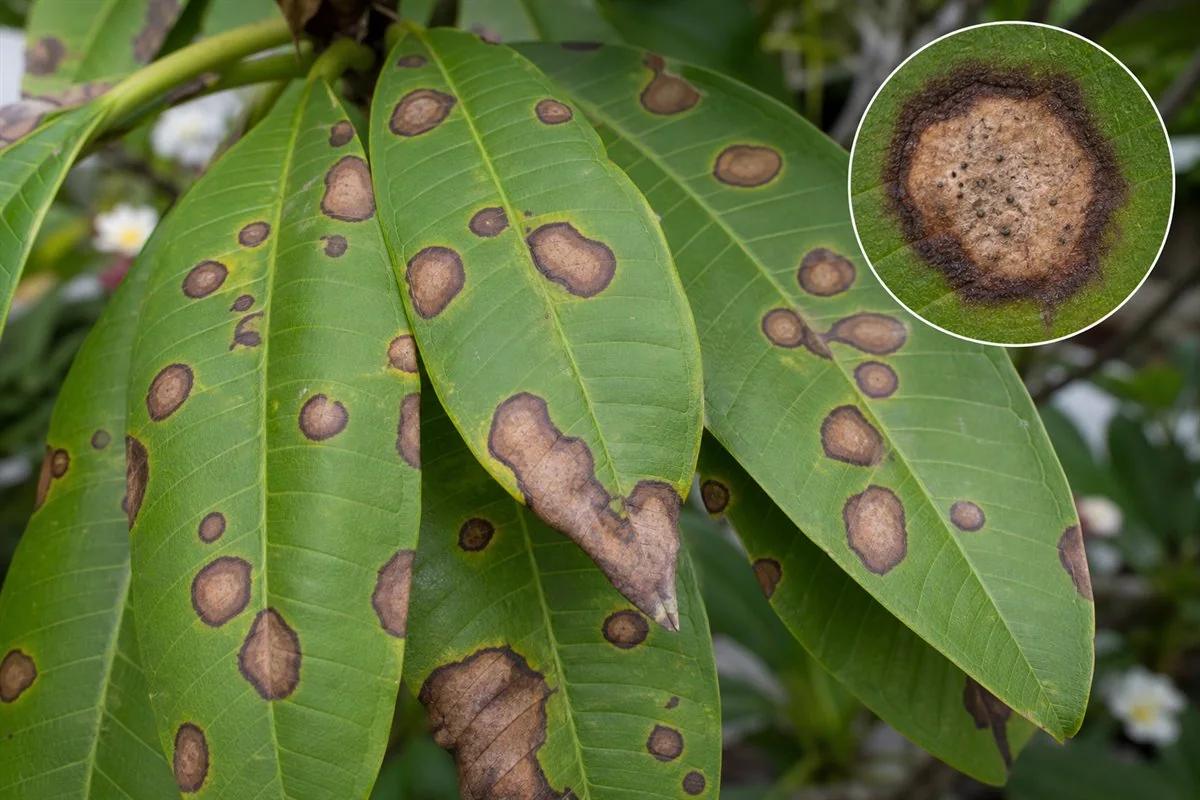
Compare this leaf pattern with healthy growth
Use these references to confirm that this article matches the visible pattern before changing care or applying a treatment.
 Condition reference
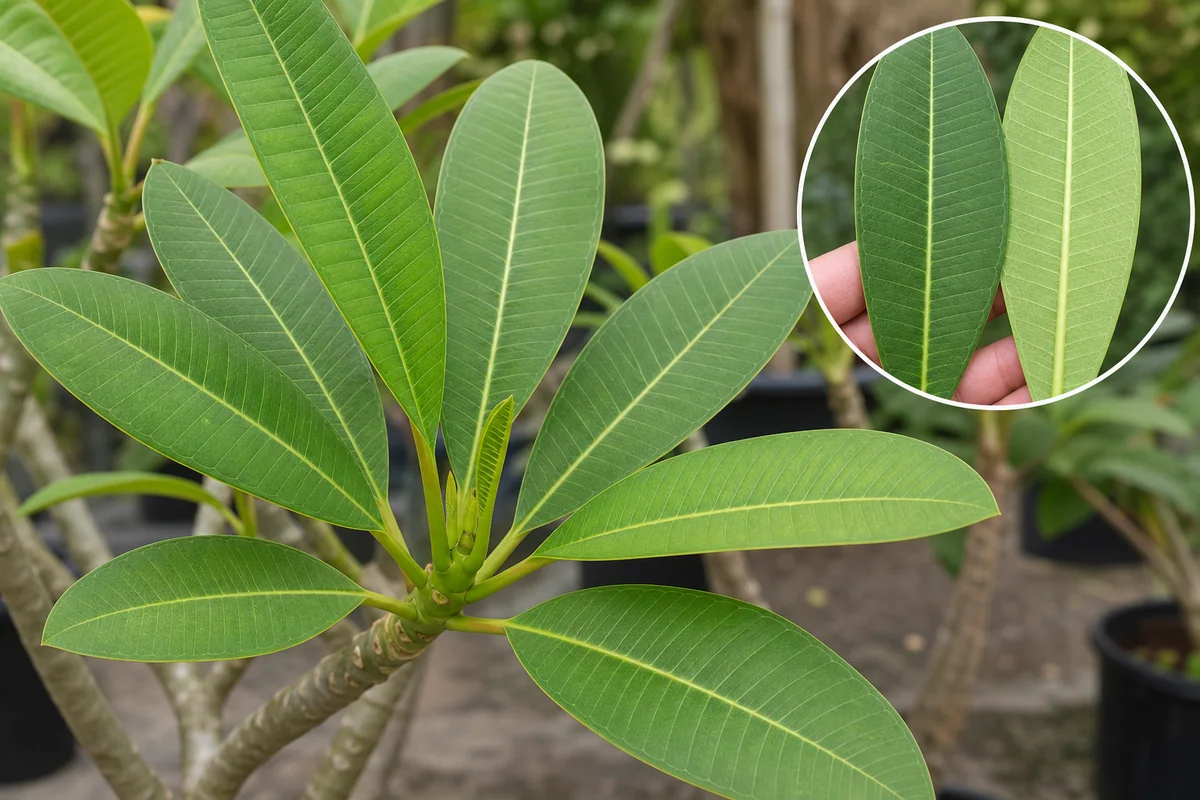 Healthy baseline
- LocationCheck which plant part, age of growth, and exposed or protected side is affected.
- TextureDecide whether the evidence is dry, powdery, sticky, raised, translucent, soft, or intact.
- ProgressionPhotograph the same area so you can tell whether the pattern is stable, improving, or spreading.
Use more than one clue. Confirm the photo with recent conditions, roots, watering history, and the rest of the plant before acting.
Treat fungal leaf spot by reducing disease pressure and improving the conditions around the leaves. The goal is to stop new lesions from appearing, not to repair leaves that are already spotted.
Fungal Leaf Spot Article Path
Use this group in order when possible: identify the problem, treat only when needed, then prevent repeat outbreaks or recurrence.
- Identify fungal leaf spot
How to Identify Fungal Leaf Spot in Plumeria – Spots, Halos, and Leaf Drop - Treat fungal leaf spot
How to Treat Fungal Leaf Spot in Plumeria – Sanitation, Airflow, and Recovery - Prevent fungal leaf spot
How to Prevent Fungal Leaf Spot in Plumeria – Airflow, Watering, and Hygiene - Compare leaf spot, rust, and sunburn
Fungal Leaf Spot vs. Rust vs. Sunburn on Plumeria
Safety and diagnostics: before applying products, review the Treatment Safety Checklist. If symptoms do not match this group, return to the Disease Symptom Checklist.
Before Applying Any Product
Use this article after the pest or disease has been identified. Before applying oils, soaps, sprays, drenches, fungicides, insecticides, miticides, systemics, copper, sulfur, peroxide products, biological products, or homemade mixtures, check the safety and application-method pages below.
- Treatment Safety Checklist
- Soil Drenches, Sprays, and Foliar Applications
- How to Mix and Apply Garden Products Safely
- When to Treat vs. Monitor Plumeria Pests
Why: the same product can help or harm depending on plant stress, weather, concentration, coverage, timing, beneficial insects, and whether the problem is active.
Leaf Spot Diagnostic Path
Use this path when plumeria leaves show spots, halos, yellowing, browning, burned-looking areas, powder, or orange pustules. Leaf problems can look similar from a distance, so match the pattern before pruning or spraying.
- Start with the disease symptom checklist when more than one leaf disease is possible.
- Compare fungal leaf spot, rust, and sunburn before choosing treatment.
- Check fungal leaf spot when spots, halos, and spreading lesions appear without orange rust powder.
- Check plumeria rust when orange powdery pustules appear on the underside of leaves.
- Check powdery mildew when a white or gray surface film appears.
Why: fungal spots, rust, mildew, sunburn, spray injury, and pest damage need different responses. Correct diagnosis prevents wasted treatment and avoidable leaf burn.
Quick Answer
Remove the worst affected leaves, clean up fallen debris, improve airflow, water in a way that lets foliage dry, and use a labeled fungicide only when spots continue spreading and the label fits ornamental plants. Most mild cases improve when wet, crowded conditions are corrected.
Step-by-Step Treatment Plan
| Step | Action | Why |
|---|---|---|
| 1. Confirm active spread | Look for new spots after rain, humidity, or overhead watering. | Old spots do not require repeated treatment if the outbreak has stopped. |
| 2. Remove worst leaves | Take off badly affected leaves and discard them away from the growing area. | This lowers disease pressure and improves airflow. |
| 3. Clean the area | Remove fallen leaves from pots, benches, and ground surfaces. | Diseased debris can keep spores close to healthy foliage. |
| 4. Improve drying | Increase spacing, airflow, and morning light where appropriate. | Fungal leaf spot needs moisture; faster drying reduces spread. |
| 5. Adjust watering | Water the root zone and avoid keeping leaves wet late in the day. | Long leaf-wetness periods favor fungal disease. |
| 6. Treat only when needed | Use a labeled ornamental fungicide if cultural steps are not enough. | Products work best as support, not as a substitute for moisture control. |
Recovery Signs
- New leaves emerge with fewer or no spots.
- Existing spots stop expanding.
- Leaf drop slows after damaged leaves are shed.
- Nearby plants stay clean after rain or watering.
What Not To Do
- Do not strip all leaves from a lightly affected plant. Why: leaves feed recovery.
- Do not spray in hot sun or on drought-stressed plants. Why: spray burn can look like more disease.
- Do not mix products casually. Why: unsafe combinations can damage foliage and violate labels.
- Do not keep overhead watering the same way. Why: treatment fails if leaf wetness continues.
Bottom Line
Fungal leaf spot treatment is mostly sanitation, airflow, and moisture control. Use labeled fungicides as support when active spread continues, and judge success by the next flush of leaves.
Related Guides
- How to Identify Fungal Leaf Spot in Plumeria – Spots, Halos, and Leaf Drop
- How to Prevent Fungal Leaf Spot in Plumeria – Airflow, Watering, and Hygiene
- Fungal Leaf Spot vs. Rust vs. Sunburn on Plumeria
- Disease Symptom Checklist
- Soil Drenches, Sprays, and Foliar Applications
Turn the explanation into an action plan
- Monitor
- Mark lesion borders and photograph the plant every two to three days during rapid change, or weekly when stable.
- Change one thing
- Make the smallest justified correction, record the date, and avoid stacking treatments before you can see which one helped.
- Escalate when needed
- Act quickly when soft decay moves into the trunk, foul odor appears, blackening advances daily, or several plants show the pattern.