The Plumeria Pests and Diseases Guide is an essential resource for identifying, preventing, and treating the most common threats to plumeria plants, including pests, fungi, and environmental stressors. This guide offers detailed information on how to recognize early signs of trouble, from insect infestations to fungal infections, and provides practical solutions to address these issues. It also covers strategies for managing environmental factors such as excessive humidity, temperature fluctuations, and poor soil conditions, which can weaken plumeria. With expert tips on natural and chemical treatments, as well as proactive care practices, this guide ensures your plumeria remains healthy, resilient, and free from common ailments, allowing it to thrive season after season.
How to Identify Plumeria Bore Worm and Borer Damage
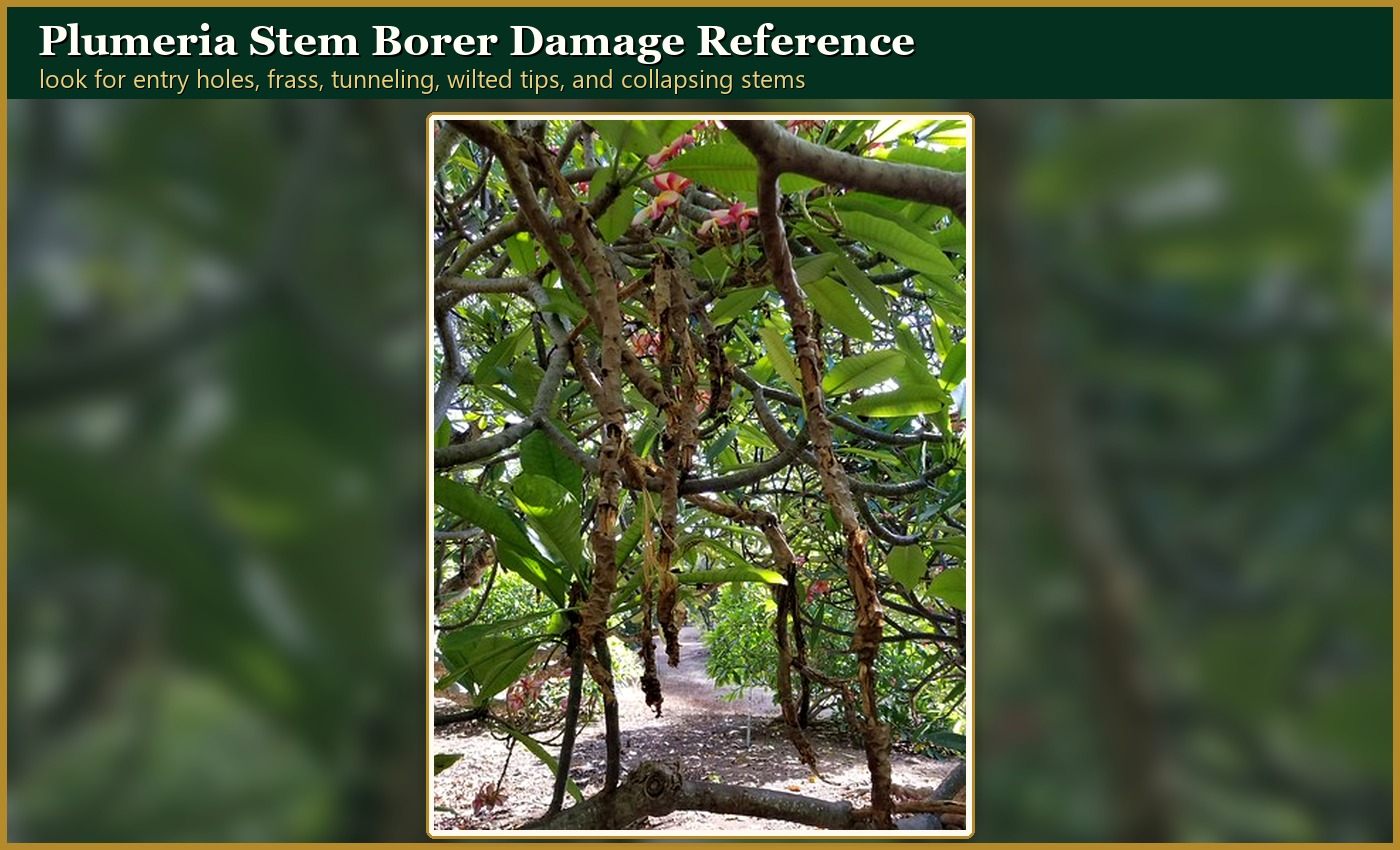
Plumeria bore worm, plumeria borer, and plumeria stem borer are grower names for boring larvae that tunnel inside stems and branches. In Hawaii references, this problem is commonly associated with the plumeria borer longhorned beetle, Lagocheirus undatus. The same diagnostic pattern matters anywhere the problem is suspected: entry holes, dark ooze, sawdust-like frass, internal tunneling, wilting tips, hollow branches, or sudden stem collapse.
Where This Page Fits
Primary plumeria bore worm and borer identification guide. Use this page when you see entry holes, frass, tunneling, soft internal damage, sudden branch collapse, or suspected larvae inside stems.
- If the damage is mostly leaf chewing or root grubs, start with the Chewing and Boring Insects Overview. After borer damage is confirmed, use How to Treat Plumeria Bore Worm and Borer Damage. For monitoring and sanitation, use How to Prevent Plumeria Bore Worm and Borer Damage.
Plumeria Bore Worm and Borer Damage Article Path
Use this group in order when possible: identify the problem, treat only when needed, then prevent repeat outbreaks or recurrence.
- Identify borer damage
How to Identify Plumeria Bore Worm and Borer Damage - Treat borer damage
How to Treat Plumeria Bore Worm and Borer Damage - Prevent borer damage
How to Prevent Plumeria Bore Worm and Borer Damage
Safety and diagnostics: before applying products, review the Treatment Safety Checklist. If symptoms do not match this group, return to the Pest & Disease Identification Guide.
Because larvae feed inside stems, borer damage can be more serious than ordinary leaf chewing. The key is to confirm physical evidence before treating, because stem rot, canker, sunburn, cold injury, and mechanical damage can look similar at first.
Photo and Confirmation Checklist
Borer diagnosis is strongest when entry holes, frass, and internal tunneling are seen together.
- Photograph entry holes, black or dark ooze, sawdust-like frass, wilted tips, hollow stems, and branch collapse.
- Compare with stem rot: rot is usually soft, wet, dark, or foul-smelling, while borer injury often has an entry point and dry frass.
- If pruning is required, photograph the cut surface and any larvae or tunneling found inside.
Regional note: Plumeria stem borer is most often discussed in Hawaii, but growers outside Hawaii should still recognize the diagnostic pattern. Confirm by evidence, not by geography alone.
Plumeria Borer Guide Path
- Identify borer damage by looking for entry holes, frass, black ooze, internal tunneling, wilted tips, or hollow branches.
- Treat borer damage by removing affected tissue and destroying infested wood when needed.
- Prevent borer problems by monitoring vulnerable stems, reducing stress, and keeping pruning cuts clean.
- Compare stem rot if tissue is soft, wet, dark, foul-smelling, or collapsing without frass.
- Use the main pest and disease identification guide if symptoms could be canker, sunburn, cold damage, or mechanical injury.
Why this matters: Once larvae are inside stems, surface sprays are unlikely to solve the problem. Physical evidence and clean removal are the key decisions.
Quick ID
- Common names: Plumeria borer, plumeria stem borer, bore worm
- Scientific association: Lagocheirus undatus, a longhorned beetle in Cerambycidae
- Main clue: Entry hole plus frass, dark ooze, tunneling, wilting, hollow stem, or branch collapse.
- Where to inspect: Stems, branch junctions, damaged branches, pruning wounds, and the ground below for frass.
- Common look-alikes: Stem rot, bacterial soft rot, canker, sunburn, cold injury, and mechanical damage.
Key Symptoms
- Small round or oval entry holes in stems or branches.
- Sawdust-like frass pushed from the hole or collected below the branch.
- Dark or black ooze near the entry site.
- Wilting, drooping, or shriveling beyond the damaged area.
- Hollow or weakened stems that break or collapse.
- Larvae, tunnels, or damaged internal tissue visible after pruning.
Borer Damage vs. Look-Alikes
| Problem | Clues That Fit | How to Separate It |
|---|---|---|
| Borer damage | Entry hole, frass, dark ooze, tunneling, hollow stem, wilted tip. | Physical tunnel or larva confirms the direction. |
| Stem rot | Soft, wet, dark, foul-smelling tissue. | Rot may lack a clean entry hole and sawdust-like frass. |
| Stem canker | Sunken lesions, cracks, localized bark damage. | Canker lesions are not usually filled with larval tunnels. |
| Sunburn or cold injury | Surface damage, cracking, discoloration. | No frass or internal feeding tunnel. |
| Mechanical damage | Broken or scraped tissue after handling, wind, or pruning. | Damage history is clear and no continuing frass appears. |
How to Confirm
- Inspect the stem and branch junctions for entry holes or dark ooze.
- Look below the branch for fresh sawdust-like frass.
- Mark the suspect area and recheck for new frass or spreading wilt.
- If the branch is collapsing or must be removed, cut below the damaged area and inspect the interior.
- Save clear photos for identification, especially if the pest is found outside areas where it is commonly reported.
Confirm Borer Damage Before Cutting
Borer damage is important to confirm because internal tunneling can look like drought wilt, stem rot, storm injury, sunken wounds, or old pruning damage from the outside.
- Look for entry holes, sawdust-like frass, soft or hollow tissue, sudden wilted tips, and branch collapse.
- Check whether the damage follows a tunnel or internal path rather than spreading evenly like rot.
- Photograph the outside damage before pruning, then photograph any cut surface, tunnel, frass, or larva if found.
- Do not seal in questionable tissue. Removing damaged tissue and drying the cut area is often more important than covering it.
- Because bore worm and borer reports can be regional, location and timing are useful when documenting a case.
Photo note: plumeria-specific borer photos are high priority, especially entry holes, frass, tunnels, larvae, and collapsed branches.
After identification: use the Plumeria Treatment Decision Guide to decide whether to monitor, isolate, rinse the canopy, prune, inspect roots, repot, apply a labeled product, or remove badly affected tissue or plants.
Related Guides
- How to Treat Plumeria Bore Worm and Borer Damage
- How to Prevent Plumeria Bore Worm and Borer Damage
- How to Identify Stem Rot in Plumeria
- Treatment Safety Checklist
- Pest & Disease Identification Guide
Help Improve This Photo Reference
If you have a clear plumeria photo of plumeria bore worm or borer damage, you can help improve this guide. The most useful photos show entry holes, frass, ooze, wilting tips, collapsed branches, and cut-stem views only if the branch has already been removed.
Submit a photo for review. Photos are not published automatically; they are checked for permission, plant context, and diagnostic accuracy before being used.