
The Plumeria Pests and Diseases Guide is an essential resource for identifying, preventing, and treating the most common threats to plumeria plants, including pests, fungi, and environmental stressors. This guide offers detailed information on how to recognize early signs of trouble, from insect infestations to fungal infections, and provides practical solutions to address these issues. It also covers strategies for managing environmental factors such as excessive humidity, temperature fluctuations, and poor soil conditions, which can weaken plumeria. With expert tips on natural and chemical treatments, as well as proactive care practices, this guide ensures your plumeria remains healthy, resilient, and free from common ailments, allowing it to thrive season after season.
Damping Off in Plumeria Seedlings: Identification, Treatment and Prevention
What to check next
This guide helps you separate infectious disease from pests, exposure injury, nutrition symptoms, and normal aging before pruning or treating. Read the detailed explanation, then use this sequence to decide what to do.
Confirm the evidence for seedling damping-off
- Look for
- A pinched, translucent, dark, or collapsing stem at the media line, failed emergence, spreading losses, or roots rotting in wet media.
- Compare with
- A dry seed coat, temporary cotyledon droop, heat injury, low light stretching, and simple underwatering do not create the same collapsing media-line lesion.
- Safest first response
- Separate affected seedlings, remove collapsed plants and contaminated debris, improve airflow and moisture control, and protect unaffected seedlings.
Microclimate clue: Warm stagnant air above cool saturated media is especially favorable for damping-off organisms.
- 1
Stabilize and isolate
Keep questionable plants away from healthy collections and avoid splashing water or sharing tools.
- 2
Describe the tissue
Note whether damage is dry, powdery, water-soaked, sunken, soft, foul-smelling, or one-sided.
- 3
Map the progression
Photograph and mark the edge so you can tell whether the condition is spreading.
- 4
Confirm the closest match
Compare the defining sign, not only leaf color, and use laboratory testing when needed.
- 5
Intervene narrowly
Remove only unsalvageable tissue, sanitize tools, and treat only when the diagnosis supports it.
How microclimate changes this answer
Long leaf wetness, warm humidity, poor airflow, and cool wet roots increase disease pressure; intense sun and cold create look-alikes.
Compare this seedling pattern with healthy growth
Use these references to confirm that this article matches the visible pattern before changing care or applying a treatment.
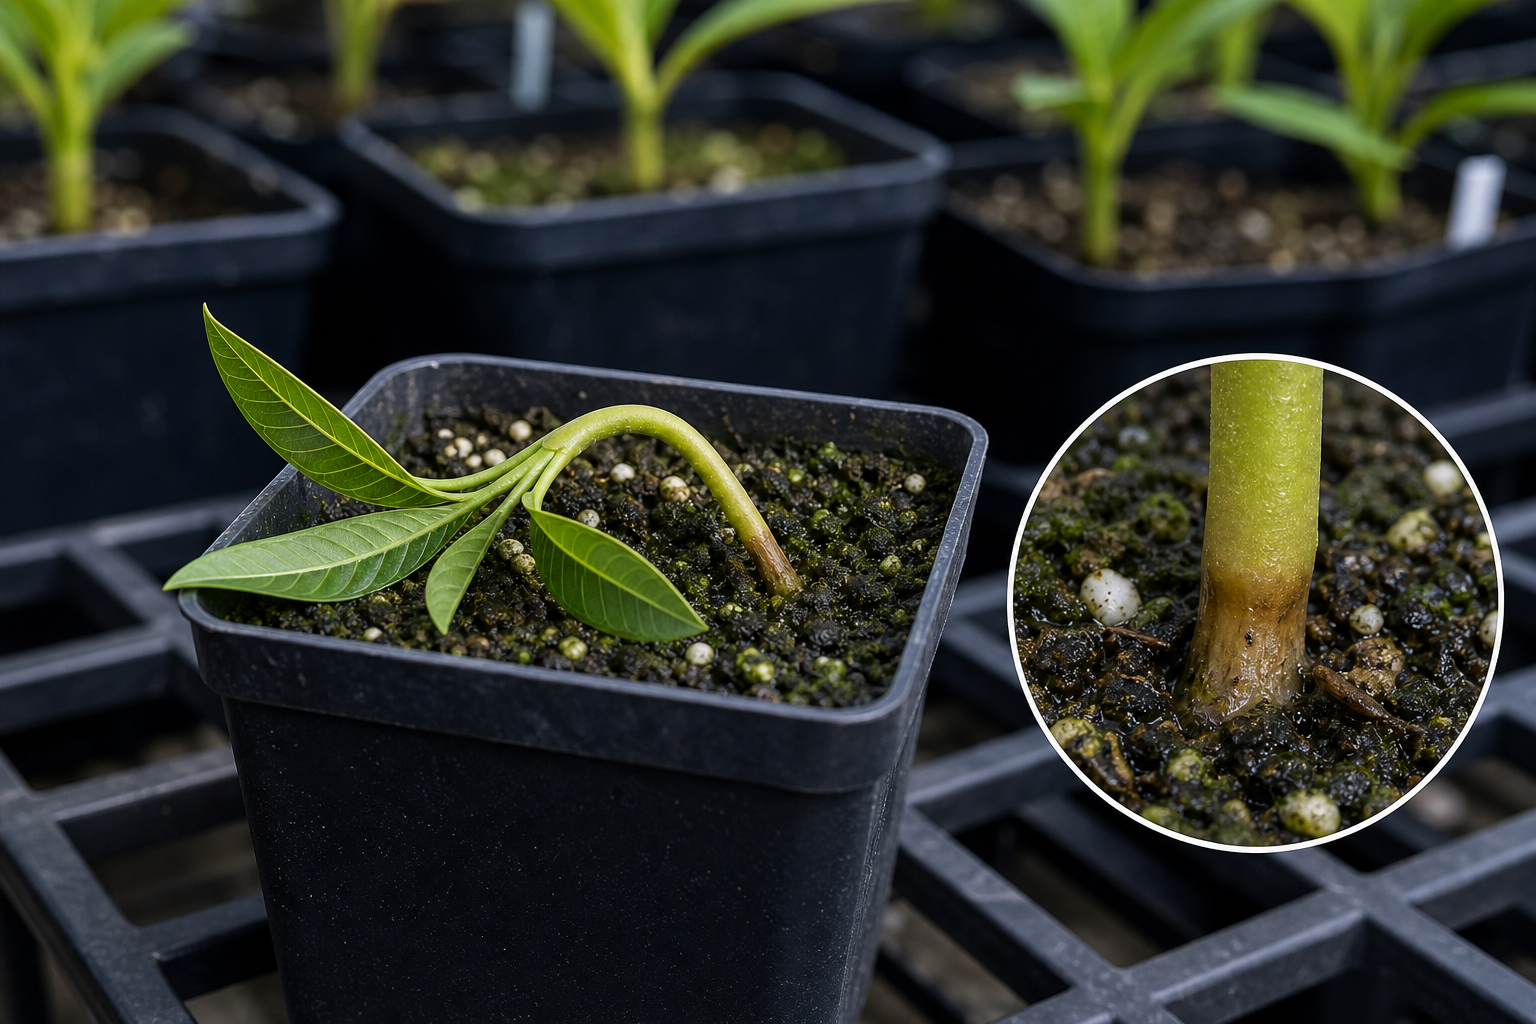 Condition reference
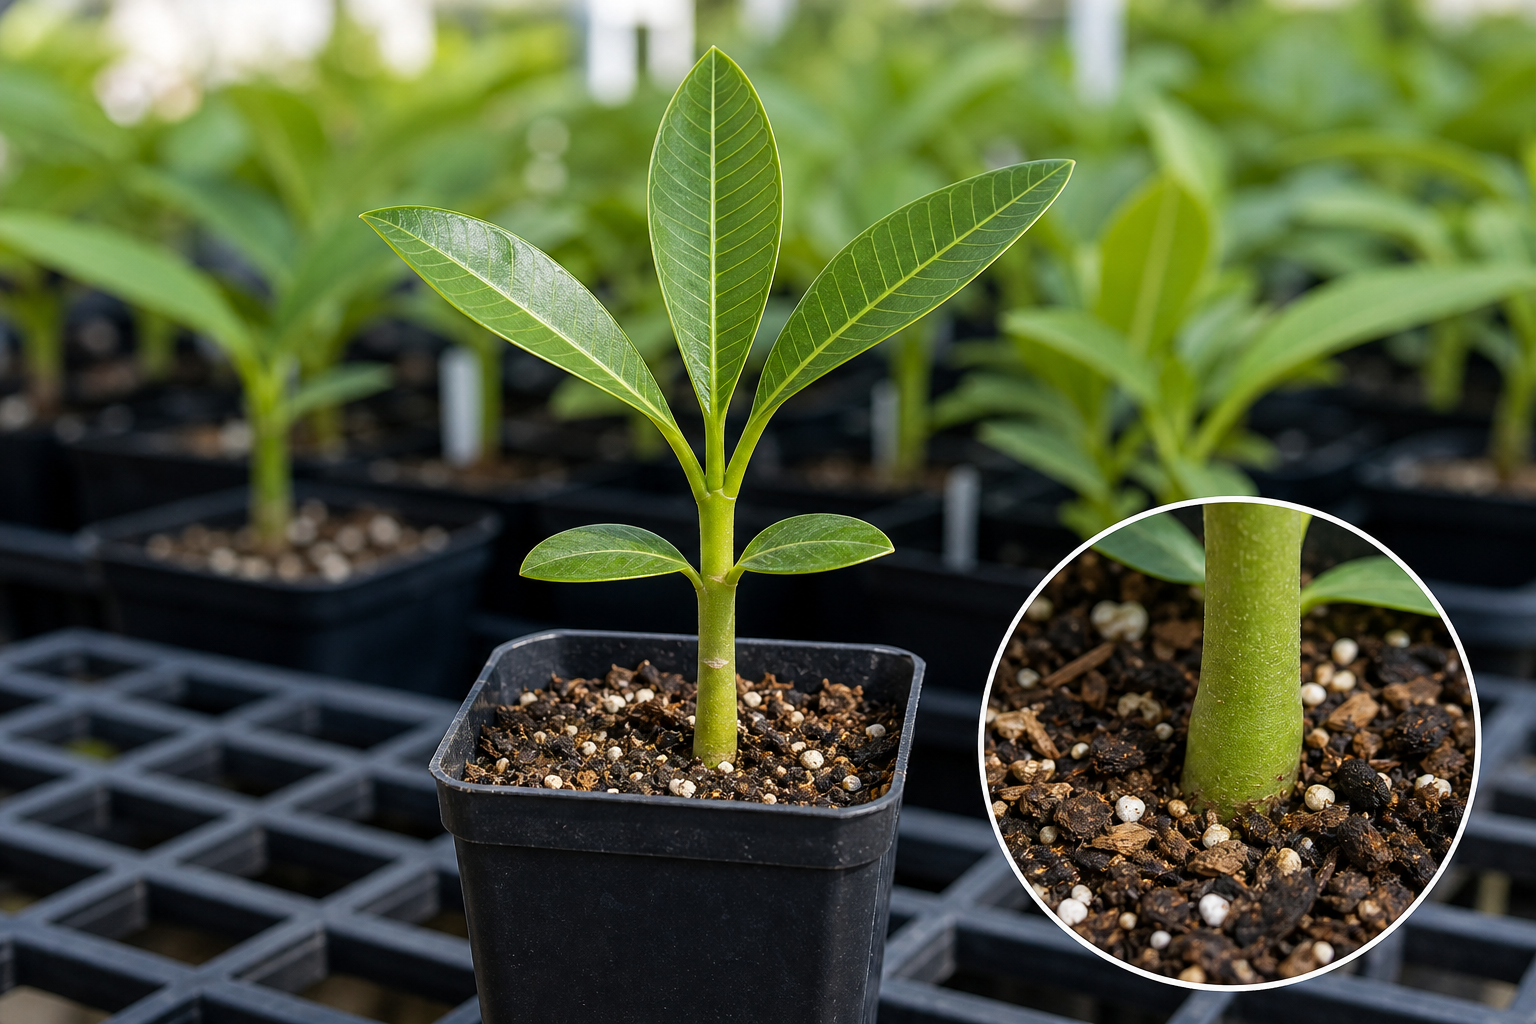 Healthy baseline
- LocationCheck which plant part, age of growth, and exposed or protected side is affected.
- TextureDecide whether the evidence is dry, powdery, sticky, raised, translucent, soft, or intact.
- ProgressionPhotograph the same area so you can tell whether the pattern is stable, improving, or spreading.
Use more than one clue. Confirm the photo with recent conditions, roots, watering history, and the rest of the plant before acting.
Damping off describes seed and seedling losses caused by several fungi and fungus-like organisms. It may prevent emergence, rot a germinating seed, decay roots, or pinch a young stem at the soil line. Cool wet media is a common risk, but some organisms also act in warmer conditions.
Look at the soil line and the tray pattern
Post-emergence damping off commonly narrows, darkens, or water-soaks the young stem at or just below the media surface until the seedling falls. Pre-emergence damping off may rot the seed or shoot before anything appears. One missing seed is not enough to diagnose disease.
Fast decision table
| What you find | What it suggests | Next step |
|---|---|---|
| Seedling pinched, dark, or water-soaked at soil line and fallen | Post-emergence damping off is likely. | Remove the seedling and nearby media; isolate and correct the tray environment. |
| Several seeds fail in a wet cluster | Pre-emergence rot is possible. | Inspect one seed carefully and compare viability, temperature, depth, and saturation. |
| Seed coat remains attached but stem is firm | Normal coat shedding or helmet head may be more likely. | Use the Seedling Checker; do not pull forcefully. |
| Long pale leaning stem without a soil-line lesion | Insufficient light or legginess is more likely. | Improve light gradually and support airflow. |
| Green wilt above dry media with firm stem | Dehydration may be primary. | Correct moisture gently without saturating the tray. |
| Yellowing and wilt above saturated media, but no pinched stem | Wet-root decline may be developing. | Check roots, drainage, temperature, and watering frequency. |
Step-by-step tray response
- Photograph before changing anything: capture the whole tray, affected cluster, soil line, and media surface. Record sowing date, emergence date, temperature, light, watering, cover use, and fertilizer.
- Remove active losses: lift collapsed seedlings and a small amount of nearby media without dragging them across healthy cells. Seal and discard them.
- Stop shared water: do not let runoff move from affected to healthy cells. Empty standing water and keep hose ends, tools, and hands off dirty surfaces.
- Correct saturation: keep media evenly moist for germination, not waterlogged. Confirm open drainage and stop watering merely because the surface looks dry.
- Improve the growth environment: provide suitable warmth, bright light, spacing, and gentle airflow so seedlings emerge and establish quickly.
- Protect healthy cells: separate unaffected seedlings or cells when practical and monitor their soil lines daily.
- Restart only with clean materials: badly affected trays may be safer to discard and resow with clean containers, fresh seed-starting media, and quality seed.
Intervention choices
| Choice | When it fits | Limit |
|---|---|---|
| Removal and sanitation | Any collapsed or rotting seedling. | The affected seedling rarely becomes vigorous again. |
| Moisture, warmth, light, and airflow correction | Healthy seedlings remain and the outbreak is limited. | Avoid strong fans, sudden heat, or drying tiny roots completely. |
| Discard and restart | Losses are spreading through shared media or most of the tray. | Reuse neither contaminated mix nor an unsanitized tray. |
| Labeled seed or media treatment | A current product label covers the plant or ornamental use, target, and application method. | Do not improvise a drench from an unrelated garden-product label. |
| Laboratory or Extension diagnosis | Repeated outbreaks, valuable seed lots, or uncertainty about disease versus environment. | Submit fresh representative seedlings and media before applying multiple products. |
Prevention checklist
- Use clean trays, tools, labels, hands, work surfaces, and fresh lightweight seed-starting media.
- Do not use garden soil or unfinished compost in seedling cells.
- Use fresh, well-stored plumeria seed and plant at a consistent appropriate depth.
- Keep media moist but not saturated; prevent cells from standing in water.
- Remove humidity covers after emergence and provide gentle airflow without chilling seedlings.
- Provide sufficient light and warmth for steady growth; slow stressed seedlings remain vulnerable longer.
- Delay fertilizer until true leaves and roots are established; avoid high salts and excess nitrogen.
Follow-up schedule
- Immediately: remove losses, isolate affected cells, empty standing water, and document conditions.
- Twice daily for 3 days: inspect every soil line for narrowing, darkening, or lean.
- Daily for the next week: record new emergence, moisture, temperature, airflow, and additional losses.
- Before resowing: clean or replace trays, discard used media, and correct the cause that favored the outbreak.
Microclimate: indoor humidity, cool windows, heat-mat temperature, greenhouse condensation, local airflow, and tray position matter more than the outdoor USDA Zone. Use the saved Growing Area for seasonal context, then record the actual seedling-zone conditions.
Continue with the focused guides
Reference basis: UC Statewide IPM ornamental damping-off guidance, UC IPM home seedling guidance, and the EPA introduction to pesticide labels.
Seedling Moisture and Tray-Rescue Safeguard
Damping off is a seedling problem. Keep the medium lightly and evenly moist, never saturated, and provide gentle airflow without chilling or dehydrating young seedlings.
- If a seedling is pinched, soft, or collapsed at the soil line: Remove it promptly with the nearby contaminated medium. Do not try to revive a collapsed stem by adding more water.
- For the remaining tray: Improve airflow, reduce excess surface moisture, keep leaves and stems from staying wet, and confirm that containers drain freely.
- For prevention: Begin with clean trays, fresh well-draining medium, clean tools, and careful spacing. Avoid reusing contaminated mix.
Sanitation and moisture correction are the first steps. If a fungicide or biological product is considered, confirm that it is labeled for the crop, site, and suspected organism, and follow the product label exactly.
Turn the explanation into an action plan
- Monitor
- Mark lesion borders and photograph the plant every two to three days during rapid change, or weekly when stable.
- Change one thing
- Make the smallest justified correction, record the date, and avoid stacking treatments before you can see which one helped.
- Escalate when needed
- Act quickly when soft decay moves into the trunk, foul odor appears, blackening advances daily, or several plants show the pattern.