
The Plumeria Climate and Environment Guide delves into how various environmental factors, such as temperature, humidity, sunlight, wind, and microclimates, influence plumeria growth. This comprehensive guide offers practical tips on how to create the ideal conditions for your plumeria, ensuring strong, healthy plants and vibrant blooms. By understanding how these factors affect your plumeria, you can make informed decisions about planting locations, seasonal adjustments, and protective measures against extreme weather conditions. Whether you’re growing plumeria in a tropical, subtropical, or temperate zone, this guide provides strategies to optimize your environment for year-round success and enhance the beauty of your plants.
Wind and Dry-Air Desiccation on Plumeria: Identification and Recovery
What to check next
This guide helps you connect visible injury to the timing of sun, heat, cold, wind, drought, flooding, salt, smoke, hail, or product exposure. Read the detailed explanation, then use this sequence to decide what to do.
Confirm the evidence for wind or storm exposure
- Look for
- Fresh tears, edge burn, leaning containers, branch movement, broken roots or stems, abrasion, and rapid moisture loss after a windy event.
- Compare with
- Chewing pests, sunburn, drought, salt spray, and physical handling can create similar damage without the wind-facing pattern or event timing.
- Safest first response
- Stabilize the container or plant, inspect roots and branch unions, make clean cuts only where necessary, protect wounds, and improve shelter without blocking all airflow.
Microclimate clue: Gusts, wind direction, building corners, open fetch, salt exposure, wet soil, plant height, and top-heavy containers determine actual damage risk.
- 1
Stop the active exposure
Move or shield the plant only enough to prevent more injury without creating another abrupt change.
- 2
Match damage to timing
Compare the affected side, height, leaf age, and first appearance with the recent event.
- 3
Check protected tissue
Look beneath the canopy and opposite side to separate directional exposure from systemic problems.
- 4
Support recovery
Stabilize moisture, airflow, and temperature; avoid fertilizer or heavy pruning while stressed.
- 5
Judge new growth
Old burned or frozen tissue may not recover, so use healthy new growth as the progress measure.
How microclimate changes this answer
Walls, pavement, reflections, wind corridors, low pockets, shade cloth, and container placement can overpower the regional forecast.
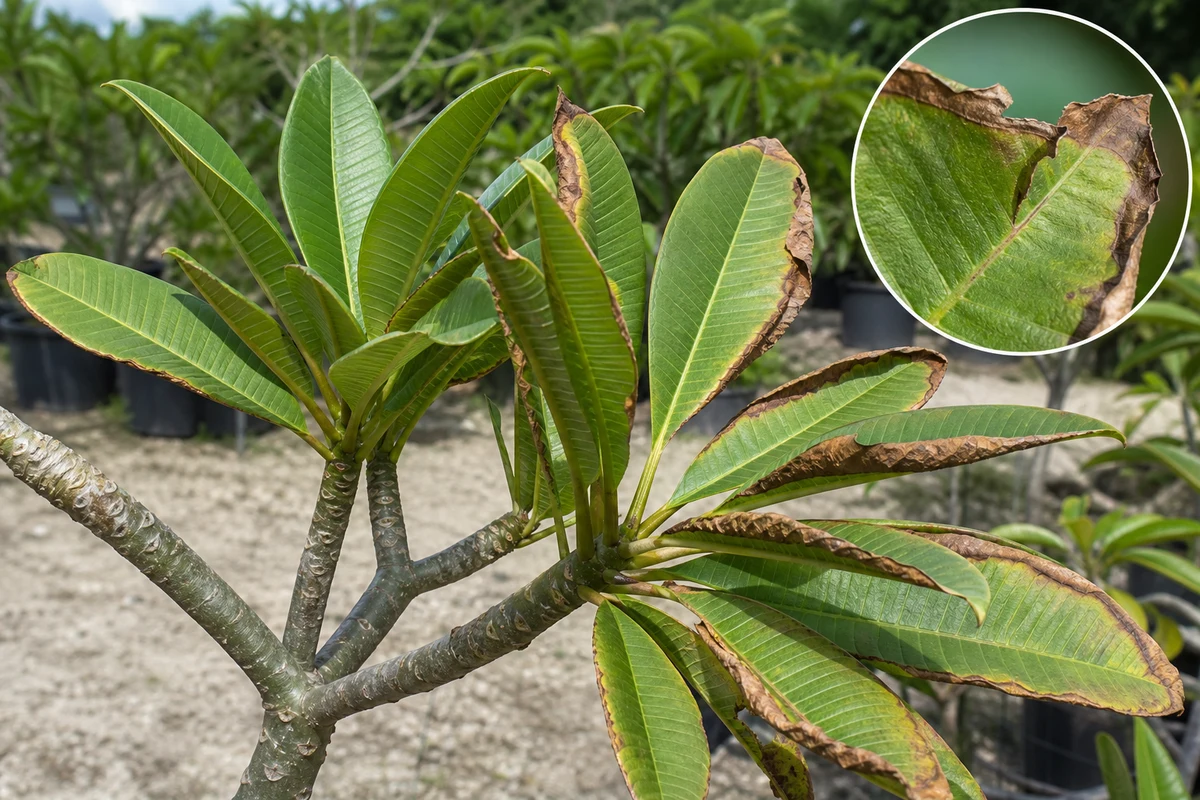
Checker support guide. Wind can remove moisture from plumeria leaves faster than the roots can replace it. Damage usually appears first on the wind-facing side while sheltered leaves remain in better condition.
Important: This is a logical course of action based on the evidence provided, not a guaranteed diagnosis. Confirm the event, tissue condition, roots, recent weather, and progression before treating.
Evidence that supports this match
- Dry brown leaf margins on the exposed side
- Leaves curl, fold, tear, or lose firmness without wet decay
- Flowers or buds dry or drop after windy weather
- Sheltered leaves on the same plant remain greener and less damaged
How to separate common look-alikes
- Drought affects more of the canopy and begins with a dry root zone
- Salt wind can add white residue and repeated marginal burn
- Potassium-like deficiency usually develops gradually on older leaves
- Mites cause fine stippling or webbing rather than directional tearing
Step-by-step first response
- Check the root ball before watering; wind can dry pots quickly, but wilt does not prove the center is dry
- Move containers to temporary shelter or install a windbreak that still allows airflow
- Water only when the root zone confirms the need, then water thoroughly and allow drainage
- Remove only leaves that are mostly dead or torn badly enough to trap water
- Delay fertilizer, oil, and strong foliar sprays until the plant is hydrated and stable
Long-term wind protection
- Use a porous windbreak: fences, screens, shrubs, or other barriers that slow wind without creating severe turbulence are usually better than a solid wall directly beside the plant.
- Protect the prevailing-wind side: use the saved Growing Area and storm history to identify the direction that repeatedly damages foliage and flowers.
- Stabilize containers: use an appropriate pot size and weight, secure tall plants when severe weather approaches, and confirm that staking does not rub or girdle the stem.
- Support young or newly planted trees: use flexible ties and inspect them regularly. Remove or adjust supports as anchorage improves.
- Maintain balanced structure: correct weak, crossing, or damaged branches deliberately rather than heavily pruning immediately before extreme heat or wind.
- Protect roots and soil: prevent erosion around in-ground roots and keep containers from rocking enough to break new roots.
- Allow airflow: do not wrap plants in material that traps heat and moisture for extended periods.
What to watch during recovery
- New leaves remain firm and open normally
- No new marginal burn develops during ordinary weather
- The container stays stable and the root ball does not shift
Seven-day observation plan
- Day 1: Photograph the full plant and a close view. Record firmness, moisture, weather, and the suspected event.
- Days 2-3: Check whether the boundary is stable, drying, softening, or spreading. Avoid adding products simply to do something.
- Days 4-7: Compare new growth and tissue beyond the injury. Continue the current plan when stable; move to the Disease and Rot Checker if softness, odor, seepage, or advancing darkness appears.
Save this with the growing area
For a saved care plan, record the plant or group, growing area, date, recent move or weather event, container or in-ground status, photographs, and the response taken. Growing conditions can change the safest next step.
Open the Environmental Damage Checker | Open the Physical Damage Checker | Check for Disease or Rot
Turn the explanation into an action plan
- Monitor
- Photograph the damage boundary and watch new leaves and tips for seven to fourteen days after exposure ends.
- Change one thing
- Make the smallest justified correction, record the date, and avoid stacking treatments before you can see which one helped.
- Escalate when needed
- Inspect stems and roots when tissue keeps softening, the trunk splits, or decline progresses after conditions stabilize.