
The Plumeria Climate and Environment Guide delves into how various environmental factors, such as temperature, humidity, sunlight, wind, and microclimates, influence plumeria growth. This comprehensive guide offers practical tips on how to create the ideal conditions for your plumeria, ensuring strong, healthy plants and vibrant blooms. By understanding how these factors affect your plumeria, you can make informed decisions about planting locations, seasonal adjustments, and protective measures against extreme weather conditions. Whether you’re growing plumeria in a tropical, subtropical, or temperate zone, this guide provides strategies to optimize your environment for year-round success and enhance the beauty of your plants.
Spray, Oil, Fertilizer, and Chemical Injury on Plumeria
What to check next
This guide helps you connect visible injury to the timing of sun, heat, cold, wind, drought, flooding, salt, smoke, hail, or product exposure. Read the detailed explanation, then use this sequence to decide what to do.
Confirm the evidence for the plant’s environmental conditions
- Look for
- The recent weather timeline, sun and wind exposure, root-zone moisture and temperature, plant stage, and whether symptoms follow a repeatable environmental pattern.
- Compare with
- Pests, disease, roots, nutrition, watering, chemicals, and physical damage can overlap with environmental stress and should be separated before treatment.
- Safest first response
- Record the location and recent change, compare affected and unaffected plants, correct the least disruptive environmental factor, and monitor before adding products.
Microclimate clue: Use the grower’s saved microclimate and current weather together; broad zone or regional advice is only the starting point.
- 1
Stop the active exposure
Move or shield the plant only enough to prevent more injury without creating another abrupt change.
- 2
Match damage to timing
Compare the affected side, height, leaf age, and first appearance with the recent event.
- 3
Check protected tissue
Look beneath the canopy and opposite side to separate directional exposure from systemic problems.
- 4
Support recovery
Stabilize moisture, airflow, and temperature; avoid fertilizer or heavy pruning while stressed.
- 5
Judge new growth
Old burned or frozen tissue may not recover, so use healthy new growth as the progress measure.
How microclimate changes this answer
Walls, pavement, reflections, wind corridors, low pockets, shade cloth, and container placement can overpower the regional forecast.
Spray, oil, fertilizer, or chemical injury decision path: Confirm the pattern and progression before changing care.
- Confirm: Damage usually appears after a known application and follows exposed droplets, coverage edges, tender tissue, or the most sunlit side. Injured tissue is often dry and papery rather than soft, odorous, or producing spores.
- Start conservatively: Stop the suspected product, move the plant to bright protected light, prevent additional heat stress, and check soil moisture before watering. Rinse foliage only when the product label or poison-control guidance supports rinsing and the application was recent.
- Use exposure-specific guidance: Preserve the product label and record the product, rate, mixture, date, weather, and application method. Follow the label, manufacturer, Extension, poison-control, or emergency guidance that applies to the actual exposure; do not add a fungicide or another corrective mixture to burned tissue.
- Check where the product went: Separate foliar coverage injury from root-zone fertilizer or salt injury. Inspect runoff, soil moisture, drainage, salt crust, root condition, and untreated plants from the same application before deciding whether any flushing or repotting is appropriate.
- Monitor: Photograph the boundary and inspect new growth every 3 to 5 days. Old damaged tissue will not turn green again; improvement is shown by stable lesions and healthy new growth.
Growing-condition check: Review recent weather, watering, airflow, drainage, plant age and stage, pot or in-ground status, recent applications, and saved microclimate. This is a logical response based on the evidence, not a confirmed laboratory diagnosis.
Use this guide path: Identify Recover
Checker support guide. Product injury often follows the shape of application: droplets, runs, coverage edges, drift on one side, or burn where a mixture concentrated. Timing and pattern are essential evidence.
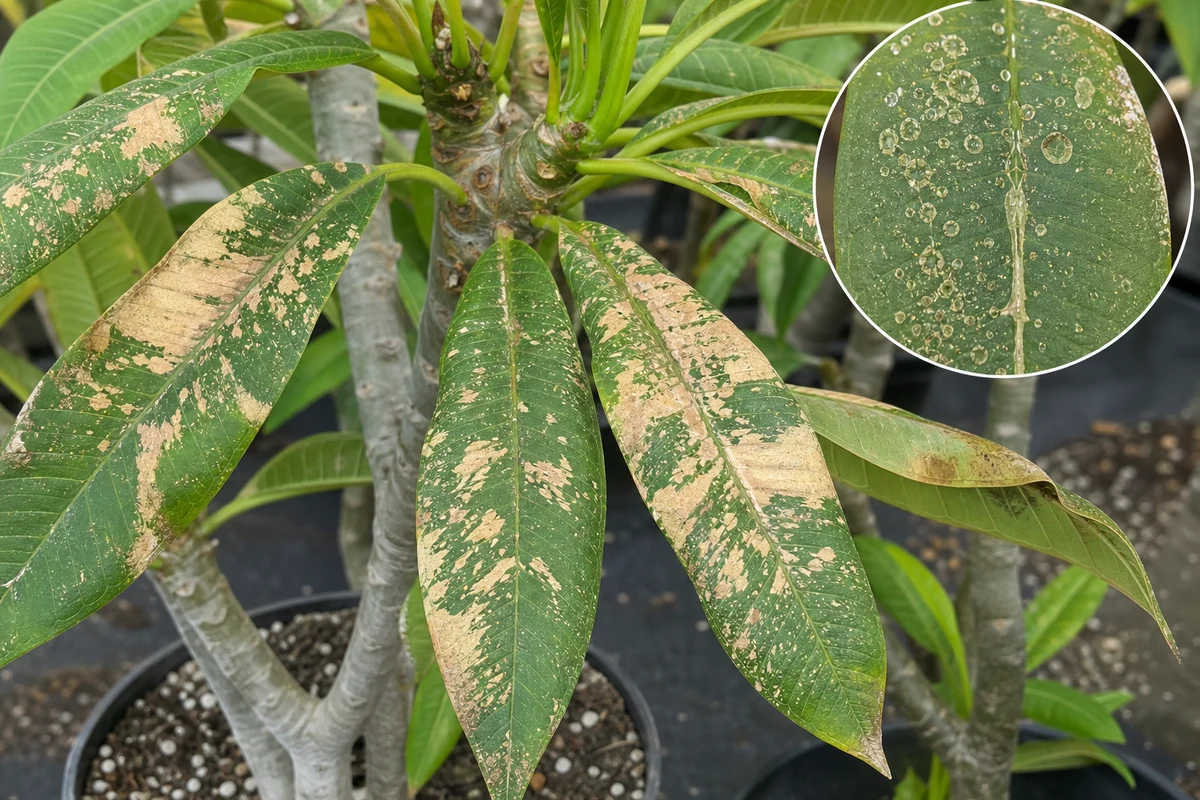
Important: This is a logical course of action based on the evidence provided, not a guaranteed diagnosis. Confirm the event, tissue condition, roots, recent weather, and progression before treating.
Evidence that supports this match
- Scorch appeared within hours or several days of a spray, oil, foliar feed, or drift event
- Marks follow droplets, runs, overlap, or the sprayed side
- Adjacent unsprayed tissue remains healthier
- Several plants treated from the same tank show a similar pattern
How to separate common look-alikes
- Sunburn follows exposure and acclimation rather than spray coverage
- Fungal spots may produce spores and continue spreading to new untreated leaves
- Mite or thrips injury includes insects, stippling, scars, or black specks
- Root-zone fertilizer burn often includes salt crust, root injury, and broad marginal scorch
Step-by-step first response
- Stop the suspected product and record the name, rate, date, weather, and tank mixture
- Rinse only when exposure was recent and the label permits it; do not keep damaged foliage wet
- Move the plant out of extreme heat while maintaining useful light and airflow
- Do not stack another corrective spray or fertilizer onto injured tissue
- Monitor new growth; old burned areas will not turn green again
What to watch during recovery
- New leaves open without the same coverage pattern
- Damaged areas become dry and stable rather than soft or expanding
- The plant maintains normal hydration and root function
Seven-day observation plan
- Day 1: Photograph the full plant and a close view. Record firmness, moisture, weather, and the suspected event.
- Days 2-3: Check whether the boundary is stable, drying, softening, or spreading. Avoid adding products simply to do something.
- Days 4-7: Compare new growth and tissue beyond the injury. Continue the current plan when stable; move to the Disease and Rot Checker if softness, odor, seepage, or advancing darkness appears.
Save this with the growing area
For a saved care plan, record the plant or group, growing area, date, recent move or weather event, container or in-ground status, photographs, and the response taken. Growing conditions can change the safest next step.
Open the Environmental Damage Checker | Open the Physical Damage Checker | Check for Disease or Rot
Turn the explanation into an action plan
- Monitor
- Photograph the damage boundary and watch new leaves and tips for seven to fourteen days after exposure ends.
- Change one thing
- Make the smallest justified correction, record the date, and avoid stacking treatments before you can see which one helped.
- Escalate when needed
- Inspect stems and roots when tissue keeps softening, the trunk splits, or decline progresses after conditions stabilize.