
The Plumeria Climate and Environment Guide delves into how various environmental factors, such as temperature, humidity, sunlight, wind, and microclimates, influence plumeria growth. This comprehensive guide offers practical tips on how to create the ideal conditions for your plumeria, ensuring strong, healthy plants and vibrant blooms. By understanding how these factors affect your plumeria, you can make informed decisions about planting locations, seasonal adjustments, and protective measures against extreme weather conditions. Whether you’re growing plumeria in a tropical, subtropical, or temperate zone, this guide provides strategies to optimize your environment for year-round success and enhance the beauty of your plants.
Sun Exposure and Acclimation Checklist: How to Read Light, Shade, and Sunburn Risk
What to check next
This guide helps you connect visible injury to the timing of sun, heat, cold, wind, drought, flooding, salt, smoke, hail, or product exposure. Read the detailed explanation, then use this sequence to decide what to do.
Confirm the evidence for sunburn or sunscald
- Look for
- Bleached, tan, yellow, or corky injury concentrated on the sun-facing side after a sudden increase in light or reflected heat.
- Compare with
- Fungal spots, mites, chemical burn, cold injury, and bark damage may cross shaded and exposed surfaces or continue spreading without new sun exposure.
- Safest first response
- Stop further exposure increase, provide temporary filtered light, protect damaged bark, and resume acclimation only after the plant stabilizes.
Microclimate clue: Reflected heat, low humidity, hot walls, dark containers, elevation, and abrupt indoor-to-outdoor moves greatly increase sunburn risk.
- 1
Stop the active exposure
Move or shield the plant only enough to prevent more injury without creating another abrupt change.
- 2
Match damage to timing
Compare the affected side, height, leaf age, and first appearance with the recent event.
- 3
Check protected tissue
Look beneath the canopy and opposite side to separate directional exposure from systemic problems.
- 4
Support recovery
Stabilize moisture, airflow, and temperature; avoid fertilizer or heavy pruning while stressed.
- 5
Judge new growth
Old burned or frozen tissue may not recover, so use healthy new growth as the progress measure.
How microclimate changes this answer
Walls, pavement, reflections, wind corridors, low pockets, shade cloth, and container placement can overpower the regional forecast.
Compare this leaf pattern with healthy growth
Use these references to confirm that this article matches the visible pattern before changing care or applying a treatment.
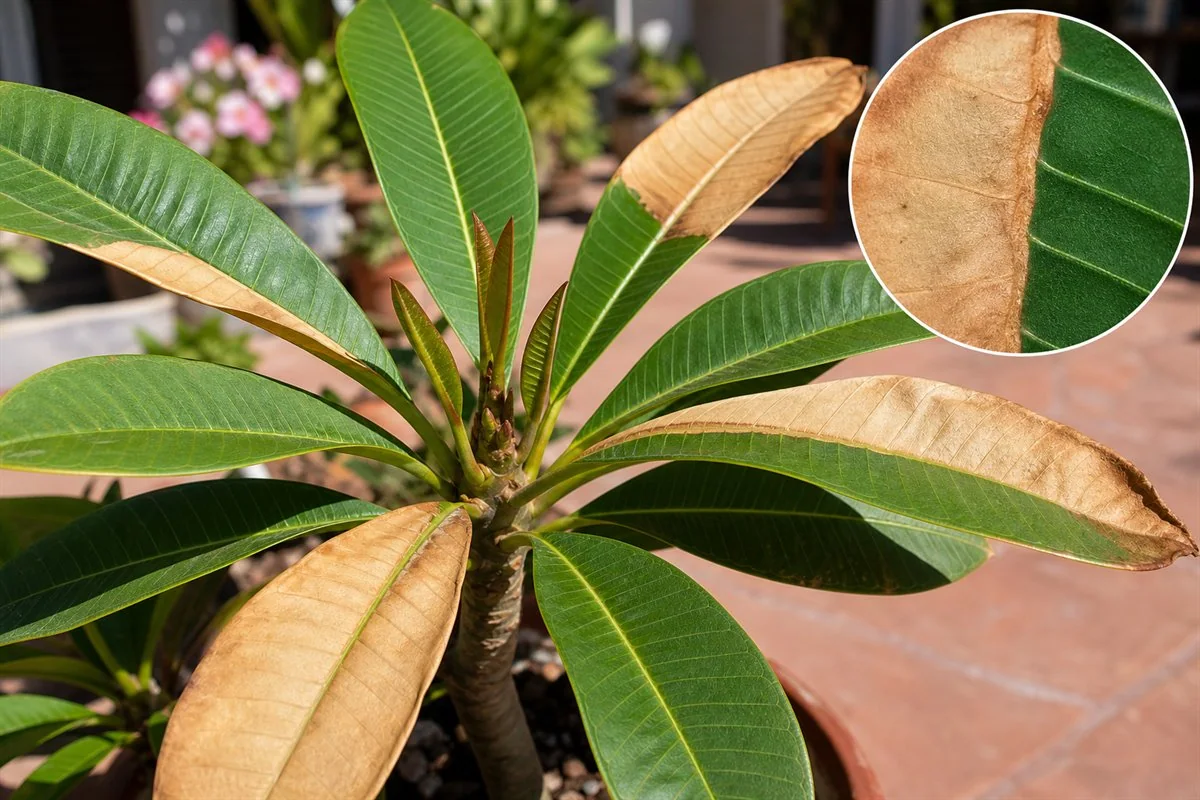 Condition reference
 Healthy baseline
- LocationCheck which plant part, age of growth, and exposed or protected side is affected.
- TextureDecide whether the evidence is dry, powdery, sticky, raised, translucent, soft, or intact.
- ProgressionPhotograph the same area so you can tell whether the pattern is stable, improving, or spreading.
Use more than one clue. Confirm the photo with recent conditions, roots, watering history, and the rest of the plant before acting.
Sunlight should be increased gradually so leaves, stems, and roots can adapt without burning.
Before you start
- Check the plant at more than one time of day.
- Look at roots, soil moisture, leaves, stems, and the surrounding growing area together.
- Make one environmental change at a time when possible.
- Record weather, location, and plant response so your decisions fit your own microclimate.
Step-by-step checklist
- Identify the current light level and how long the plant has been there.
- Count direct sun hours, especially harsh midday and afternoon sun.
- Look for reflected heat from walls, pavement, windows, and light-colored surfaces.
- Check whether the plant was recently shipped, repotted, pruned, rooted, or kept indoors.
- Inspect leaves for bleached patches, crispy areas, curled edges, and sudden drooping.
- Move toward stronger sun in stages rather than all at once.
- Use temporary shade during heat spikes or after relocation.
- Separate true sunburn from water stress, fertilizer residue, chemical spray injury, or heat stress.
Sunburn versus heat stress and common look-alikes
| Pattern | Stronger evidence | First response |
|---|---|---|
| Sunburn | Dry bleached, tan, or papery injury on the most exposed side after a sudden increase in light. | Provide temporary filtered light, protect the hot root zone, and stop additional spray or fertilizer stress. |
| Heat stress | Green leaves or flowers droop, fold, or lose firmness during peak heat and improve as conditions moderate. | Reduce reflected heat, protect the container, confirm root moisture, and add temporary afternoon protection. |
| Cold injury | Dark, translucent, limp, or soft tissue follows a cold night, frost, or freeze. | Keep the plant dry and protected while the final boundary develops; do not prune firm tissue immediately. |
| Spray or chemical injury | Droplet, coverage, drift, or application-shaped scorch follows a recent oil, soap, pesticide, fertilizer, or mixture. | Stop repeat applications, preserve the label and application record, and monitor new growth. |
| Active rot | Softness, seepage, odor, or a dark boundary continues moving beyond the original exposure area. | Use the Disease and Rot Checker and inspect the affected structure promptly. |
Step-by-step recovery and acclimation
- Photograph the entire plant and both exposed and sheltered tissue before moving it.
- Place the plant in bright filtered light rather than deep shade, unless extreme heat requires temporary stronger protection.
- Check moisture inside the root ball and the container temperature; do not flood dry-looking leaves without confirming the roots.
- Leave firm damaged tissue in place while the boundary stabilizes. Remove only tissue that is fully dead, collapsing, or creating a sanitation problem.
- Increase direct exposure in small stages and hold each stage until leaves, stems, roots, and the next weather change show that the plant is coping.
- Pause or step back when new bleaching, dry exposed-side patches, persistent wilt, or hot-root symptoms appear.
What your results mean
- Ready for more sun: Leaves are firm, roots are stable, and the plant is already handling bright light.
- Needs acclimation: The plant came from indoors, shade, shipping, greenhouse cover, or recent stress.
- Needs protection: Bleaching, leaf burn, wilting, or heat load appears faster than the plant can recover.
Common mistakes to avoid
- Treating all shade as bad and all full sun as automatically best.
- Moving an indoor or shaded plant into full sun in one day.
- Applying sprays or fertilizer before intense sun exposure.
- Ignoring pot temperature while only looking at leaves.
What to do next
Use the checklist result to decide whether to move the plant, add shade, improve airflow, protect roots, adjust watering, or wait and observe. Recheck after the next weather change before making another major adjustment.
Related climate guide pages
- Impact of Sun Exposure on Plumeria
- How to Acclimate Plumerias to Varying Sunlight Levels
- How to Monitor Sunburn Signs in Plumerias
Continue the climate checklist series
- Microclimate Mapping Checklist: What to Check Before Placing Plumeria
- Heat, Drought, and Hot-Weather Stress Checklist: What to Check Before You Shade, Water, or Move
- Cold, Frost, and Dormancy Protection Checklist: What to Check Before Cold Weather
- Wind, Rain, Humidity, and Airflow Checklist: What to Check After Storms or Wet Weather
- Indoor, Greenhouse, and Transition Checklist: What to Check Before Moving Plumeria In or Out
Turn the explanation into an action plan
- Monitor
- Photograph the damage boundary and watch new leaves and tips for seven to fourteen days after exposure ends.
- Change one thing
- Make the smallest justified correction, record the date, and avoid stacking treatments before you can see which one helped.
- Escalate when needed
- Inspect stems and roots when tissue keeps softening, the trunk splits, or decline progresses after conditions stabilize.