
The Plumeria Climate and Environment Guide delves into how various environmental factors, such as temperature, humidity, sunlight, wind, and microclimates, influence plumeria growth. This comprehensive guide offers practical tips on how to create the ideal conditions for your plumeria, ensuring strong, healthy plants and vibrant blooms. By understanding how these factors affect your plumeria, you can make informed decisions about planting locations, seasonal adjustments, and protective measures against extreme weather conditions. Whether you’re growing plumeria in a tropical, subtropical, or temperate zone, this guide provides strategies to optimize your environment for year-round success and enhance the beauty of your plants.
How to Revive a Sunburned Plumeria
What to check next
This guide helps you connect visible injury to the timing of sun, heat, cold, wind, drought, flooding, salt, smoke, hail, or product exposure. Read the detailed explanation, then use this sequence to decide what to do.
Confirm the evidence for sunburn or sunscald
- Look for
- Bleached, tan, yellow, or corky injury concentrated on the sun-facing side after a sudden increase in light or reflected heat.
- Compare with
- Fungal spots, mites, chemical burn, cold injury, and bark damage may cross shaded and exposed surfaces or continue spreading without new sun exposure.
- Safest first response
- Stop further exposure increase, provide temporary filtered light, protect damaged bark, and resume acclimation only after the plant stabilizes.
Microclimate clue: Reflected heat, low humidity, hot walls, dark containers, elevation, and abrupt indoor-to-outdoor moves greatly increase sunburn risk.
- 1
Stop the active exposure
Move or shield the plant only enough to prevent more injury without creating another abrupt change.
- 2
Match damage to timing
Compare the affected side, height, leaf age, and first appearance with the recent event.
- 3
Check protected tissue
Look beneath the canopy and opposite side to separate directional exposure from systemic problems.
- 4
Support recovery
Stabilize moisture, airflow, and temperature; avoid fertilizer or heavy pruning while stressed.
- 5
Judge new growth
Old burned or frozen tissue may not recover, so use healthy new growth as the progress measure.
How microclimate changes this answer
Walls, pavement, reflections, wind corridors, low pockets, shade cloth, and container placement can overpower the regional forecast.
Compare this leaf pattern with healthy growth
Use these references to confirm that this article matches the visible pattern before changing care or applying a treatment.
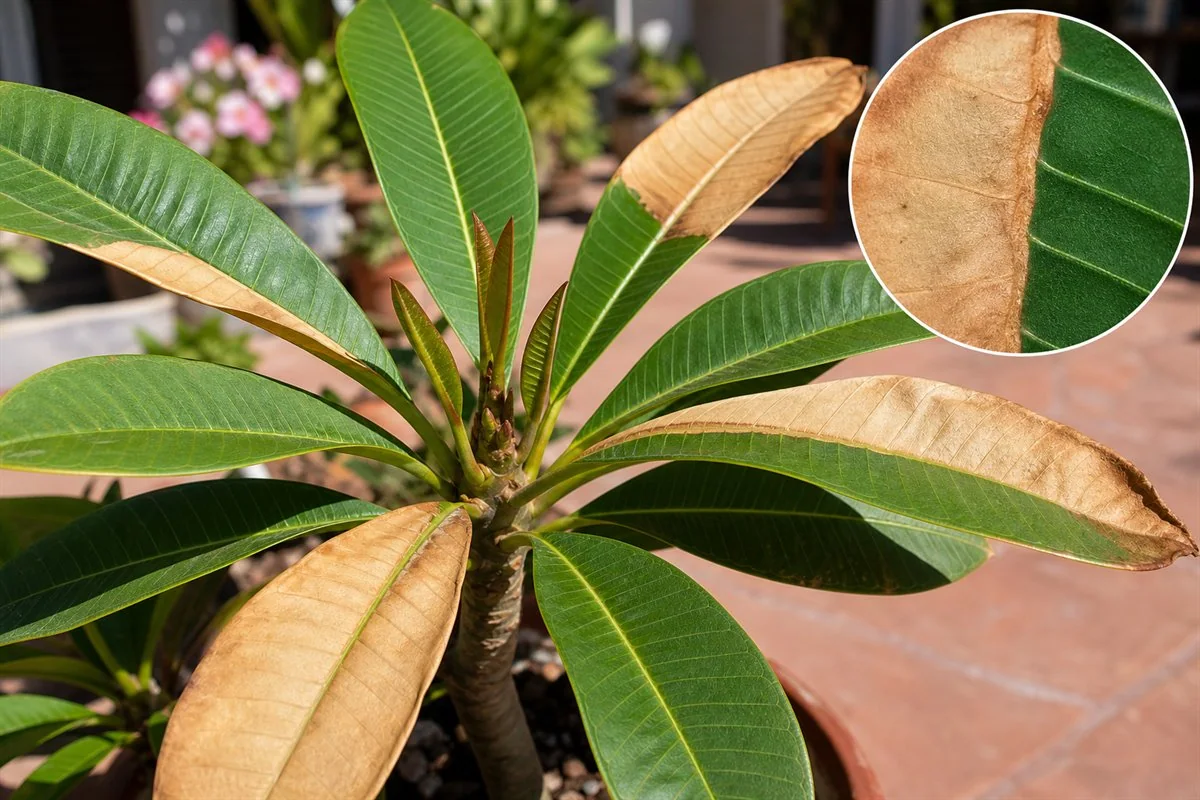 Condition reference
 Healthy baseline
- LocationCheck which plant part, age of growth, and exposed or protected side is affected.
- TextureDecide whether the evidence is dry, powdery, sticky, raised, translucent, soft, or intact.
- ProgressionPhotograph the same area so you can tell whether the pattern is stable, improving, or spreading.
Use more than one clue. Confirm the photo with recent conditions, roots, watering history, and the rest of the plant before acting.
Rehabilitation Steps to Help Recover a Plumeria Plant that has Suffered from Excessive Sun Exposure
Sun, the elixir of life for plants, sometimes becomes an overbearing force. Plumeria plants, despite their tropical origin, can fall victim to excessive sun exposure, resulting in signs of distress and damage. If you find your plumeria struggling under the relentless rays, you have the power to restore it. Here is your confident guide to rehabilitating a sun-stressed plumeria, ensuring it returns to its splendid best.
1. Identifying Sun Damage: The First Insights
A. Sunburned Leaves
- Look for Discolored Patches: Leaves may exhibit white, yellow, or brown scorched areas.
B. Wilting or Drooping
- Observe the Plant’s Stance: It might appear fatigued and stressed.
C. Reduced Flowering
- Note Lack of Blooms: The stress can lead to diminished flowering.
2. Immediate Interventions: The Critical Responses
A. Relocating to Suitable Spot
- Move to Partial Shade: Immediate relocation can mitigate further damage.
B. Modifying Watering Regimen
- Increase Watering: Sun-stressed plumerias might require more frequent watering.
C. Applying Anti-Transpirants
- Consider Leaf Sprays: Products that reduce water loss can be beneficial.
3. Ongoing Rehabilitation: The Nurturing Pathway
A. Gradual Sun Exposure Adjustment
- Slowly Acclimate: Gradually reintroduce to sunnier spots if desired.
B. Monitoring and Adjusting Watering
- Consistent Moisture: Maintain an optimal watering schedule to support recovery.
C. Nutrient Support
- Balanced Fertilization: Encourage recovery with appropriate nutrient supplements.
D. Pruning Damaged Parts
- Carefully Remove Scorched Areas: This helps the plant focus energy on healthy growth.
E. Supportive Mulching
- Apply Mulch Around the Base: Helps in retaining soil moisture and protects the roots.
4. Vigilant Observation and Care: The Healing Journey
A. Regular Checks
- Observe for Improvement: Watch for signs of recovery and growth.
B. Seasonal Adjustments
- Tailor Care to Seasons: Adapt care practices based on seasonal sun intensity and temperatures.
Conclusion: The Revival of Your Sun-Kissed Plumeria
Sunburn in plumerias is not an end but a bend in their life’s journey. The sun that once scorched can again nourish, and the leaves that once wilted can again flourish. You have not merely followed a set of instructions; you have woven a restorative symphony, harmonizing elements to breathe life back into your plumeria.
This rehabilitation transcends the physical; it’s a communion with your garden, where every leaf, every root resonates with your care. Your plumeria will rise, enriched and emboldened, its blossoms a radiant testament to your confident intervention. The sun will no longer be a tormentor but a nurturer, its rays a gentle caress, painting your garden with warmth and wonder.
May your plumeria bloom with renewed vigor, its fragrance a melody, its beauty a poem, all etched in sunlight, all sculpted by your caring hands.
Turn the explanation into an action plan
- Monitor
- Photograph the damage boundary and watch new leaves and tips for seven to fourteen days after exposure ends.
- Change one thing
- Make the smallest justified correction, record the date, and avoid stacking treatments before you can see which one helped.
- Escalate when needed
- Inspect stems and roots when tissue keeps softening, the trunk splits, or decline progresses after conditions stabilize.