
The Plumeria How-To Guide offers step-by-step instructions for essential tasks like rooting, pruning, fertilizing, and repotting—helping you grow strong, healthy plumeria with proven techniques.
How to Address Aphid Infestations in Plumerias
What to check next
This guide helps you connect growth habit, light, roots, water, nutrition, season, and cultivar traits before trying to correct the whole plant. Read the detailed explanation, then use this sequence to decide what to do.
- 1
- 2
Check the foundation
Inspect anchorage, container size, roots, drainage, and the amount and direction of light.
- 3
Compare season and cultivar
Confirm whether the habit is new, worsening, seasonal, or normal for the variety.
- 4
Correct the strongest limiter
Address the clearest root, light, structural, moisture, or nutrition limitation first.
- 5
Measure new growth
Use dated photos, internode length, branching, and the next leaf flush to judge progress.
How microclimate changes this answer
A sheltered wall, partial canopy, wind, container heat, and winter storage can shape the plant more than its regional Zone.
Compare this insect or pest pattern with healthy growth
Use these references to confirm that this article matches the visible pattern before changing care or applying a treatment.
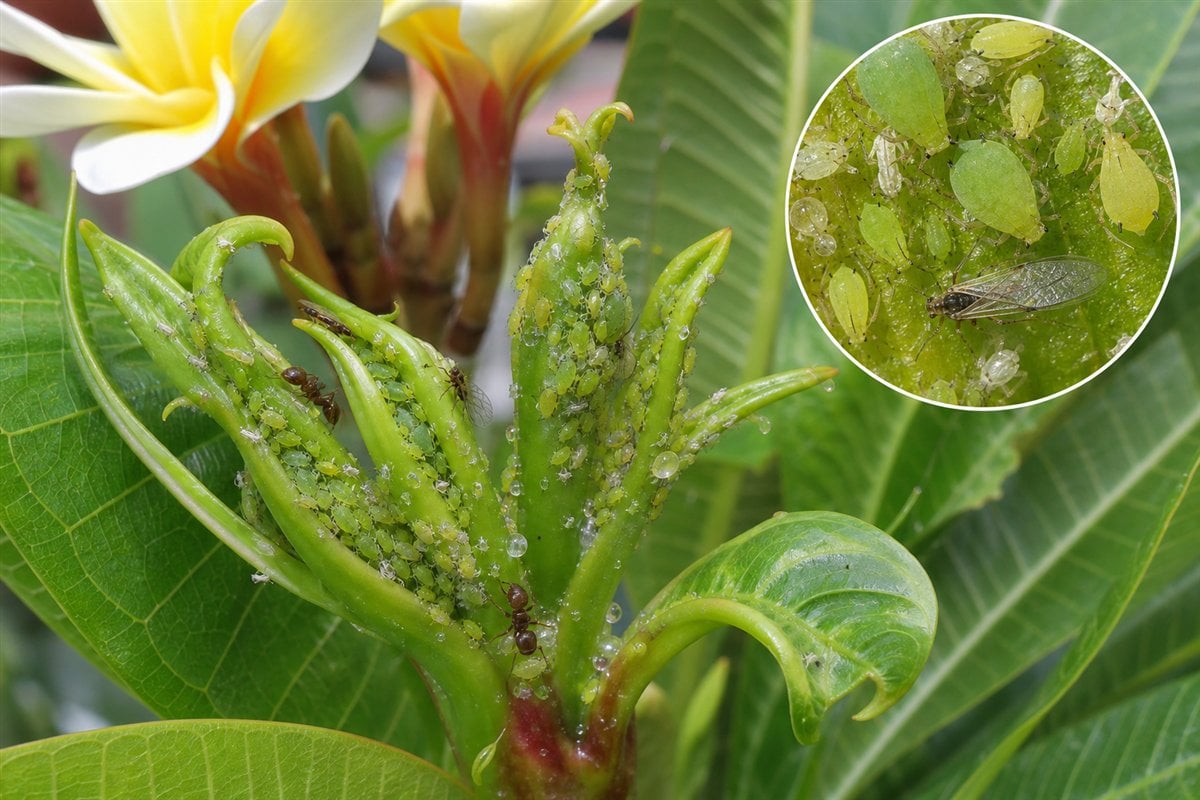 Condition reference
 Healthy baseline
- LocationCheck which plant part, age of growth, and exposed or protected side is affected.
- TextureDecide whether the evidence is dry, powdery, sticky, raised, translucent, soft, or intact.
- ProgressionPhotograph the same area so you can tell whether the pattern is stable, improving, or spreading.
Use more than one clue. Confirm the photo with recent conditions, roots, watering history, and the rest of the plant before acting.
Identifying Aphid Issues in Plumerias: Early Detection and Solutions
Aphids are small, sap-sucking insects that can be a significant problem for plumeria plants. Identifying an aphid infestation early and implementing appropriate solutions can save your plumerias from serious damage. Here’s a comprehensive guide to help you tackle aphid issues.
1. Early Identification of Aphid Issues:
a. Visual Inspection:
- Appearance: Aphids are tiny, ranging from green to black or even red in color.
- Location: Check under the leaves, on the stems, and around flower buds. Aphids often cluster together.
b. Signs of Infestation:
- Sticky Residue: Aphids secrete a sticky substance called honeydew. Look for this on leaves.
- Leaf Damage: Curling, yellowing, or distorted leaves may be signs of an aphid infestation.
- Presence of Ants: Ants are often attracted to the honeydew and may indicate an aphid issue.
2. Organic Solutions:
a. Manual Removal:
- Gently rub the affected areas with a soft, damp cloth to remove the aphids.
b. Water Spraying:
- A strong spray of water can dislodge aphids from the plant. Repeat as needed.
c. Insecticidal Soaps:
- Mix a mild soap with water and spray the affected areas. Rinse after a few hours.
d. Introduce Beneficial Insects:
- Ladybugs and lacewings are natural predators of aphids and can help control the population.
3. Chemical Solutions:
a. Selecting the Right Insecticide:
- Look for insecticides specifically designed to target aphids, following the instructions on the packaging.
b. Application:
- Spray the insecticide evenly on all affected parts of the plumeria, paying attention to undersides of leaves.
c. Follow-up:
- Monitor the plant closely and reapply as directed if the infestation persists.
4. Preventive Measures:
a. Regular Monitoring:
- Regularly inspect your plumerias to catch any infestation at an early stage.
b. Healthy Growing Practices:
- Healthy plumerias are less susceptible to aphid infestations. Follow proper watering, fertilizing, and pruning practices.
c. Avoid Over-Fertilizing:
- Excessive nitrogen can make plumerias more appealing to aphids. Use a balanced fertilizer.
Conclusion:
Aphids can cause considerable harm to your plumerias if left unchecked. Early identification followed by the application of organic or chemical solutions can mitigate their impact and restore the health of your plants. Continuous vigilance and adopting healthy growing practices can prevent future infestations and ensure your plumerias continue to thrive.
Remember, the chosen method should align with your gardening practices and the severity of the infestation. Always follow the instructions if using commercial products, and consider consulting with local gardening experts if the problem persists.
Turn the explanation into an action plan
- Monitor
- Compare whole-plant photographs monthly during active growth and at each seasonal transition.
- Change one thing
- Make the smallest justified correction, record the date, and avoid stacking treatments before you can see which one helped.
- Escalate when needed
- Inspect roots and major stems promptly when decline is sudden, anchorage fails, or several branches soften or die back.