
The Plumeria How-To Guide offers step-by-step instructions for essential tasks like rooting, pruning, fertilizing, and repotting—helping you grow strong, healthy plumeria with proven techniques.
How to Treat Plumeria with Chlorosis
What to check next
This guide helps you connect growth habit, light, roots, water, nutrition, season, and cultivar traits before trying to correct the whole plant. Read the detailed explanation, then use this sequence to decide what to do.
- 1
- 2
Check the foundation
Inspect anchorage, container size, roots, drainage, and the amount and direction of light.
- 3
Compare season and cultivar
Confirm whether the habit is new, worsening, seasonal, or normal for the variety.
- 4
Correct the strongest limiter
Address the clearest root, light, structural, moisture, or nutrition limitation first.
- 5
Measure new growth
Use dated photos, internode length, branching, and the next leaf flush to judge progress.
How microclimate changes this answer
A sheltered wall, partial canopy, wind, container heat, and winter storage can shape the plant more than its regional Zone.
Compare this leaf pattern with healthy growth
Use these references to confirm that this article matches the visible pattern before changing care or applying a treatment.
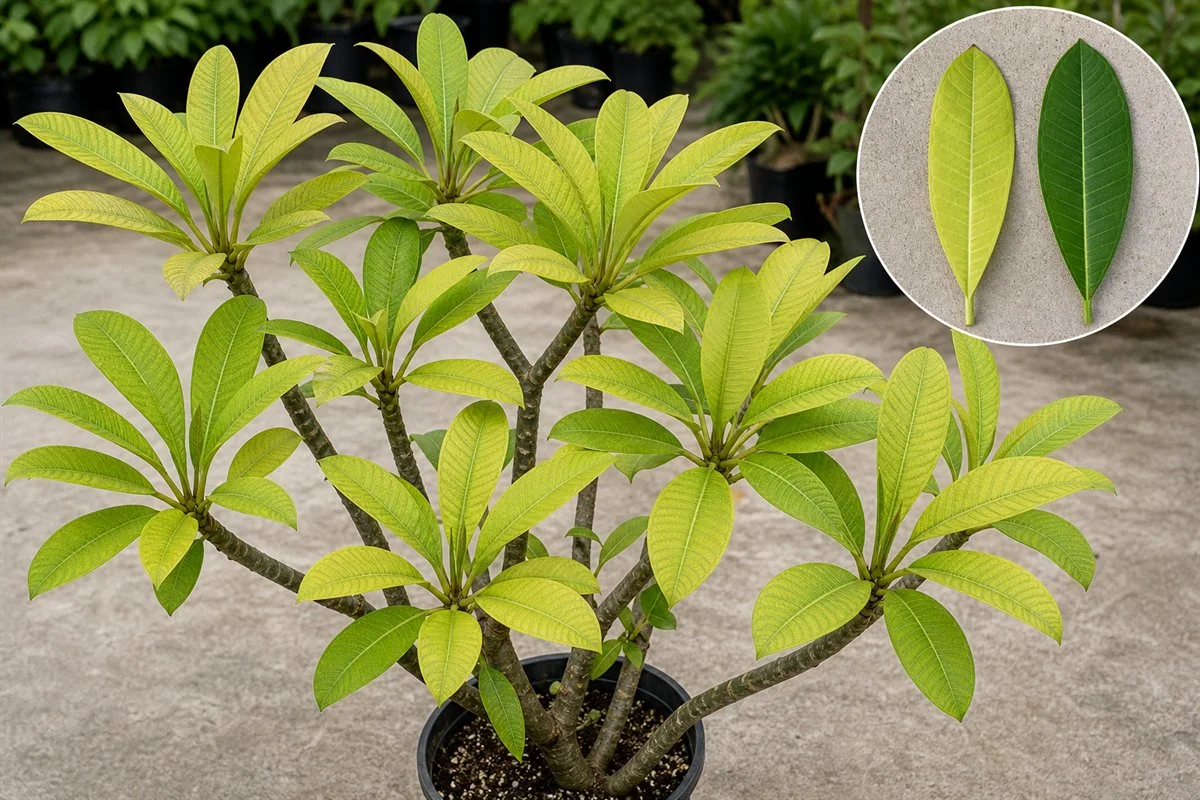 Condition reference
 Healthy baseline
- LocationCheck which plant part, age of growth, and exposed or protected side is affected.
- TextureDecide whether the evidence is dry, powdery, sticky, raised, translucent, soft, or intact.
- ProgressionPhotograph the same area so you can tell whether the pattern is stable, improving, or spreading.
Use more than one clue. Confirm the photo with recent conditions, roots, watering history, and the rest of the plant before acting.
How to Treat Plumeria with Chlorosis
Chlorosis in plumeria is a condition where leaves produce insufficient chlorophyll, leading to pale, yellow, or lime-green colored leaves. It can affect the overall health and aesthetics of the plant. This guide offers a step-by-step process to diagnose and treat chlorosis in plumeria.
I. Identifying Chlorosis in Plumeria
A. Symptoms of Chlorosis
- Pale Green or Yellow Leaves: The leaf’s green color becomes weak, especially in the newer leaves.
- Weak and Stunted Growth: Affected plants may grow slowly and appear weak.
B. Possible Causes of Chlorosis
- Nutrient Deficiencies: Lack of essential nutrients such as iron, magnesium, or nitrogen.
- Poor Drainage: Waterlogged soil may hinder nutrient uptake.
- High pH Levels: Alkaline soil can lock certain nutrients.
II. Confirming the Diagnosis
A. Visual Inspection
- Look for pale or yellow leaves, especially in new growth.
B. Soil and Leaf Testing
- Soil tests can determine pH and nutrient levels.
- Leaf tissue testing can identify specific nutrient deficiencies.
III. Treatment Options
A. Correcting Nutrient Deficiencies
- Iron Deficiency: Apply chelated iron.
- Magnesium Deficiency: Use Epsom salts according to instructions.
- Nitrogen Deficiency: Apply a balanced fertilizer with nitrogen.
B. Adjusting Soil pH
- If soil is too alkaline, add sulfur or other acidifying agents.
C. Improving Soil Drainage
- Aerating the soil and ensuring proper drainage will prevent waterlogging.
D. Regular Monitoring and Care
- Check the affected areas frequently to observe improvements or detect additional problems.
IV. Preventive Measures
A. Regular Soil Testing
- Ensuring that soil has the right pH and nutrient balance will help prevent chlorosis.
B. Proper Watering Practices
- Maintain a consistent watering routine to avoid both over-watering and under-watering.
C. Selecting the Right Location and Soil
- Plant plumerias in well-drained soil and a location with the appropriate sunlight.
V. Conclusion
Chlorosis in plumerias can be both concerning and frustrating, but with careful observation and precise action, it’s a condition that can be treated effectively. Understanding the root cause and implementing the right solutions will restore the vibrant green hues to your plumerias and ensure they continue to thrive. Whether it’s adjusting the pH, supplementing with the right nutrients, or improving drainage, these methods will help you get your plumerias back to their best selves.
B
Turn the explanation into an action plan
- Monitor
- Compare whole-plant photographs monthly during active growth and at each seasonal transition.
- Change one thing
- Make the smallest justified correction, record the date, and avoid stacking treatments before you can see which one helped.
- Escalate when needed
- Inspect roots and major stems promptly when decline is sudden, anchorage fails, or several branches soften or die back.