
Welcome to the Plumeria Cultivation & Planting Guide. This is your definitive starting point for turning rooted cuttings, seedlings, or mature specimens into thriving, bloom-laden trees. Inside, you’ll learn how to choose the ideal micro-climate. You will craft well-draining soil mixes. Mastering container-versus-in-ground decisions is also included. You will time each planting task to your growing zone. Step-by-step instructions guide each aspect of planting. Troubleshooting checkpoints help resolve common issues. Nutrition tips based on science ensure your plumeria has strong roots, vigorous growth, and abundant flowers. Whether you garden on a balcony or use raised beds, this guide offers decades of practical experience. It is also helpful if you maintain a full grove. It turns that knowledge into practical, easy-to-follow advice. The guide empowers beginners and seasoned collectors alike to cultivate with confidence.
Tie, Wire, and Label Girdling on Plumeria Stems
What to check next
This guide helps you connect growth habit, light, roots, water, nutrition, season, and cultivar traits before trying to correct the whole plant. Read the detailed explanation, then use this sequence to decide what to do.
- 1
Describe the whole pattern
Compare height, branching, canopy density, leaf size, flowering, leaning, and vigorous areas.
- 2
Check the foundation
Inspect anchorage, container size, roots, drainage, and the amount and direction of light.
- 3
Compare season and cultivar
Confirm whether the habit is new, worsening, seasonal, or normal for the variety.
- 4
Correct the strongest limiter
Address the clearest root, light, structural, moisture, or nutrition limitation first.
- 5
Measure new growth
Use dated photos, internode length, branching, and the next leaf flush to judge progress.
How microclimate changes this answer
A sheltered wall, partial canopy, wind, container heat, and winter storage can shape the plant more than its regional Zone.
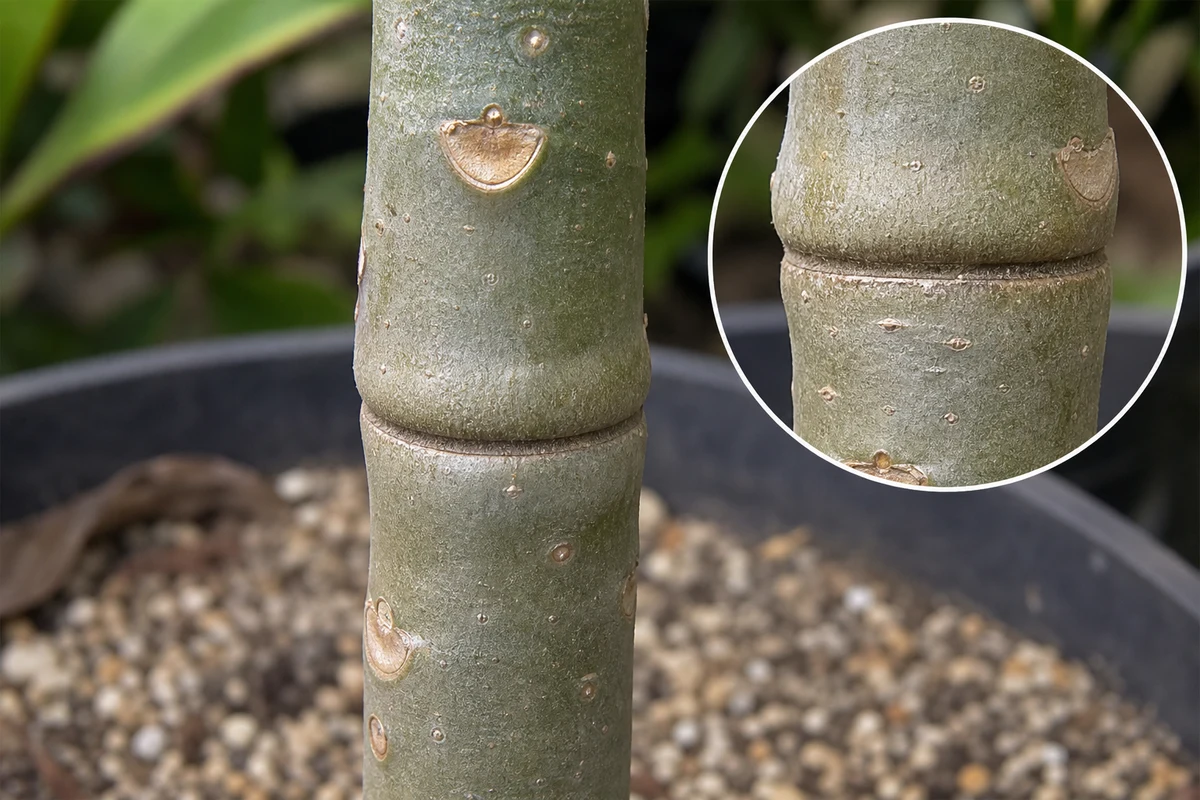
Checker support guide. A forgotten tie, wire, or plant label can cut into a growing plumeria stem. A continuous groove and swelling above the pressure point distinguish constriction from many diseases.
Important: This is a logical course of action based on the evidence provided, not a guaranteed diagnosis. Confirm the event, tissue condition, roots, recent weather, and progression before treating.
Evidence that supports this match
- A narrow line circles most or all of the stem
- A tie, wire, tag, or support was present at the groove
- Tissue above the line may be slightly swollen or less vigorous
- The groove is firm rather than wet and spreading
How to separate common look-alikes
- A graft union has an intentional junction and matching scion/rootstock structure
- A canker forms an irregular lesion rather than an even pressure line
- Abrasion is usually one-sided and scraped
- Stem rot is soft, dark, or expanding
Step-by-step first response
- Remove the constricting material carefully without cutting deeper into the stem
- Support the branch above the injury if the groove weakens it
- Leave the groove dry and uncovered
- Reduce mechanical load and avoid strong fertilizer while transport tissue recovers
- Monitor growth above the groove and prune only if decline or structural failure develops
What to watch during recovery
- Swelling does not increase rapidly
- Leaves above the groove remain firm and active
- Callus fills the groove without softness or cracking
Seven-day observation plan
- Day 1: Photograph the full plant and a close view. Record firmness, moisture, weather, and the suspected event.
- Days 2-3: Check whether the boundary is stable, drying, softening, or spreading. Avoid adding products simply to do something.
- Days 4-7: Compare new growth and tissue beyond the injury. Continue the current plan when stable; move to the Disease and Rot Checker if softness, odor, seepage, or advancing darkness appears.
Save this with the growing area
For a saved care plan, record the plant or group, growing area, date, recent move or weather event, container or in-ground status, photographs, and the response taken. Growing conditions can change the safest next step.
Open the Environmental Damage Checker | Open the Physical Damage Checker | Check for Disease or Rot
Turn the explanation into an action plan
- Monitor
- Compare whole-plant photographs monthly during active growth and at each seasonal transition.
- Change one thing
- Make the smallest justified correction, record the date, and avoid stacking treatments before you can see which one helped.
- Escalate when needed
- Inspect roots and major stems promptly when decline is sudden, anchorage fails, or several branches soften or die back.