
Welcome to the Plumeria Cultivation & Planting Guide. This is your definitive starting point for turning rooted cuttings, seedlings, or mature specimens into thriving, bloom-laden trees. Inside, you’ll learn how to choose the ideal micro-climate. You will craft well-draining soil mixes. Mastering container-versus-in-ground decisions is also included. You will time each planting task to your growing zone. Step-by-step instructions guide each aspect of planting. Troubleshooting checkpoints help resolve common issues. Nutrition tips based on science ensure your plumeria has strong roots, vigorous growth, and abundant flowers. Whether you garden on a balcony or use raised beds, this guide offers decades of practical experience. It is also helpful if you maintain a full grove. It turns that knowledge into practical, easy-to-follow advice. The guide empowers beginners and seasoned collectors alike to cultivate with confidence.
Rubbing and Bark Abrasion on Plumeria: Protecting the Wound
What to check next
This guide helps you evaluate a break, bruise, cut, constriction, transport injury, animal injury, or storm wound before supporting, pruning, or monitoring. Read the detailed explanation, then use this sequence to decide what to do.
- 1
Stabilize the plant
Prevent movement, rubbing, or additional weight from widening the injury.
- 2
Inspect the connection
Check how much healthy tissue remains and whether the wound is clean, crushed, split, or contaminated.
- 3
Choose support or removal
Support a viable connection; use a clean cut only when the section cannot remain sound.
- 4
Protect without trapping moisture
Keep the wound clean and dry, sanitize tools, and avoid sealing wet decay inside.
- 5
Watch the wound edge
Healthy callus stays firm; spreading softness, darkening, odor, or oozing needs reassessment.
How microclimate changes this answer
Wind, repeated movement, wet weather, humidity, intense sun, and cool conditions change how quickly a wound dries and calluses.
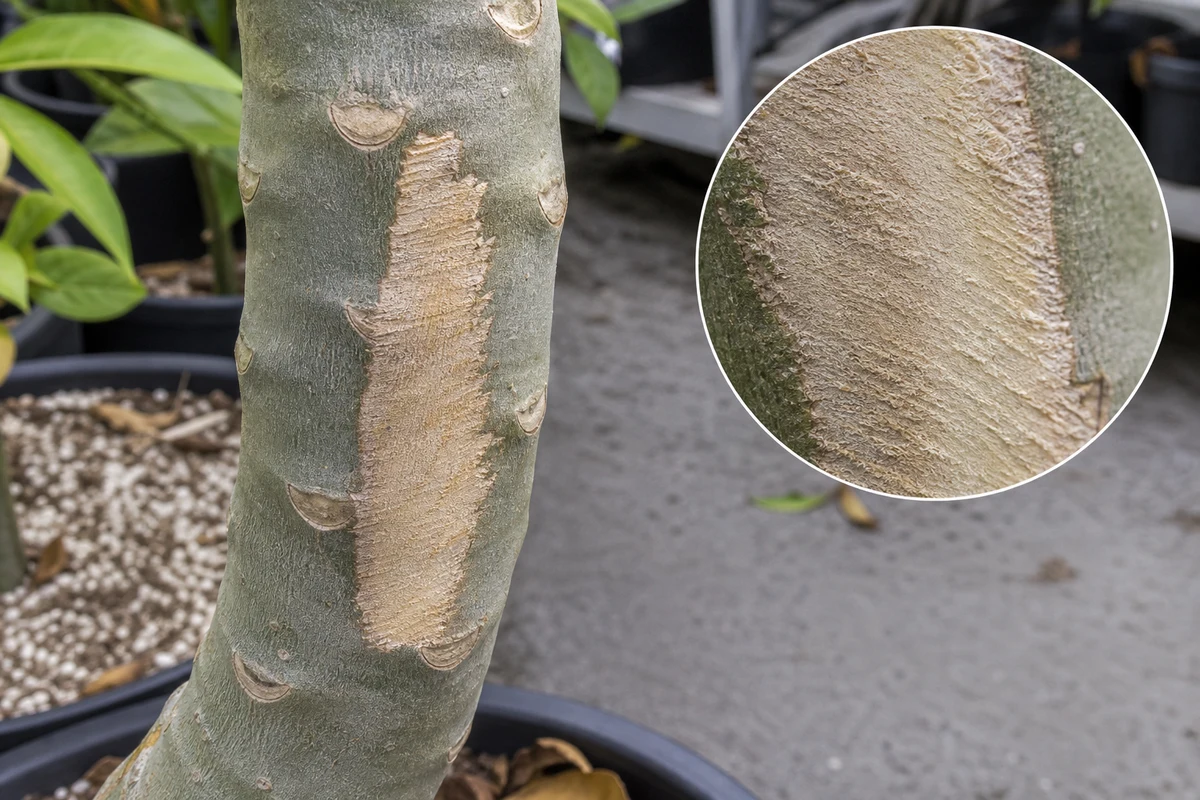
Checker support guide. Repeated contact with a stake, wall, branch, tie, or vehicle can remove the plumeria outer skin and expose a shallow dry wound. Stopping the contact is the first treatment.
Important: This is a logical course of action based on the evidence provided, not a guaranteed diagnosis. Confirm the event, tissue condition, roots, recent weather, and progression before treating.
Evidence that supports this match
- The scrape aligns with a nearby contact point or movement path
- Damage is shallow, elongated, and dry with parallel rub marks
- Healthy firm tissue surrounds the abrasion
- The injury does not begin as a soft internal lesion
How to separate common look-alikes
- A canker is usually sunken with a defined diseased margin
- Sunburn is a broad exposed-side discoloration rather than a contact strip
- Snails and slugs leave rasped patches, slime, or night activity
- Borer injury includes a hole, frass, or internal gallery
Step-by-step first response
- Remove or pad the source of rubbing without tying tightly around the stem
- Keep the surface clean, dry, and open to airflow
- Do not apply thick sealants, soil, or moisture-holding wraps
- Support the plant from a different contact point when necessary
- Inspect weekly until a firm dry callus forms
What to watch during recovery
- No new rubbing appears at the edge
- The exposed area stays firm and dry
- Callus gradually develops from healthy margins
Seven-day observation plan
- Day 1: Photograph the full plant and a close view. Record firmness, moisture, weather, and the suspected event.
- Days 2-3: Check whether the boundary is stable, drying, softening, or spreading. Avoid adding products simply to do something.
- Days 4-7: Compare new growth and tissue beyond the injury. Continue the current plan when stable; move to the Disease and Rot Checker if softness, odor, seepage, or advancing darkness appears.
Save this with the growing area
For a saved care plan, record the plant or group, growing area, date, recent move or weather event, container or in-ground status, photographs, and the response taken. Growing conditions can change the safest next step.
Open the Environmental Damage Checker | Open the Physical Damage Checker | Check for Disease or Rot
Turn the explanation into an action plan
- Monitor
- Check stability and firmness every few days for two weeks, then weekly until a firm callus forms.
- Change one thing
- Make the smallest justified correction, record the date, and avoid stacking treatments before you can see which one helped.
- Escalate when needed
- Remove load and seek experienced help when the trunk is unstable, decay crosses the wound, or a canopy section could fall.