
Welcome to the Plumeria Cultivation & Planting Guide. This is your definitive starting point for turning rooted cuttings, seedlings, or mature specimens into thriving, bloom-laden trees. Inside, you’ll learn how to choose the ideal micro-climate. You will craft well-draining soil mixes. Mastering container-versus-in-ground decisions is also included. You will time each planting task to your growing zone. Step-by-step instructions guide each aspect of planting. Troubleshooting checkpoints help resolve common issues. Nutrition tips based on science ensure your plumeria has strong roots, vigorous growth, and abundant flowers. Whether you garden on a balcony or use raised beds, this guide offers decades of practical experience. It is also helpful if you maintain a full grove. It turns that knowledge into practical, easy-to-follow advice. The guide empowers beginners and seasoned collectors alike to cultivate with confidence.
Preventing Transplant Shock
What to check next
This guide helps you connect growth habit, light, roots, water, nutrition, season, and cultivar traits before trying to correct the whole plant. Read the detailed explanation, then use this sequence to decide what to do.
- 1
Describe the whole pattern
Compare height, branching, canopy density, leaf size, flowering, leaning, and vigorous areas.
- 2
Check the foundation
Inspect anchorage, container size, roots, drainage, and the amount and direction of light.
- 3
Compare season and cultivar
Confirm whether the habit is new, worsening, seasonal, or normal for the variety.
- 4
Correct the strongest limiter
Address the clearest root, light, structural, moisture, or nutrition limitation first.
- 5
Measure new growth
Use dated photos, internode length, branching, and the next leaf flush to judge progress.
How microclimate changes this answer
A sheltered wall, partial canopy, wind, container heat, and winter storage can shape the plant more than its regional Zone.
Preventing Transplant Shock
A Guide to Safely Moving Plumeria Cuttings, Seedlings, and Rooted Trees
After a Pot Topples or a Plumeria Is Transported
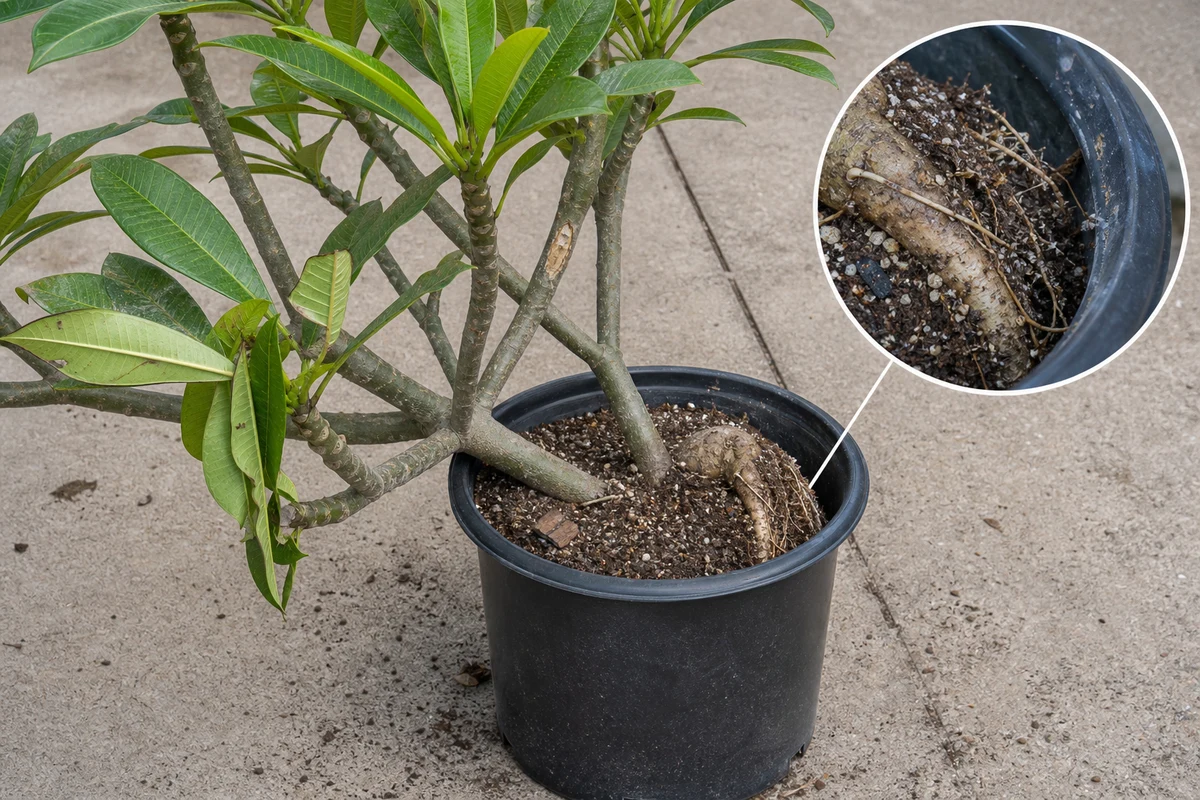
- Photograph the plant before straightening it so the direction of movement and contact points remain clear.
- Stabilize the container and support heavy branches before moving the root ball.
- Check for a shifted root ball, torn anchoring roots, new trunk movement at the soil line, scraped bark, cracks, and crushed tissue.
- Return loose mix around an intact root ball without packing it tightly. Repot only when the container, drainage, or root damage requires it.
- Keep the plant protected from strong wind and abrupt full sun while monitoring firmness and new growth.
Do not automatically add fertilizer or extra water after a fall. Water according to actual root-zone moisture, drainage, plant stage, and the amount of root disturbance. Escalate when the trunk rocks independently of the root ball, major roots are torn, or a wound becomes soft, dark, wet, or increasingly unstable.
Transplant shock is a common but preventable condition that affects plumeria after being moved to a new container or in-ground location. It can lead to yellowing leaves, wilt, root stall, delayed blooming, or even plant death. While plumeria are resilient tropical trees, they still require care when being transplanted.
This guide outlines what transplant shock is, what causes it, and—most importantly—how to prevent it in cuttings, rooted plants, and seedlings. Whether you’re potting up for growth, moving into the landscape, or transitioning indoors, these strategies will help ensure a smooth and healthy adjustment.
What Is Transplant Shock?
Transplant shock is the stress response a plumeria experiences when it’s suddenly moved to a new environment or disturbed at the root zone. Symptoms often include:
- Yellowing or dropping leaves
- Wilting despite moist soil
- Slowed or halted growth
- Root or stem softening in severe cases
This stress is caused by disruption to root function, sudden changes in light or moisture, or environmental swings.
Common Causes of Transplant Shock
| Cause | Description |
|---|---|
| Root disturbance | Damaging or drying out roots during transplanting |
| Change in light | Moving from filtered light to full sun too quickly |
| Overwatering | Roots are sensitive post-transplant and can rot easily |
| Temperature swings | Cold, heat, or wind exposure during or after transplant |
| Improper soil | Overly wet or compact soil leads to suffocation and rot |
| Fertilizing too soon | Nutrient uptake is minimal before roots recover |
General Prevention Tips for All Transplants
- Transplant during active warmth: Soil temps above 65°F and stable night temps above 55°F
- Transplant early morning or late afternoon to reduce heat stress
- Water lightly before and after planting to hydrate but not saturate
- Use sharp, clean tools to avoid crushing stems or roots
- Label and track the transplant date for future observations
Prevention for Specific Plumeria Types
Rooted Plants (Container or In-Ground)
| Step | Action |
|---|---|
| 1 | Water 24 hours before transplant to reduce shock |
| 2 | Loosen roots gently—do not break apart the entire root ball |
| 3 | Plant at the same depth or slightly higher than original root flare |
| 4 | Water in gently with filtered water—avoid flooding |
| 5 | Place in partial shade or filtered light for 2–5 days |
| 6 | Transition slowly to full sun over 1–2 weeks |
| 7 | Apply Excalibur VI or IX fertilizer after 2–3 weeks |
Unrooted Cuttings
| Step | Action |
|---|---|
| 1 | Ensure callus is fully formed and stem is firm |
| 2 | Use a very well-draining mix with pine bark and perlite |
| 3 | Do not water heavily at planting—moisten soil only lightly |
| 4 | Stake for support and place in bright indirect light |
| 5 | Wait 2–6+ weeks for root development before exposing to full sun or watering deeply |
Avoid fertilizer until roots and leaves develop.
Seedlings
| Step | Action |
|---|---|
| 1 | Transplant when seedlings are 4–6 inches tall with a solid root ball |
| 2 | Use a light mix for the new pot with pine bark and perlite |
| 3 | Water in with diluted kelp extract or beneficial microbes (optional) |
| 4 | Shade lightly for 2–3 days, then move to full sun |
| 5 | Wait 2–3 weeks before applying Excalibur Boost or worm castings |
Extra Tips for Minimizing Stress
- Use rooting or transplant tonic: Products with seaweed, humic acid, or mycorrhizae help root reestablishment.
- Shield from wind and direct sun: Use shade cloth or partial shade to reduce transpiration until stable
- Avoid unnecessary pruning: Let the plant recover before shaping
- Use mulch wisely: Add pine bark mulch around in-ground plants to retain moisture and regulate temperature—keep away from the stem
- Label all transplants and track recovery and first signs of new growth
Signs Your Plumeria Is Adjusting Well
- Leaves stay green or drop only moderately
- New leaf buds appear within 2–4 weeks
- Stem remains firm and upright
- New roots emerge near the surface (in cuttings or seedlings)
Conclusion
While transplant shock is common, it’s far from inevitable. By minimizing root disturbance, controlling environmental conditions, and delaying fertilizer application until the plant has reestablished, you can help your plumeria transition smoothly. Whether you’re potting up a prized cultivar or planting a newly rooted tree into your garden, patience and precision will ensure success.
Give your plumeria time, protection, and the right soil—and it will reward you with strong growth and blooms for seasons to come.
Turn the explanation into an action plan
- Monitor
- Compare whole-plant photographs monthly during active growth and at each seasonal transition.
- Change one thing
- Make the smallest justified correction, record the date, and avoid stacking treatments before you can see which one helped.
- Escalate when needed
- Inspect roots and major stems promptly when decline is sudden, anchorage fails, or several branches soften or die back.