
The Plumeria Pests and Diseases Guide is an essential resource for identifying, preventing, and treating the most common threats to plumeria plants, including pests, fungi, and environmental stressors. This guide offers detailed information on how to recognize early signs of trouble, from insect infestations to fungal infections, and provides practical solutions to address these issues. It also covers strategies for managing environmental factors such as excessive humidity, temperature fluctuations, and poor soil conditions, which can weaken plumeria. With expert tips on natural and chemical treatments, as well as proactive care practices, this guide ensures your plumeria remains healthy, resilient, and free from common ailments, allowing it to thrive season after season.
How to Prevent Bacterial Leaf Spot in Plumeria – Water Discipline, Leaf Handling & Seasonal Inspection
What to check next
This guide helps you separate infectious disease from pests, exposure injury, nutrition symptoms, and normal aging before pruning or treating. Read the detailed explanation, then use this sequence to decide what to do.
Confirm the evidence for bacterial leaf spot
- Look for
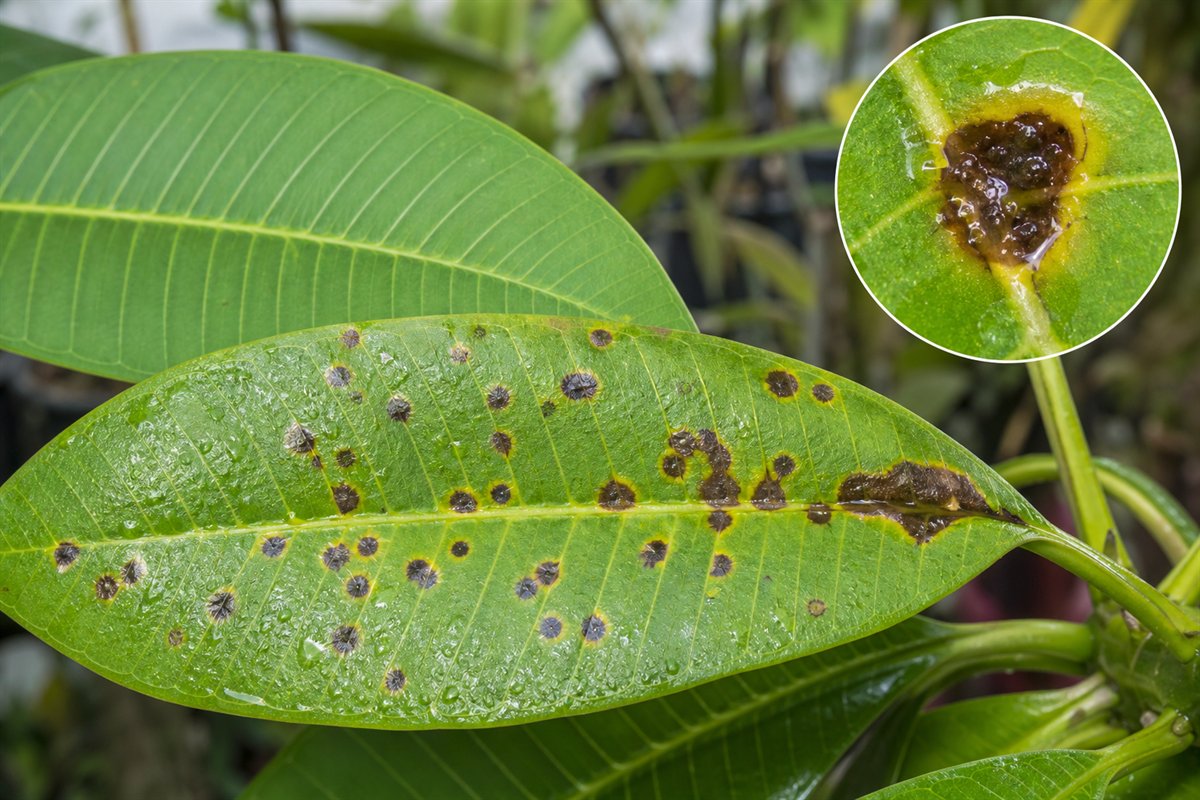
- Water-soaked lesions that enlarge, turn brown or black, may have yellow halos, and appear after splashing, handling, or prolonged wetness.
- Compare with
- Fungal leaf spots, sunburn, cold injury, edema, chemical splash, and insect feeding can resemble bacterial lesions.
- Safest first response
- Isolate, keep foliage dry, sanitize tools and hands, remove only clearly affected material, and seek testing when the diagnosis matters.
Microclimate clue: Warm wet weather, overhead watering, storms, and crowded foliage increase splash spread and slow leaf drying.
- 1
Stabilize and isolate
Keep questionable plants away from healthy collections and avoid splashing water or sharing tools.
- 2
Describe the tissue
Note whether damage is dry, powdery, water-soaked, sunken, soft, foul-smelling, or one-sided.
- 3
Map the progression
Photograph and mark the edge so you can tell whether the condition is spreading.
- 4
Confirm the closest match
Compare the defining sign, not only leaf color, and use laboratory testing when needed.
- 5
Intervene narrowly
Remove only unsalvageable tissue, sanitize tools, and treat only when the diagnosis supports it.
How microclimate changes this answer
Long leaf wetness, warm humidity, poor airflow, and cool wet roots increase disease pressure; intense sun and cold create look-alikes.
Compare this disease or rot pattern with healthy growth
Use these references to confirm that this article matches the visible pattern before changing care or applying a treatment.
 Condition reference
 Healthy baseline
- LocationCheck which plant part, age of growth, and exposed or protected side is affected.
- TextureDecide whether the evidence is dry, powdery, sticky, raised, translucent, soft, or intact.
- ProgressionPhotograph the same area so you can tell whether the pattern is stable, improving, or spreading.
Use more than one clue. Confirm the photo with recent conditions, roots, watering history, and the rest of the plant before acting.
Bacterial leaf spot decision path: Confirm the pattern and progression before changing care.
- Confirm: Stronger evidence includes water-soaked lesions that darken, follow veins, develop yellow halos, or expand rapidly after wet handling. Fungal spots, rust pustules, sunburn, and spray injury can appear similar without laboratory testing.
- Start conservatively: Isolate when practical, avoid handling wet foliage, remove fallen leaves, improve airflow, and stop overhead irrigation. Remove attached leaves selectively only when lesions are active and healthy foliage remains.
- Escalate only when justified: Use a fungicide, bactericide, wound treatment, or other product only when its label includes the condition and treatment site. Follow all dilution, interval, temperature, protective-equipment, and maximum-application directions.
- Sanitize and contain: When cutting is justified, disinfect tools between cuts with 70% isopropyl alcohol or another labeled tool disinfectant and let the tool dry. Bag suspected infectious material instead of composting it.
- Monitor: Mark representative lesions and inspect every 3 to 5 days, especially after rain or high humidity. Rapid wet expansion supports escalation.
Growing-condition check: Review recent weather, watering, airflow, drainage, plant age and stage, pot or in-ground status, recent applications, and saved microclimate. This is a logical response based on the evidence, not a confirmed laboratory diagnosis.
Prevent bacterial leaf spot by managing water, airflow, sanitation, and leaf handling before warm humid weather creates disease pressure. Prevention matters because spotted leaves do not heal back to perfect green, even after the disease is stopped.
Bacterial Leaf Spot Article Path
Use this group in order when possible: identify the problem, treat only when needed, then prevent repeat outbreaks or recurrence.
- Identify bacterial leaf spot
How to Identify Bacterial Leaf Spot in Plumeria – Water-Soaked Lesions, Brown Edges & Tissue Collapse - Treat bacterial leaf spot
How to Treat Bacterial Leaf Spot in Plumeria – Pruning, Sanitation & Antibacterial Sprays - Prevent bacterial leaf spot
How to Prevent Bacterial Leaf Spot in Plumeria – Water Discipline, Leaf Handling & Seasonal Inspection
Safety and diagnostics: before applying products, review the Treatment Safety Checklist. If symptoms do not match this group, return to the Disease Symptom Checklist.
Rot & Bacterial Disease Diagnostic Path
Use this path when plumeria leaves, tips, nodes, cuttings, or stems turn wet, soft, black, sunken, foul-smelling, greasy, or rapidly collapsing. Rot and bacterial-like problems can look like cold injury, overwatering, sunburn, fungal leaf spot, pruning wounds, or pest damage, so confirm the pattern before cutting or treating.
- Start with the disease symptom checklist when more than one disease pattern is possible.
- Check bacterial leaf spot when wet-looking spots, brown margins, or spreading leaf lesions appear.
- Check bacterial soft rot when tissue becomes mushy, watery, foul-smelling, or collapses quickly.
- Check bacterial blight-like symptoms when dark leaf burn, wet lesions, or fast tip dieback follows warm wet conditions.
- Use isolation and sanitation steps before pruning, moving, or treating a plant with active rot.
Why: fast rot requires quick action, but cutting or spraying the wrong problem can weaken the plant and hide the real cause.
Quick Answer
Keep foliage from staying wet, avoid crowding, sanitize cutting tools, remove diseased debris, and inspect after rain or overhead watering. In humid regions, prevention is mostly about helping leaves dry quickly and avoiding unnecessary wounds.
Prevention Checklist
| Practice | Best habit | Why |
|---|---|---|
| Water management | Water the root zone early enough for leaves and benches to dry before night. | Long leaf-wetness periods encourage bacterial and fungal leaf disease. |
| Airflow | Space plants so air can move around leaves and stems. | Airflow dries leaves faster and reduces humid pockets. |
| Sanitation | Remove badly diseased fallen leaves and clean benches or trays. | Old diseased tissue keeps disease pressure close to the plant. |
| Tool hygiene | Clean pruning tools between plants, especially after diseased tissue. | Tools can move sap and contaminated moisture. |
| Gentle handling | Avoid bruising, tearing, or folding leaves during moving and inspection. | Bacteria enter more easily through damaged tissue. |
| Monitoring | Inspect after storms, long humidity, greenhouse crowding, or overhead watering. | Early spotting is easier to stop than an established outbreak. |
Regional Notes
- Hot, humid, rainy regions: prioritize spacing, morning watering, and quick removal of diseased leaves. Why: leaves may stay wet long enough for disease to spread.
- Dry regions: watch for spray injury and dusty mite stress before assuming bacterial disease. Why: spots may come from heat or pests rather than moisture-driven disease.
- Greenhouses and patios: use fans, spacing, and inspection. Why: protected areas may trap humidity even when outdoor weather is dry.
- Winter storage: keep plants dry and ventilated. Why: stagnant damp storage can trigger rot and leaf problems as plants wake up.
What Not To Do
- Do not crowd plants tightly through rainy season. Why: leaves dry slowly and disease moves faster.
- Do not leave piles of diseased leaves under benches. Why: debris increases disease pressure.
- Do not use preventive sprays as a substitute for airflow and sanitation. Why: products cannot overcome constantly wet foliage.
- Do not fertilize weak roots heavily to “push through” disease. Why: stressed roots and soft growth can make the plant more vulnerable.
Bottom Line
Preventing bacterial leaf spot is mostly about dry leaves, clean tools, clean benches, and open airflow. The fewer wet wounds and crowded leaves the plant has, the less opportunity disease has to start.
Confirm Active Disease Before Escalating
Before pruning, spraying, or changing care, confirm that the bacterial pattern is active. This matters because dry old damage, cold injury, sunburn, and healed wounds can look alarming but may not be spreading.
- Mark or photograph the edge of the symptom and recheck whether it expands.
- Feel for softness, collapse, wet tissue, odor, or spreading discoloration.
- Review recent conditions: cool wet weather, overhead moisture, pruning wounds, leaf scars, crowded airflow, or stressed roots.
- Remove actively collapsing tissue when needed, but avoid cutting healthy tissue unnecessarily.
- Sanitize tools and let cuts dry before returning the plant to wet or crowded conditions.
Continue with the Complete Bacterial Leaf Spot Guide
Use the complete guide to compare look-alikes, reduce splash and infection pressure, choose a label-supported treatment only when justified, and judge recovery by new growth.
Watering and Leaf-Drying Safeguard by Plant Stage
| Plant stage | Moisture rule |
|---|---|
| Unrooted cutting | Water the rooting medium once at the beginning of the rooting process, then do not water again until two to three full-sized leaves have grown. Mist the firm stem only if it looks dehydrated, and keep new leaves and leaf scars dry. |
| Newly rooted cutting | Water sparingly and allow the mix to approach dry before watering again. Apply water to the medium and avoid leaving tender foliage wet. |
| Established plant | Water according to root-zone moisture, drainage, weather, season, and active growth. Water early and at soil level when possible so leaves dry promptly. |
| Seedling | Keep the small root zone lightly and evenly moist, never saturated. Provide airflow and avoid prolonged moisture on tender leaves. |
Prevent Leaf Spot by Limiting Splash and Leaf Wetness
Water the root zone
Avoid routine overhead watering and prevent runoff or splash from moving between containers.
Provide airflow
Space plants so leaves dry promptly after rain. Reduce crowding in storage and greenhouse areas.
Handle dry plants
Prune, move, and inspect when foliage is dry. Sanitize tools and hands between suspect plants.
Quarantine arrivals
Keep new plants separate long enough to watch new growth and avoid shared water, tools, and leaf contact.
Use weather and season
Increase inspections after repeated rain, warm humid nights, storms, or periods when leaves remain wet for hours. Reduce watering frequency when root-zone drying slows, but do not diagnose leaf spots from weather alone.
Match water to plant stage
- Rooting cutting: water once at the beginning, then do not water again until two or three full-sized leaves have grown. Mist the stem only if a firm cutting looks dehydrated.
- Newly rooted cutting: water sparingly and allow the mix to approach dry before watering again.
- Seedling: keep lightly and evenly moist, never saturated; water without repeatedly wetting foliage.
- Established plant: use root-zone moisture, drainage, current weather, season, and active growth to decide when to water.
If symptoms are active now: prevention helps stop problems from returning, but active pests, rot, disease, or root decline may need a different first step. Confirm the problem, then use the Plumeria Treatment Decision Guide to decide whether to monitor, isolate, rinse the canopy, prune, inspect roots, repot, apply a labeled product, or remove badly affected tissue or plants. For timing patterns, compare with the Seasonal Pest Management Calendar.
Related Guides
- How to Identify Bacterial Leaf Spot in Plumeria – Water-Soaked Lesions, Brown Edges & Tissue Collapse
- How to Treat Bacterial Leaf Spot in Plumeria – Pruning, Sanitation & Antibacterial Sprays
- Disease Symptom Checklist
- Isolation and Sanitation Checklist
- Fungal Leaf Spot vs. Rust vs. Sunburn
Turn the explanation into an action plan
- Monitor
- Mark lesion borders and photograph the plant every two to three days during rapid change, or weekly when stable.
- Change one thing
- Make the smallest justified correction, record the date, and avoid stacking treatments before you can see which one helped.
- Escalate when needed
- Act quickly when soft decay moves into the trunk, foul odor appears, blackening advances daily, or several plants show the pattern.