
Welcome to the Plumeria Cultivation & Planting Guide. This is your definitive starting point for turning rooted cuttings, seedlings, or mature specimens into thriving, bloom-laden trees. Inside, you’ll learn how to choose the ideal micro-climate. You will craft well-draining soil mixes. Mastering container-versus-in-ground decisions is also included. You will time each planting task to your growing zone. Step-by-step instructions guide each aspect of planting. Troubleshooting checkpoints help resolve common issues. Nutrition tips based on science ensure your plumeria has strong roots, vigorous growth, and abundant flowers. Whether you garden on a balcony or use raised beds, this guide offers decades of practical experience. It is also helpful if you maintain a full grove. It turns that knowledge into practical, easy-to-follow advice. The guide empowers beginners and seasoned collectors alike to cultivate with confidence.
Storm, Wind, and Falling-Object Damage on Plumeria
What to check next
This guide helps you connect visible injury to the timing of sun, heat, cold, wind, drought, flooding, salt, smoke, hail, or product exposure. Read the detailed explanation, then use this sequence to decide what to do.
- 1
Stop the active exposure
Move or shield the plant only enough to prevent more injury without creating another abrupt change.
- 2
Match damage to timing
Compare the affected side, height, leaf age, and first appearance with the recent event.
- 3
Check protected tissue
Look beneath the canopy and opposite side to separate directional exposure from systemic problems.
- 4
Support recovery
Stabilize moisture, airflow, and temperature; avoid fertilizer or heavy pruning while stressed.
- 5
Judge new growth
Old burned or frozen tissue may not recover, so use healthy new growth as the progress measure.
How microclimate changes this answer
Walls, pavement, reflections, wind corridors, low pockets, shade cloth, and container placement can overpower the regional forecast.
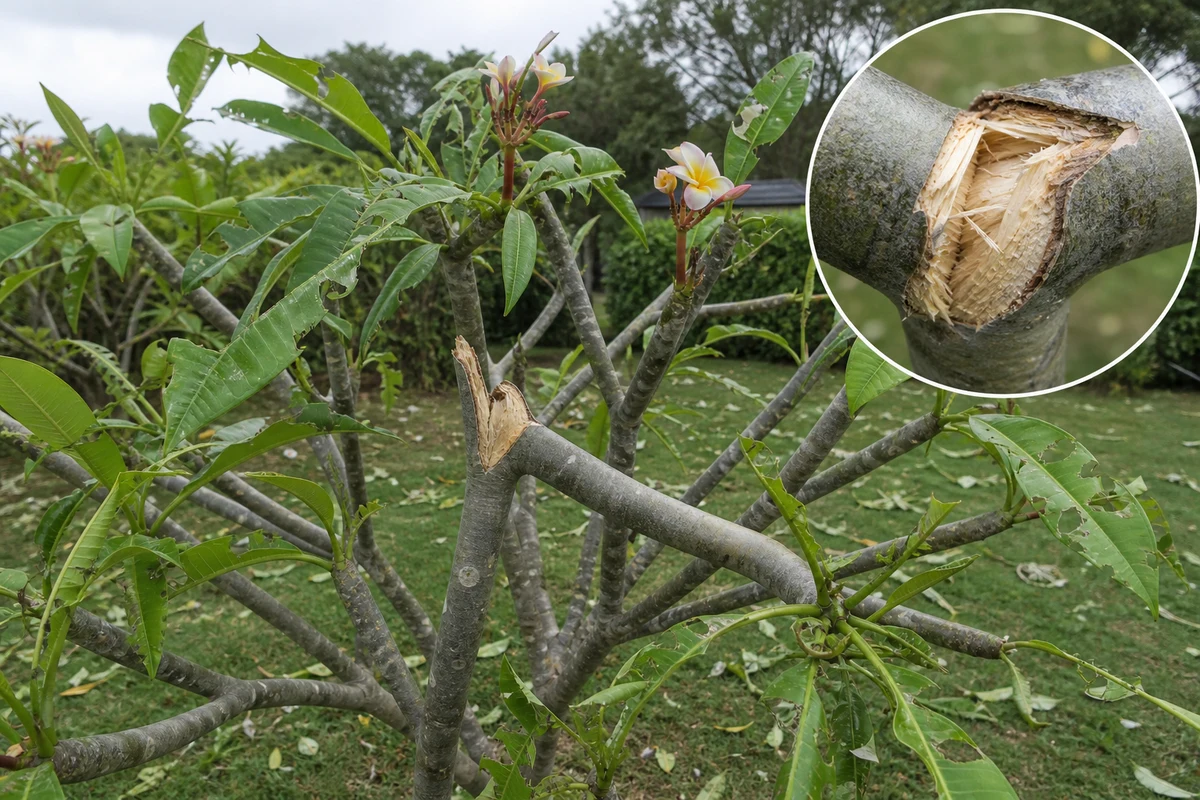
Checker support guide. Severe weather can create multiple structural injuries at once. The safest response is to stabilize the plant, separate clean mechanical damage from active decay, and avoid overcorrecting.
Important: This is a logical course of action based on the evidence provided, not a guaranteed diagnosis. Confirm the event, tissue condition, roots, recent weather, and progression before treating.
Evidence that supports this match
- Several tears, splits, bruises, or a toppled container appeared after one event
- Damage aligns with wind direction or debris impact
- Fresh fracture tissue is pale and fibrous
- There was no progressive lesion before the storm
How to separate common look-alikes
- Hail produces many smaller round pits and bruises
- Borer damage includes holes and granular frass
- Rot continues softening after the original break
- Pruning wounds are deliberate and cleanly shaped
Step-by-step first response
- Make the area safe and support hanging branches before close inspection
- Photograph the plant and mark every major injury
- Correct only jagged unstable breaks with sanitized tools
- Keep fresh wounds dry and ensure the root zone drains
- Reinspect for secondary rot after rain and during the next two weeks
What to watch during recovery
- Fracture margins dry and remain firm
- Supported branches hold position
- No new softness, odor, seepage, or unexplained dieback develops
Seven-day observation plan
- Day 1: Photograph the full plant and a close view. Record firmness, moisture, weather, and the suspected event.
- Days 2-3: Check whether the boundary is stable, drying, softening, or spreading. Avoid adding products simply to do something.
- Days 4-7: Compare new growth and tissue beyond the injury. Continue the current plan when stable; move to the Disease and Rot Checker if softness, odor, seepage, or advancing darkness appears.
Save this with the growing area
For a saved care plan, record the plant or group, growing area, date, recent move or weather event, container or in-ground status, photographs, and the response taken. Growing conditions can change the safest next step.
Open the Environmental Damage Checker | Open the Physical Damage Checker | Check for Disease or Rot
Turn the explanation into an action plan
- Monitor
- Photograph the damage boundary and watch new leaves and tips for seven to fourteen days after exposure ends.
- Change one thing
- Make the smallest justified correction, record the date, and avoid stacking treatments before you can see which one helped.
- Escalate when needed
- Inspect stems and roots when tissue keeps softening, the trunk splits, or decline progresses after conditions stabilize.