
The Plumeria Pests and Diseases Guide is an essential resource for identifying, preventing, and treating the most common threats to plumeria plants, including pests, fungi, and environmental stressors. This guide offers detailed information on how to recognize early signs of trouble, from insect infestations to fungal infections, and provides practical solutions to address these issues. It also covers strategies for managing environmental factors such as excessive humidity, temperature fluctuations, and poor soil conditions, which can weaken plumeria. With expert tips on natural and chemical treatments, as well as proactive care practices, this guide ensures your plumeria remains healthy, resilient, and free from common ailments, allowing it to thrive season after season.
How to Treat Black Tip Rot in Plumeria – Watch, Cut, Dry, or Let Branch
What to check next
This guide helps you separate infectious disease from pests, exposure injury, nutrition symptoms, and normal aging before pruning or treating. Read the detailed explanation, then use this sequence to decide what to do.
Confirm the evidence for bacterial soft rot or black-tip decay
- Look for
- Rapid water-soaked collapse, soft tissue, dark advancing margins, foul odor, or watery decay that progresses over days.
- Compare with
- Cold injury, sunburn, dry tip dieback, fungal canker, and bruising may darken tissue without wet foul-smelling collapse.
- Safest first response
- Isolate immediately, keep tissue dry, remove advancing soft decay with sanitized tools when salvageable, and disinfect between every cut.
Microclimate clue: Warm wet conditions, fresh wounds, trapped moisture, and contaminated tools can accelerate bacterial decay.
- 1
Stabilize and isolate
Keep questionable plants away from healthy collections and avoid splashing water or sharing tools.
- 2
Describe the tissue
Note whether damage is dry, powdery, water-soaked, sunken, soft, foul-smelling, or one-sided.
- 3
Map the progression
Photograph and mark the edge so you can tell whether the condition is spreading.
- 4
Confirm the closest match
Compare the defining sign, not only leaf color, and use laboratory testing when needed.
- 5
Intervene narrowly
Remove only unsalvageable tissue, sanitize tools, and treat only when the diagnosis supports it.
How microclimate changes this answer
Long leaf wetness, warm humidity, poor airflow, and cool wet roots increase disease pressure; intense sun and cold create look-alikes.
Black tip injury or rot decision path: Treat only after the defining evidence and progression support this condition.
- Confirm: Determine whether the tip is dry and firm or soft, wet, spreading, and odorous. A dry black tip after cold or weather injury may stop on its own; advancing softness supports active rot and requires faster action.
- Start with culture and sanitation: Keep the tip dry, protect it from cold rain and abrupt exposure, and mark the boundary. Do not cut a stable dry tip automatically. Cut only when damage advances, tissue is soft, or clean tissue must be reached.
- Escalate only when justified: Use a fungicide, bactericide, wound treatment, or other product only when its label includes the disease or use site. Follow dilution, interval, temperature, protective-equipment, and maximum-application directions. A product cannot restore tissue that is already dead.
- Use clean tools: Remove diseased tissue only when justified. Disinfect cutting tools between cuts with 70% isopropyl alcohol or another tool disinfectant used according to its label, and allow the tool to dry before the next cut.
- Monitor: Check the marked boundary daily during active change, then every 3 to 5 days once stable. Healthy branching below a dry stopped tip can be normal recovery.
Growing-condition check: Review recent rain, humidity, cold, heat, wind, irrigation, drainage, plant stage, pot or in-ground status, and the saved microclimate. These steps are a logical course based on observed evidence, not a laboratory-confirmed diagnosis.
Treat black tip rot based on whether the tip is dry and stable or soft and spreading. Many plumeria tips that die in cool damp weather will later push side branches, but active soft rot should be removed before it moves farther down the branch.
Black Tip Rot Article Path
Use this group in order when possible: identify the problem, treat only when needed, then prevent repeat outbreaks or recurrence.
- Identify black tip rot
How to Identify Black Tip Rot in Plumeria – Dark Tips, Softness, and Dieback - Treat black tip rot
How to Treat Black Tip Rot in Plumeria – Watch, Cut, Dry, or Let Branch - Prevent black tip rot
How to Prevent Black Tip Rot in Plumeria – Tip Care and Cool Weather Moisture
Safety and diagnostics: before applying products, review the Treatment Safety Checklist. If symptoms do not match this group, return to the Disease Symptom Checklist.
Before Applying Any Product
Use this article after the pest or disease has been identified. Before applying oils, soaps, sprays, drenches, fungicides, insecticides, miticides, systemics, copper, sulfur, peroxide products, biological products, or homemade mixtures, check the safety and application-method pages below.
- Treatment Safety Checklist
- Soil Drenches, Sprays, and Foliar Applications
- How to Mix and Apply Garden Products Safely
- When to Treat vs. Monitor Plumeria Pests
Why: the same product can help or harm depending on plant stress, weather, concentration, coverage, timing, beneficial insects, and whether the problem is active.
Rot Location Diagnostic Path
Use this path when plumeria tissue turns soft, wet, black, sunken, hollow, foul-smelling, cracked, or rapidly collapsing. First identify where the problem starts, because a root-zone problem, cutting-base problem, tender-tip problem, leaf-scar problem, and stem wound do not all need the same response.
- Start with the disease symptom checklist when several disease patterns are possible.
- Check root rot when a plant wilts while the media is wet, roots are dark or mushy, or the pot smells sour.
- Check stem rot when the branch or cutting becomes soft, hollow, wet, or foul-smelling.
- Check black tip rot when tender growing tips blacken, stall, soften, or die back after cool damp weather.
- Check leaf node rot when a leaf scar or node stays wet, dark, soft, or sunken.
- Check stem canker when a localized crack, sunken lesion, wound, or sap-weeping area progresses slowly.
Why: rot decisions depend on location, texture, speed, smell, and moisture history. Cutting too soon can remove healthy wood, but waiting too long can let active rot move deeper.
Quick Answer
If the tip is firm, dry, and not spreading, monitor it. If the tip is soft, wet, foul, or moving downward, cut back to firm clean tissue, let the wound dry, and sanitize tools. Seal only clean dry tissue when needed; do not seal active wet rot.
Treatment Decision Table
| What you see | Best response | Why |
|---|---|---|
| Firm dry black tip | Monitor and keep dry. | It may stop naturally and branch later. |
| Soft wet tip | Cut back to firm clean tissue. | Soft tissue can continue downward. |
| Tip dead but branch firm | Wait for side shoots if no spread occurs. | Plumeria often branches after tip loss. |
| Rot moving down branch | Cut below all discolored or soft tissue. | Leaving active rot behind invites recurrence. |
| Repeated tip loss | Review cold, humidity, airflow, watering, and nutrition. | Recurring black tip usually has an environmental trigger. |
Should You Apply a Product?
| Situation | Logical choice | Limit |
|---|---|---|
| Firm, dry, stable tip | No disease product. Keep the tip dry, photograph it, and monitor for 24 to 72 hours. | Cold injury, dormancy, sunburn, and old dry dieback do not improve with a fungicide or bactericide. |
| Soft or downward-moving tip | Sanitary pruning to uniformly firm clean tissue, followed by dry wound care. | A spray cannot restore collapsing tissue. Disinfect the blade between cuts and do not seal wet tissue. |
| Supported bacterial or fungal problem | A copper product or another protectant may fit only when its current label permits ornamental plants, the target disease, and the application site. | Do not treat “black tip” as one proven organism. Copper and other sprays can injure stressed or tender growth under unsuitable weather or concentration. |
| Biological or organic-labeled protectant | Consider only when the label specifically supports the target and ornamental use, after active decay has been removed and conditions corrected. | Organic labeling does not make a product a cure for wet, cold, or dead tissue. |
| Repeated or rapidly spreading cases | Seek Extension or laboratory identification before repeating products across the collection. | Collect fresh representative tissue before sprays or pruning obscure the evidence. |
Avoid routine root-rot products for tip damage. Phosphites, fosetyl-Al, and mefenoxam target particular water-mold situations and are not general cures for every black tip. Use them only when the diagnosis and label support that organism and site.
Aftercare
- Keep the cut dry during the first healing period.
- Avoid overhead wetting during cool or humid weather.
- Watch for side shoots below the old tip.
- Hold heavy fertilizing until active healthy growth returns.
- Improve airflow around plants that repeatedly blacken at the tips.
What Not To Do
- Do not keep trimming a dry stable tip lower and lower. Why: it may no longer be active.
- Do not cut with a dirty blade. Why: pruning can move disease or create a new infection point.
- Do not seal before the cut is clean and dry. Why: sealing wet tissue traps the condition you are trying to stop.
- Do not force growth with heavy fertilizer during cool damp conditions. Why: tender growth may be more vulnerable.
Bottom Line
Black tip treatment is a judgment call: watch dry stable tips, cut soft spreading tips, dry the wound, and correct the cool wet conditions behind the problem.
Confirm Active Disease Before Escalating
Before pruning, spraying, or changing care, confirm that the bacterial pattern is active. This matters because dry old damage, cold injury, sunburn, and healed wounds can look alarming but may not be spreading.
- Mark or photograph the edge of the symptom and recheck whether it expands.
- Feel for softness, collapse, wet tissue, odor, or spreading discoloration.
- Review recent conditions: cool wet weather, overhead moisture, pruning wounds, leaf scars, crowded airflow, or stressed roots.
- Remove actively collapsing tissue when needed, but avoid cutting healthy tissue unnecessarily.
- Sanitize tools and let cuts dry before returning the plant to wet or crowded conditions.
Watering Safeguard by Plant Stage
| Plant stage | Watering rule |
|---|---|
| Unrooted cutting | If the tip is pruned, keep the wound dry while it closes. Water the rooting medium once at the beginning of the rooting process, then do not water again until two to three full-sized leaves have grown. Mist the stem only if the firm cutting looks dehydrated. |
| Newly rooted cutting | Water sparingly and allow the mix to approach dry before watering again. Protect the tender tip and new roots from prolonged wetness. |
| Established plant | Adjust watering to root-zone moisture, drainage, weather, season, and active growth. Keep irrigation and repeated rain off a damaged or freshly pruned tip when possible. |
| Seedling | Keep the small root zone lightly and evenly moist, never saturated. Seedlings should not be managed with the dry unrooted-cutting rule. |
Related Guides
- How to Identify Black Tip Rot in Plumeria – Dark Tips, Softness, and Dieback
- How to Prevent Black Tip Rot in Plumeria – Tip Care and Cool Weather Moisture
- Disease Symptom Checklist
- Isolation and Sanitation Checklist
- Bacterial Soft Rot
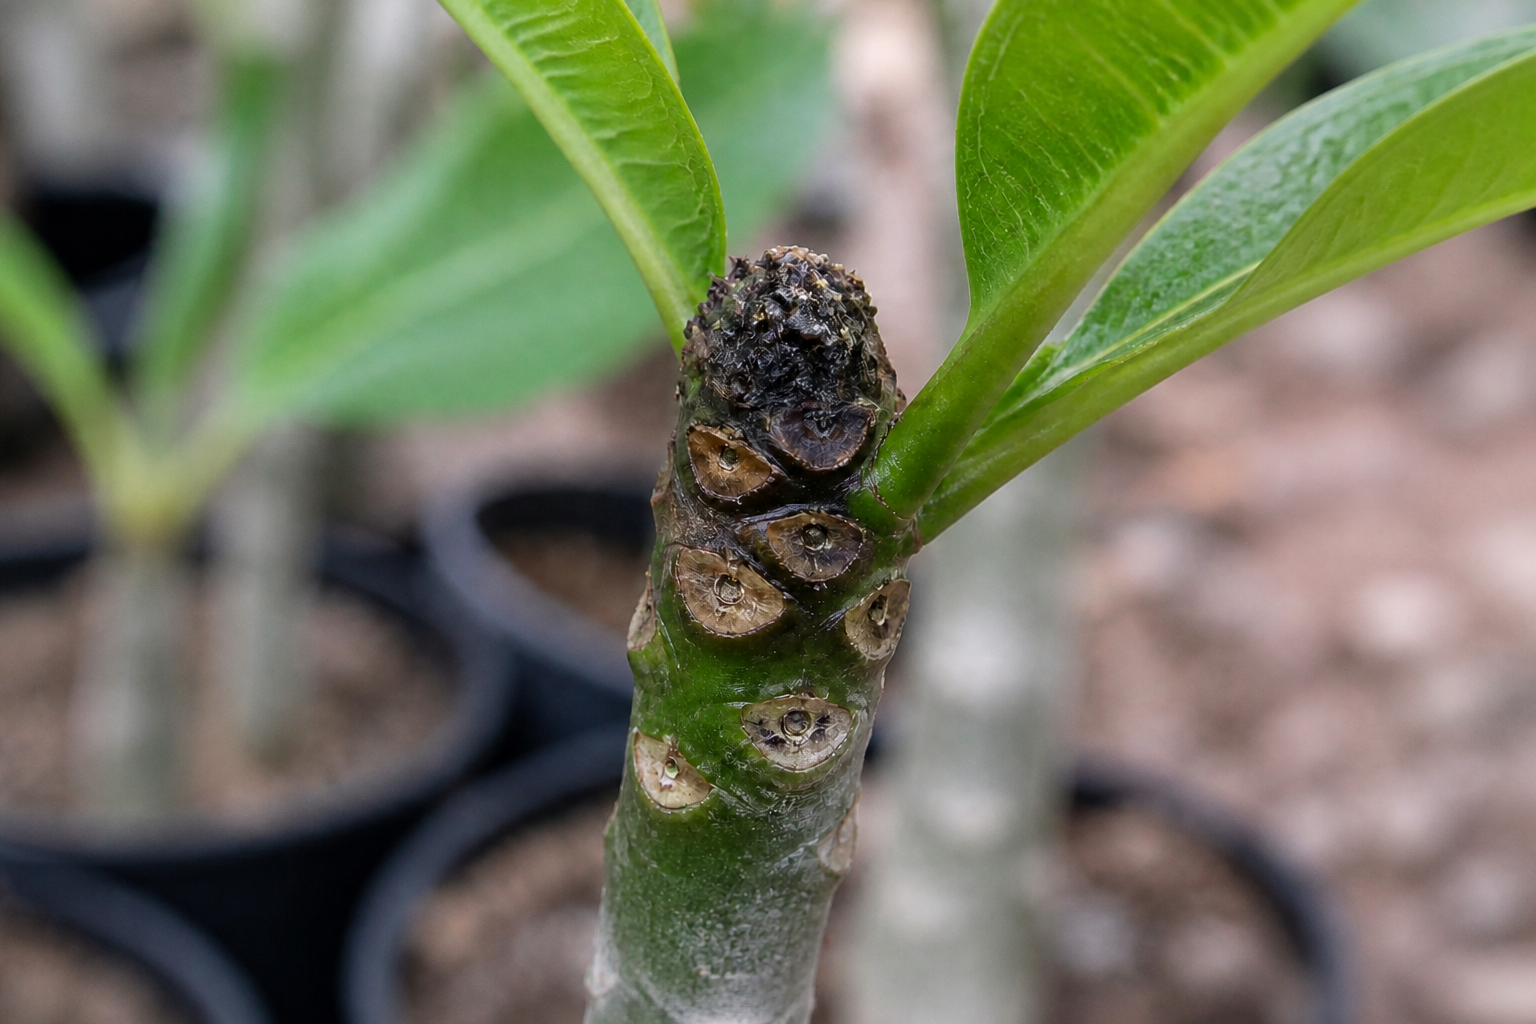
Examine the tip before deciding to cut
Black tip describes the location and appearance of damage; it does not identify one pathogen. Photograph the tip, note whether it is firm or soft, mark the lower edge of discoloration, and compare it again in 24 to 72 hours. A dry stable tip and a wet advancing tip require different responses.
Turn the explanation into an action plan
- Monitor
- Mark lesion borders and photograph the plant every two to three days during rapid change, or weekly when stable.
- Change one thing
- Make the smallest justified correction, record the date, and avoid stacking treatments before you can see which one helped.
- Escalate when needed
- Act quickly when soft decay moves into the trunk, foul odor appears, blackening advances daily, or several plants show the pattern.